> This is part 1 of 4 of the full documentation (pages 1–100 of 333).
> The content is paginated: fetch every part to see all of it.
> Next part: https://help.sdocs.com/llms-full.txt/1
> Page index: https://help.sdocs.com/llms.txt

# Install S-Docs

Install S-Docs from Salesforce AppExchange and assign user permissions.

{% hint style="info" %}
Install S-Docs in a **Sandbox** or **Developer** organization first. Test the installation before installing it in a production org.
{% endhint %}

1\. Navigate to the [**Salesforce AppExchange listing**](https://appexchange.salesforce.com/appxListingDetail?listingId=a0N30000003HeuPEAS).

2\. Select **Try It** for a Sandbox installation.

3\. Select **Get It Now** for a production or Developer organization installation.

4\. Confirm your details.

5\. Select **Continue to Installation**.

6\. Select **Log In & Install**.

7\. Select the Salesforce org where you want to install S-Docs.

![Salesforce package installation screen](https://1474071652-files.gitbook.io/~/files/v0/b/gitbook-x-prod.appspot.com/o/spaces%2Fv7v0UNK83URKB2C83QVU%2Fuploads%2FAp8GrwFoOvi0x5CqSVkS%2FScreenshot%202026-09-09%20111136.png?alt=media\&token=acf09fd3-1828-446b-998e-bc0ec79ac84e)

8\. Select **Install for Admins Only**.

9\. Select **Install**.
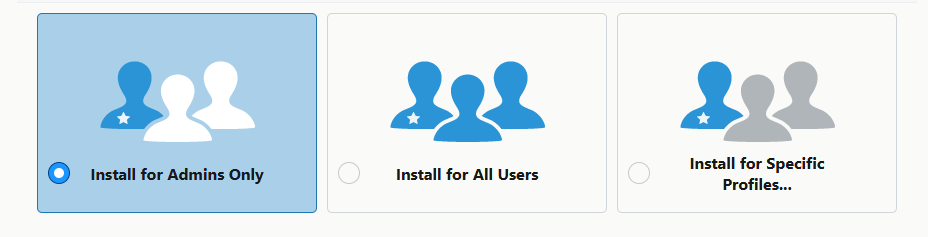
![Salesforce package installation confirmation screen](https://kb.sdocs.com/wp-content/uploads/Screenshot-2025-04-10-081217.png)

{% hint style="info" %}
**Install for Admins Only** grants S-Docs access to the **System Administrator** profile and all custom profiles. Review Salesforce’s [package installation options](https://help.salesforce.com/s/articleView?language=en_US\&id=sf.distribution_installing_packages.htm\&type=5) for more restrictive access.
{% endhint %}

**Congratulations! S-Docs is now installed in your org.**

Assign the **SDocs User** or **SDocs Administrator** permission set to yourself and each user who uses S-Docs. Learn more in [Security and Permissions](/quick-start/getting-started/security-and-permissions).


# Connect S-Docs to your customer records

Configure S-Docs relationships for Salesforce standard and Custom Objects.

Once you have successfully installed S-Docs, the next step is configuring the application to recognize the specific Salesforce objects you plan to use for document generation.

To ensure S-Docs works seamlessly with your desired objects—whether they are standard Salesforce objects or custom ones—you must ensure the proper relational architecture is in place.

### Create a Lookup Field on the SDoc Relationship Object

To associate generated documents with your records, create a lookup field on **SDoc Relationship**. This field links the target object to S-Docs.

S-Docs includes lookup fields for standard objects, including **Account** and **Opportunity**. Check for an existing lookup field before you create one.

If the lookup field does not exist, create it. Custom Objects always require a new field. Some standard objects also require one.

1. Navigate to **Setup** > **Object Manager**.
2. Search for **SDoc Relationship**.
3. Select **SDoc Relationship**.

   ![The SDoc Relationship object selected in Salesforce Object Manager](https://1474071652-files.gitbook.io/~/files/v0/b/gitbook-x-prod.appspot.com/o/spaces%2Fv7v0UNK83URKB2C83QVU%2Fuploads%2FJffsdutPFHtbfyw9ZTHP%2Fimage.png?alt=media\&token=798c97df-c04d-4a58-8525-6ac9c6b2d208)
4. Select **Fields & Relationships**.
5. Select **New**.

   ![The New button on the SDoc Relationship Fields and Relationships page](https://1474071652-files.gitbook.io/~/files/v0/b/gitbook-x-prod.appspot.com/o/spaces%2Fv7v0UNK83URKB2C83QVU%2Fuploads%2FkhdMNFl0no96qSi8xhBI%2Fimage.png?alt=media\&token=6335cd3f-c489-4551-b2f0-3d9f77a3d7eb)
6. Select **Lookup Relationship**.
7. Select **Next**.
8. Select the target object from the **Related To** list.
9. Select **Next**.
10. Enter a value in **Field Label**.
11. Enter a value in **Field Name**.

    Enter the exact object name without `__c`. For example, enter `CustomObj` for `CustomObj__c`.
12. Select **Next**.
13. Select the checkbox for each relevant user.
14. Select **Next**.

    ![The field-level security visibility checkbox in Salesforce](https://1474071652-files.gitbook.io/~/files/v0/b/gitbook-x-prod.appspot.com/o/spaces%2Fv7v0UNK83URKB2C83QVU%2Fuploads%2FrNZIUcoefyodEEcY0wId%2Fimage.png?alt=media\&token=87141271-d2d4-4b68-bbae-3bbcb4e95c9f)
15. Leave the default layout settings unchanged.
16. Select **Save**.

{% hint style="info" %}
For AppExchange packages, use `package_u_CustomObj` as the field name for `package__CustomObj__c`. Salesforce does not allow double underscores in the new field name.
{% endhint %}

### Add a Custom Object to the S-Doc Template Picklist

Complete this procedure when you configure S-Docs for a Custom Object. This lets you create S-Docs templates related to that object.

{% hint style="info" %}
This procedure uses `CustomObj__c` as an example. Replace it with your Custom Object API name.
{% endhint %}

1. Navigate to **Setup** > **Object Manager**.
2. Search for **S-Doc Template**.
3. Select **S-Doc Template**.
4. Select **Fields & Relationships**.
5. Search for **Related to Type**.
6. Select **Related to Type**.
7. Scroll to **Values**.
8. Select **New**.
9. Enter the Custom Object API name as a picklist value.
10. Select **Save**.

{% hint style="info" %}
For a Custom Object from an AppExchange managed package, enter the full API name. For example, enter `package__CustomObj__c`.
{% endhint %}


# Security and Permissions

To grant your team access to S-Docs, you need to configure security settings. Depending on your Salesforce environment, this involves up to two main steps: assigning package licenses and applying the correct permission sets.

> Best Practice Warning: Before configuring user permissions, we recommend reviewing standard Salesforce user management best practices. Always adhere to the principle of "Least Privilege"—starting users with a minimum access profile and layering on permission sets only as needed based on their job functions.

### Part 1: Licenses (Production vs. Sandbox)

Before you begin assigning licenses, you need to determine if your current environment actually requires them.

If you are installing in a Sandbox environment: You do not need to assign licenses. S-Docs provides site-wide licensing automatically in sandboxes. You can skip this entire section and move directly to Part 2: Permission Sets.

If you are installing in a Production environment: You must have a license, but the type of license you purchased dictates your next steps:

* Site License: If your organization purchased a Site License, S-Docs is automatically licensed for all users in your org. You do not need to assign seats manually. Skip to Part 2: Permission Sets.
* Seated License: If your organization purchased a specific number of seats, you must manually assign those licenses to individual users. Follow the steps below.

### How to Assign Individual Licenses (Seated Production Orgs Only)

1. Navigate to the Setup menu by clicking the gear icon in the upper right corner.
2. Type Installed Packages into the Quick Find bar and select it from the drop-down menu.
3. Find the S-Docs package in your list of installed packages and click Manage Licenses.
4. On the Package Manager page, click the Add Users button.
5. Use the checkboxes to select yourself and any other users who need access to S-Docs.
6. Click Add at the bottom of the screen.

Your selected users will now appear in the Licensed Users list. You do not have to assign all of your available licenses at once; you can return to this page to add or remove users at any time.

### Part 2: Permission Sets

Regardless of whether you are in a Sandbox or Production environment, all users must be assigned permission sets to use S-Docs.

S-Docs provides several out-of-the-box permission sets. For standard internal setup, you will primarily use the following two:

* SDocs Administrator: Grants full access to S-Docs, including the template editor and S-Docs Setup tab. Assign this to users who will be building templates and managing the app's configuration.
* SDocs User: Designed for standard internal users. It grants them the access required to generate documents and insert S-Docs Jobs but restricts them from altering templates or backend configurations.

### Additional Permission Sets

Depending on your organization's specific workflow and additional add-ons, you may also utilize the following permission sets:

* SDocs LWC Community User: Ensures that Experience Cloud users can interact with S-Docs Lightning Web Components.
* S-Doc eSignature Requester: Allows users to send e-signature requests (requires S-Sign).
* S-Doc eSignature Signer: Assigned to the site guest user profile associated with an Experience Cloud site created for the e-signature interface.
* SDocs Jobs (Guest Users) (legacy): Grants a website guest user the ability to insert SDoc Jobs.
* **Note**: The "S-Doc Site Guest User" permission set is deprecated.

### For Example:

| S-Docs Permission Set      | Target Roles / Users                                                                                             | Example Scenarios                                                                                                                                                                                            |
| -------------------------- | ---------------------------------------------------------------------------------------------------------------- | ------------------------------------------------------------------------------------------------------------------------------------------------------------------------------------------------------------ |
| SDocs Administrator        | \*Salesforce Administrators\*Business Analysts\* Operations Managers\* Document Template Creators                | \* Alex, the Admin: Needs to design an automated invoice template, map Salesforce fields, and configure the S-Docs global settings.                                                                          |
| SDocs User                 | <p>\* Sales Representatives<br>\* Customer Success Agents<br>\* Field Service Technicians<br>\* HR Personnel</p> | \* Sarah, the Account Executive: Needs to click the "Generate Proposal" button on an Opportunity record to send a PDF to a client, but shouldn't be altering the legal language/content within the template. |
| SDocs LWC Community User   | <p>\* External Partners<br>\* Customers (Experience Cloud)<br>\* Franchisees/Brokers</p>                         | \* John, a Partner Community User: Logs into your portal and needs to generate a dynamic compliance report using an S-Docs Lightning Web Component embedded on his dashboard.                                |
| S-Doc eSignature Requester | <p>\* Sales Ops / Account Executives<br>\* Contract Managers<br>\* Procurement Officers</p>                      | \* Elena, the Contract Manager: Needs to send a newly generated Sales Agreement out to a client for secure digital signing via e-Sign.                                                                       |
| S-Doc eSignature Signer    | \* Site Guest User Profile (associated with your public-facing Experience Cloud site)                            | \* Public/External Signers: A client receives an email link to sign a contract. Salesforce uses this background guest profile to allow them to securely view and sign the document without logging in.       |


# Create Your First Template

Welcome! If you are a new Salesforce Administrator looking to quickly generate beautiful, data-driven documents, you are in the right place. Creating templates from scratch using HTML and CSS can feel a bit daunting at first, but S-Docs has a fantastic feature designed specifically for you: the PDF-Upload template format.

Let's walk through exactly what this feature is, how to enable it, and the step-by-step process of building your very first drag-and-drop template.

***

### Introduction to PDF-Upload Templates

What are PDF-Upload templates? Simply put, PDF-Upload templates allow you to take a pre-existing, standard-formatted PDF (like a fillable form or a beautifully designed marketing brochure) and upload it directly into S-Docs. From there, you can use a simple drag-and-drop interface to merge your Salesforce data directly onto the document. You get to skip the process of rebuilding the document from scratch using HTML or CSS!

When should you use them? PDF-Upload templates are your best friend when you have:

* Design-heavy documents that were created by a marketing or design team (where rebuilding the exact layout in HTML would be time-consuming).
* Basic documents that only require simple, straightforward field merges (like placing a Contact Name and Account Address on a static form).

***

### Step 1: Creating Your First Template Record

Let's create the shell for your new template.

1. Open the App Launcher (the 9-dot grid on the top left) and search for S-Docs.
2. Click on the S-Docs Templates tab, then click the New button.
3. Fill out the required fields to set up your template:
   * Template Name: Give it a clear, descriptive name (e.g., "Customer Welcome Packet").
   * Related to Type: Select your base object. This is the primary record you will generate the document from (e.g., Opportunity or Contact).
   * Template Format: Select PDF-UPLOAD from the drop-down.
4. Click Save.
5. Once saved, look at the top right of the record page. Click the dropdown arrow and select the Template Editor button to launch the designer.

***

### Step 2: Uploading Your PDF

Welcome to the Template Editor! Let's get your PDF onto the canvas.

1. Locate the PDF File Quality drop-down menu. You can choose from Full, High, Medium, or Low.
   * *Note: Higher quality will look crisper but will result in a larger generated file size. High or Medium is usually the sweet spot for standard business documents.*
2. Click the Upload PDF File button and select the local PDF file from your computer.

Once uploaded, your PDF will appear on the right side of the screen, and your building tools will appear on the left.

***

### Step 3: Adding & Formatting Merge Fields

This is where the magic happens! On the left side of the editor, you will see two main menus:

* PDF-Upload Settings: This is used to apply global CSS styling that affects *all* fields on your document.
* S-Docs Fields: This is where you configure and grab the individual Salesforce merge fields to drop onto your PDF.

Let's add your first field:

1. Under the S-Docs Fields menu, click Create Another Field.
2. Select Merge Field as your field type.
3. Click the Select Merge Field button. This opens a window showing all the fields available on your base object.
   * *Pro-Tip: You can pull data from related objects (up to 3 levels deep) by clicking on fields that have a `>` symbol next to them!*
4. Select your desired field and click Insert Field.

> ⚠️ Warning: The Crucial CSS Tip! By default, text merged onto a PDF-Upload template will *not* wrap; if the text is too long, it will run right off the side of the page! To prevent this, locate the Additional Style box for your specific field and type in the following: `white-space: normal !important; max-width: 200px;` *(You can adjust the "200px" number based on how wide you want the text block to be).*

Adding Conditional Logic (Optional): Only want a field to show up under certain conditions? Use the Render If box! For example, if you only want an address to appear when an Opportunity is closed, you would enter: `{{!Opportunity.stagename}} == 'Closed'`.

Place the Field: Once your field is configured, you'll see a generated drag-and-drop block (e.g., SDOCS INPUT ID=1). Simply click, hold, and drag this block exactly where you want it to appear on the PDF canvas on the right.

***

### Limitations & Best Practices

To set you up for success, it's important to know the boundaries of the PDF-Upload format. While incredibly fast and user-friendly, it trades a bit of complexity for ease of use. Keep these limitations in mind:

* File Type: PDF is the *only* supported file type for upload.
* Advanced Features: Complex data structures like Related Lists (tables of child records) and nested conditional renders are NOT supported in this format. (If you need these, use the standard HTML/PDF template format!).
* Editor Tabs: The standard Template Headers, Footers, and Page Settings tabs are not available in this mode, as those elements should already be baked into the PDF you are uploading.

***

Congratulations! You've just learned how to build a PDF-Upload template. You are well on your way to becoming an S-Docs power user.


# Configure Document Generation

If this is your first hands-on S-Docs setup, start here. S-Docs Lightning Web Components give you a simple, native way to generate documents directly from a Salesforce record page.

You do not need to build a custom interface or write code to get started. Add the components in Lightning App Builder, choose a few settings, and users get a clean generate-review-send workflow in one place.

## What You'll Build

In this tutorial, you'll add S-Docs Lightning Web Components to a Salesforce Lightning record page.

By the end, you'll have:

* A **Generate Documents (S-Docs)** component on a record page
* A **Documents (S-Docs)** component below it
* Optional email, refresh, versioning, and Live Edit features configured
* A tested record-page workflow for end users

## Prerequisites

Before starting, make sure you have:

* Complete [Create Your First Template](/quick-start/getting-started/create-your-first-template)
* Permission to edit Lightning record pages
* A test record for that object
* Access to Lightning App Builder
* The target object's API name, such as `Account`, `Opportunity`, or `Case`

If you plan to enable optional features, also confirm:

* You have an HTML email template ready for email actions
* Your template supports Live Edit if you want inline editing
* Your template is configured correctly for the output format you want to generate

{% hint style="info" %}
Documents generated from these components are saved as Salesforce Files and linked to the record.
{% endhint %}

{% stepper %}
{% step %}

#### Step 1: Pick the record page and test record

Choose the object where users will generate documents.

Then open one real record for that object.

Use this record later to test the page after configuration.
{% endstep %}

{% step %}

#### Step 2: Open Lightning App Builder

1. Open your test record.
2. Click on the **Settings/Gear** Icon
3. Select **Edit Page**

**Or**

1. Click **Setup**.
2. Go to **Object Manager**.
3. Open your target object.
4. Select **Lightning Record Pages**.
5. Open the page you want to edit.
6. Click **Edit**.

This opens **Lightning App Builder**.
{% endstep %}

{% step %}

#### Step 3: Add the Generate Documents component

1. In the component panel, search for **S-Docs**.
2. Drag **Generate Documents (S-Docs)** onto the page.
3. Place it where users should start the workflow.

A top section or left column usually works best.
{% endstep %}

{% step %}

#### Step 4: Configure Generate Documents (S-Docs)

Select the component and set the core properties.

Recommended starting configuration:

* **Title:** `Templates to Generate`
* **Object API Name:** your base object, such as `Account`
* **Template Name** or **Template IDs or Names:** choose the templates users should see
* **Notify User:** enabled
* **Open Preview:** enabled if users should review documents immediately

Use these options only when needed:

* **Allow Users to Select Templates** when users should choose from multiple templates
* **Reuse Template for Multiple Documents** when one template should generate several documents in one flow
  {% endstep %}

{% step %}

#### Step 5: Add the Documents component

1. Search for **S-Docs** again.
2. Drag **Documents (S-Docs)** onto the same page.
3. Place it directly below **Generate Documents (S-Docs)**.

This gives users a clean top-to-bottom workflow:

1. Generate documents
2. Review generated files
3. Email, refresh, edit, or inspect versions
   {% endstep %}

{% step %}

#### Step 6: Configure Documents (S-Docs)

Select **Documents (S-Docs)** and configure the features your users need.

Recommended starting configuration:

* **Title:** `Generated Documents`
* **Object API Name:** the same object used in the Generate Documents component

Optional configuration:

* Add an **Email Template** if users should send documents with a predefined message
* Enable **Automatically Open Email Editor** if users usually email right after generation
* Enable **Show Refresh** if users need to update document data after record changes
* Enable **Show Versions** if users need version history on refreshed or edited documents
  {% endstep %}

{% step %}

#### Step 7: Save and activate the page

1. Click **Save**.
2. Click **Activate** if the page is not already active.
3. Assign the page as needed for app, record type, or profile.

Then return to your test record.
{% endstep %}

{% step %}

#### Step 8: Test document generation

On the record page:

1. Find **Templates to Generate**.
2. Generate one document.
3. Confirm the document appears in **Generated Documents**.
4. Confirm the file is linked to the record.
5. If **Open Preview** is enabled, confirm the preview opens automatically.

Your base record-page setup is now complete.
{% endstep %}
{% endstepper %}

## Turn On Optional Features

Use the options below to expand the workflow.

### Send generated documents by email

Configure an [email template](/quick-start/template-building/create-your-first-email-template) in the **Documents (S-Docs)** component when users send the same type of message often.

You can also enable **Automatically Open Email Editor** to open email right after generation.

For setup details, see [How To: Sending Generated Documents via Email](/sdocs/automation-and-document-lifecycle/workflows/sending-generated-documents-via-email-s-docs-lwc).

### Refresh document data

Enable **Show Refresh** in the **Documents (S-Docs)** component when users need updated field values in an existing document.

Refresh updates the document content and creates a new version.

For details, see [How To: Refresh Document Data Within the Documents](/sdocs/automation-and-document-lifecycle/workflows/refresh-document-data-within-the-documents-s-docs-lwc).

### Show document versions

Enable **Show Versions** when users need to review earlier document states.

This works best with **Refresh Data** and **Live Edit**.

For details, see [How To: View Document Versions in the Documents LWC](/sdocs/automation-and-document-lifecycle/workflows/view-document-versions-in-the-documents-lwc).

### Enable Live Edit

Live Edit is controlled on the template.

To enable it:

1. Open the S-Docs template record.
2. Open the template editor.
3. Go to **Document Options**.
4. Under **Attachment & File Options**, enable **Allow Edit**.
5. Save the template.

After that, users can edit supported generated files from the **Documents (S-Docs)** component.

For details, see [How To: Editing Generated Documents](/sdocs/automation-and-document-lifecycle/workflows/editing-generated-documents-live-edit).

## Recommended Admin Setup

For most internal Lightning record pages, start with this pattern:

* **Generate Documents (S-Docs)** at the top
* **Documents (S-Docs)** directly below it
* **Notify User** enabled
* **Open Preview** enabled
* **Show Refresh** enabled when record data changes often
* **Show Versions** enabled when auditability matters
* A predefined [email template](/quick-start/template-building/create-your-first-email-template) when users send the same document type repeatedly

This keeps generation and post-generation actions in one place.

## Common Issues

<details>

<summary>Templates do not appear in the Generate Documents component</summary>

Check these items:

* The template is built for the same base object as the record page
* The template name or ID was entered correctly
* The user has access to the template
* The component's **Object API Name** matches the record page object

</details>

<details>

<summary>The document generates, but it does not appear in Generated Documents</summary>

Check these items:

* Both components use the same object configuration
* The document was created as a Salesforce File
* The page was saved and activated after configuration
* The record was refreshed after generation

</details>

<details>

<summary>Refresh or Versions options do not appear</summary>

Check these items:

* **Show Refresh** is enabled for refresh actions
* **Show Versions** is enabled for version history
* The page was saved and activated after changes

</details>

<details>

<summary>Edit does not appear for a generated document</summary>

Check these items:

* **Allow Edit** is enabled on the template
* The generated format supports Live Edit
* The document came from a template that has Live Edit enabled

</details>

<details>

<summary>DOCX generation does not work as expected</summary>

Check the template configuration.

For DOCX output, enable **New Microsoft Template Upload** on the template.

</details>

## What You've Built

You now have a Lightning record page where users can:

* Generate documents from S-Docs templates
* Review generated files without leaving the record
* Email documents
* Refresh document data
* View document versions
* Edit supported documents when Live Edit is enabled

### Continue with tutorials

Ready for more hands-on practice? These tutorials cover the most common next steps.

* [Configure Email Sending On Your Record Page](/quick-start/document-generation/configure-email-sending-on-your-record-page)
* [Getting Started: Automate Document Generation](/quick-start/document-generation/getting-started-automate-document-generation)
* [Getting Started: Automate Emails](/quick-start/document-generation/getting-started-automate-emails)


# Generate and Email Your Document

Generate a document from a Salesforce record page, review it, and send it by email with the S-Docs Lightning Web Components.

## What You'll Learn

* Generate a document from a Salesforce record page
* Review the generated file in the document list
* Open the email editor from the generated document
* Check recipients, subject, and sender details before sending
* Troubleshoot the most common end-user issues

## What You'll Build

In this tutorial, you will use an `Opportunity` record to generate a quote and email it to a customer.

By the end, you will have:

* One generated quote linked to the `Opportunity`
* One reviewed PDF ready to send
* One outbound email sent from the record page
* One repeatable workflow your team can use every day

**Estimated time:** 10 minutes

## Prerequisites

Before you start, make sure you have:

* Access to an `Opportunity` record page with **Generate Documents (S-Docs)** and **Documents (S-Docs)**
* At least one S-Docs template available in the generation list
* One test `Opportunity` with customer data
* Permission to generate documents and send email from Salesforce
* Email Deliverability set to All Emails in Setup
* An admin-configured email template if you expect default subject or recipient values

If the S-Docs components do not appear on the record page, ask your Salesforce admin to complete [Add S-Docs Lightning Components to a Record Page](/quick-start/document-generation/add-s-docs-lightning-components-to-a-record-page).

{% stepper %}
{% step %}

### Step 1: Open the record where you want to send the document

Start on the Salesforce record that holds the customer data.

For this example, use an `Opportunity`.

1. Open Salesforce.
2. Go to **Opportunities**.
3. Open one test opportunity.
4. Confirm the record has the customer and quote details you want to send.

You are now on the record page where the full generate-and-send workflow happens.
{% endstep %}

{% step %}

### Step 2: Generate the document

Use the S-Docs generation panel at the top of the record page.

You may see it labeled **Generate Documents (S-Docs)** or a custom title such as `Templates to Generate`.

1. Find the S-Docs generation panel.
2. Select the template you want, such as a quote template.
3. Click **Generate**.
4. Wait for the success notification if **Notify User** is enabled.

This creates the document from the record data.

{% hint style="info" %}
If your page is configured to open previews automatically, the generated document may open right away.
{% endhint %}
{% endstep %}

{% step %}

### Step 3: Confirm the document appears in the document list

After generation, the file should appear in the S-Docs document list on the same page.

{% hint style="warning" %}
Note: You may need to refresh the page to ensure the document is visible in the Generated Documents component.
{% endhint %}

You may see it labeled **Documents (S-Docs)** or a custom title such as `Generated Documents`.

1. Scroll to the S-Docs document list.
2. Look for the new file you just generated.
3. Confirm the file name matches the document you expected.
4. Confirm the document is tied to the same `Opportunity`.

This confirms the document was created and linked to the record.
{% endstep %}

{% step %}

### Step 4: Review the document before you send it

Check the file before you email it.

1. Open the generated document from the list.
2. Review key details such as customer name, amount, and date.
3. Close the preview when you are done.

This helps you catch record-data issues before the customer sees the document.
{% endstep %}

{% step %}

### Step 5: Open the email editor

Use the email action from the generated document.

Depending on your page setup, this can appear as an **Email** action on the document row or as an action after you select the document.

1. Find the generated document in the list.
2. Open the email action for that document.
3. Wait for the email editor to load.

If your admin enabled automatic email open, the editor may appear right after generation instead.
{% endstep %}

{% step %}

### Step 6: Review the email details and send

Check the message before you send it.

1. Confirm the **To** address is correct.
2. Confirm the **Subject** matches the document you are sending.
3. Confirm the **From** address matches your team's process.
4. Review the email body.
5. Make edits if your org allows them.
6. Click **Send**.

What you just did:

* Used the generated document as the source for the outbound email
* Confirmed recipient and sender details before sending
* Completed the full workflow without leaving the record page
  {% endstep %}

{% step %}

### Step 7: Verify the result on the record

Do one quick check after sending.

1. Return to the `Opportunity` record if the editor closed.
2. Confirm the generated document still appears in the document list.
3. Confirm the workflow completed without an error.
4. If needed, check the record's **Files** related list.

You now have a complete record-page workflow for generating and emailing S-Docs output.
{% endstep %}
{% endstepper %}

## Common Issues and Solutions

<details>

<summary>I do not see any templates in the generation panel</summary>

Check these items:

* The page includes **Generate Documents (S-Docs)**
* Your admin added templates to the component setup
* The template matches the same base object as the record
* You have access to the template

If the panel is empty, ask your Salesforce admin to review [Configure Document Generation](/quick-start/getting-started/configure-document-generation).

</details>

<details>

<summary>The document generated, but I cannot find it</summary>

Check these items:

* Refresh the record page
* Confirm the page includes **Documents (S-Docs)**
* Confirm the generation finished without an error
* Check the record's **Files** related list

</details>

<details>

<summary>The email editor opens, but the recipient is blank</summary>

Check these items:

* The source record contains the expected email address
* Your admin configured email defaults on the template
* You can type the address manually if your org allows it

If email defaults are expected but missing, ask your admin to review [Configure Email Template Settings](/quick-start/template-building/customize-template-settings-email).

</details>

<details>

<summary>I cannot send the email</summary>

Check these items:

* All required email fields are completed
* Your Salesforce user can send email
* The sender option configured by your admin is valid
* Your org did not apply a sending restriction that blocks the address

</details>

<details>

<summary>The document content looks wrong</summary>

Check these items:

* The source record has the correct data
* You generated from the correct template
* You opened the newest generated file

If the layout or default values are wrong, share the issue with the template owner or Salesforce admin.

</details>

## What You've Learned

✅ Generated a document from a Salesforce record page\
✅ Confirmed the file appeared in the S-Docs document list\
✅ Opened the email editor from the generated document\
✅ Reviewed recipient, subject, and sender details\
✅ Sent the document without leaving the record page

## Next Steps

* Use [Configure Email Template Settings](/quick-start/template-building/customize-template-settings-email) if your team wants email defaults.
* Use [Configure Template Settings: Document Generation](/quick-start/template-building/customize-template-settings-document-generation) if your team wants cleaner file names and save behavior.
* Use [Add S-Docs Lightning Components to a Record Page](/quick-start/document-generation/add-s-docs-lightning-components-to-a-record-page) if your admin still needs to set up the page.

## Practice Exercise

Send one test quote from an `Opportunity` record.

1. Open a test opportunity.
2. Generate one quote document.
3. Review the file.
4. Email it to yourself.
5. Confirm the email arrives with the expected subject and attachment.

Bonus challenges:

* Generate a second template from the same record.
* Send the document to a different test address.
* Update the `Opportunity`, regenerate the file, and compare the result.


# Auto-fill customer data in Document Templates

Add Merge Fields to PDF-Upload Document Templates and generate documents with Salesforce record data.

Use this tutorial to place Salesforce record data into a PDF-Upload Document Template.

### Previewing Generated Output

After setup, each generated PDF can include:

* Record data in fixed page locations
* Different values for each Salesforce record
* Reusable field placement across similar Document Templates

Use this approach for welcome packets and branded PDFs.

### Understanding Merge Fields

Merge Fields pull Salesforce data into generated documents.

When S-Docs runs, it reads the source record, resolves each field path, and prints the value in the final output.

Common examples include:

* Customer names
* Billing addresses
* Opportunity amounts

### Understanding Merge Fields in S-Docs

S-Docs uses the Document Template's **Related To Type** as the starting object.

From there, it can pull fields from that record and related records, such as `Opportunity.Account.Name`.

In a PDF-Upload Document Template, select the field in the editor.

S-Docs creates the Merge Field and adds it to the PDF canvas.

### Using Merge Field Syntax

Use `{{!Object.FieldName}}` in the Document Template body to print one field value.

Example: `{{!Opportunity.Name}}`

{% hint style="info" %}
The field picker creates Merge Fields in PDF-Upload Document Templates.
{% endhint %}

### Add a Merge Field to a PDF-Upload Document Template

#### Reviewing the configuration

* One PDF-Upload Document Template tied to a Salesforce object
* One Merge Field placed on the PDF
* One test document to confirm the output

**Estimated time:** 10 minutes

#### Meeting prerequisites

Before you start, make sure you have:

* Access to **S-Docs Templates**
* Permission to create or edit Document Templates
* A PDF file ready to upload
* A test record with values you can verify

{% stepper %}
{% step %}

#### Create a PDF-Upload Document Template

1. Navigate to **S-Docs Templates**.
2. Click **New**.
3. Set **Related To Type** to the required object, such as `Opportunity`.
4. Set **Template Format** to `PDF-UPLOAD`.
5. Click **Save**.

S-Docs uses these settings for drag-and-drop Merge Field placement.
{% endstep %}

{% step %}

#### Upload the PDF

1. Open the Document Template.
2. Click **Template Editor**.
3. Click **Upload PDF File**.
4. Select the PDF file.

The PDF appears on the canvas. The field tools appear on the left.

Download the sample PDF file for reference.

{% file src="/files/xk7rv0Lq1oaDi88B8YdL" %}
{% endstep %}

{% step %}

#### Create a Merge Field

1. In **S-Docs Fields**, click **Create Another Field**.
2. Select **Merge Field**.
3. Click **Select Merge Field**.
4. Choose a field, such as `Opportunity.Name` or `Opportunity.Account.Name`.
5. Click **Insert Field**.

S-Docs creates the Merge Field from the selected Salesforce path.
{% endstep %}

{% step %}

#### Place the Merge Field on the PDF

1. Find the generated field block in the left panel.
2. Drag it onto the PDF canvas.
3. Drop it where the value should appear.

S-Docs prints the field value in this location.
{% endstep %}

{% step %}

#### Test the Document Template

1. Click **Save**.
2. Open a test record for the same object.
3. Click **Generate Document**.
4. Confirm the PDF shows the expected value in the right spot.

If the value is incorrect or blank, check the source record and field selection.
{% endstep %}
{% endstepper %}

### Resolving Common Issues

### **The Merge Field shows blank in the PDF**

Verify that the source record contains data. Confirm **Related To Type** matches the source object. Reinsert the Merge Field if you selected an incorrect path.

### **You need data from a related record**

Expand related records in the field picker. Select a path such as `Opportunity.Account.Name`. Test with a record that includes the relationship.

### **The Merge Field placement looks incorrect**

Move the Merge Field to a wider PDF area. Test with shorter sample values. Split long content across separate fields when needed.

### Reviewing What You Learned

* Merge Fields add Salesforce data to generated documents.
* S-Docs resolves Merge Fields from Salesforce record data.
* PDF-Upload Document Templates support drag-and-drop Merge Field placement.

### Continuing to Related Tasks

* Use [How to Format Text, Dates, and Currency](/quick-start/template-building/how-to-format-text-dates-and-currency) to format values.
* Use [Create Your First Template](/quick-start/getting-started/create-your-first-template) for the full PDF-Upload setup flow.
* Use [How to Show or Hide Content Automatically](/quick-start/template-building/conditional-logic-tutorial) when content appears for selected records.

### Practicing Merge Field Placement

1. Add `Opportunity.Name` to a PDF-Upload Document Template.
2. Add `Opportunity.Account.Name` below it.
3. Generate the document from two different records and compare the output.


# Customize Template Settings: Document Generation

Configure page layout, file naming, and file save behavior for a quote Document Template.

Use this tutorial when you want one Document Template to generate polished quotes with consistent layout and file handling.

## Reviewing expected results

After setup, one generated quote gives you:

* A PDF with a consistent file name, such as `Quote-Acme Corporation-2026-04-09.pdf`
* A Salesforce File linked to the Opportunity
* Page spacing that leaves room for company letterhead

Use this configuration for quote, invoice, and renewal Document Templates that need predictable output.

## Choosing Document Template settings

Use Document Template settings when you need predictable output from one Document Template.

**Best for:**

* Quote Document Templates with fixed page layout and file naming
* Invoice Document Templates that should save as Salesforce Files
* Renewal or contract Document Templates with consistent output formatting

Use another feature when the problem is different:

* Use [How to Show or Hide Content Automatically](/quick-start/template-building/conditional-logic-tutorial).
* Use [Adding Tables (Like Products or Contacts) to Your Document](/quick-start/template-building/adding-tables-like-products-or-contacts-to-your-document).
* Use [How to Format Text, Dates, and Currency](/quick-start/template-building/how-to-format-text-dates-and-currency).

## Configure settings for a quote Document Template

### Configure These Settings

* Custom page margins for letterhead
* An automatic output file name
* Automatic file save behavior

**Estimated time:** 15 minutes

### Meet Prerequisites

Before starting, make sure you have:

* An existing S-Docs Document Template
* The Document Template's **Related To Type** set to `Opportunity`
* Permission to edit S-Docs Document Templates
* At least one Opportunity with an Account and line items for testing
* Basic familiarity with Merge Field syntax

If you do not have a starter Document Template, create one first.

{% stepper %}
{% step %}

### Open the Document Template Editor

1. Navigate to **S-Docs Templates**.
2. Open your quote Document Template.
3. Click **Edit Template**.
4. Confirm the editor shows tabs such as **Page Settings**, **Document Options**, and **Email Settings**.

You are now in the screen where all Document Template settings appear.
{% endstep %}

{% step %}

### Set Page Margins for Letterhead

Use custom margins when your company header is already printed or built into the design.

1. Open **Page Settings**.
2. Set **Page Layout** to `Custom`.
3. Enter these values:
   * **Page Width:** `8.5`
   * **Page Height:** `11`
   * **Top Margin:** `2`
   * **Bottom Margin:** `1`
   * **Left Margin:** `0.75`
   * **Right Margin:** `0.75`
   * **Unit:** `inches`

This leaves extra room at the top and keeps body content readable.
{% endstep %}

{% step %}

### Set the Output File Name

This controls the file name you see in Salesforce and email attachments.

1. Open **Document Options**.
2. Find **Attachment & File Name Options**.
3. In **Output File Format**, enter:

{% code title="Output file format" %}

```
Quote-{!Opportunity.Account.Name}-{!TODAY()}.pdf
```

{% endcode %}

A generated file now follows one consistent pattern.

Example output: `Quote-Acme Corporation-2026-04-09.pdf`

{% hint style="info" %}
Use single-brace Merge Fields like `{!Opportunity.Name}` in settings tabs. Use double-brace Merge Fields like `{{!Opportunity.Name}}` in the Document Template body.
{% endhint %}
{% endstep %}

{% step %}

### Save the Generated Document as a Salesforce File

This keeps each generated quote attached to the source record.

1. Stay in **Document Options**.
2. Under **Attachment & File Options**, enable **Create Salesforce File and link to record**.
3. Leave **Delete related Salesforce Attachment/File upon S-Doc deletion** enabled.

Each generated quote now appears in the record's **Files** related list.
{% endstep %}
{% endstepper %}

Save the Document Template. Then generate one test document.

Verify these results:

* The file name matches your expected pattern.
* The quote appears in the **Files** related list.
* The top margin leaves room for letterhead.

## Applying guardrails and limits

### Follow Merge Field Rules

* **Use** single braces in settings tabs.
* If you mix syntax or casing, values can print as raw text or stay blank.

### Configure File Behavior

* **Enable** Salesforce Files in your org if your team saves generated documents there.
* **Expect** the generated file to link back to the source record when file creation is enabled.

### Follow Testing Rules

* **Test** with an Opportunity that already has real account data.
* **Generate** a fresh document after each settings change.
* **Verify** the file name, Files related list, and page spacing every time.
* If you skip testing, layout and file issues can surface after you generate live documents.


# Customize Template Settings: Email

Configure default email subject, recipients, sender behavior, and sending guardrails for a quote Document Template.

Use this tutorial when you want one Document Template to generate a document with email defaults.

## Reviewing expected results

After setup, one generated quote gives you:

* A prefilled subject, such as `Quote for Renewal - Acme Corporation`
* A default recipient pulled from the related record
* A defined sender option for consistent outbound email
* Optional restrictions that prevent editing or sending to the wrong domain

Use this configuration for quote, invoice, and renewal Document Templates you email often.

## Choosing email settings

Use email settings when you need predictable email behavior from one Document Template.

**Best for:**

* Quote Document Templates with a default subject and recipient
* Invoice Document Templates that should send from one approved address
* Contract Document Templates that need locked email content or domain limits

Use another feature when the problem is different:

* Use [Create Your First Email Template](/quick-start/template-building/create-your-first-email-template).
* Use [Configure Email Sending On Your Record Page](/quick-start/document-generation/configure-email-sending-on-your-record-page).
* Use [Getting Started: Automate Emails](/quick-start/document-generation/getting-started-automate-emails).

## Configure email settings for a quote Document Template

### Configure These Settings

* A default email subject
* Default email recipients
* Sender behavior for outbound email
* Optional sending restrictions

**Estimated time:** 15 minutes

### Meet Prerequisites

Before starting, make sure you have:

* An existing S-Docs Document Template
* The Document Template's **Related To Type** set to `Opportunity`
* Permission to edit S-Docs Document Templates
* At least one Opportunity with an Account and a valid contact email for testing
* Basic familiarity with Merge Field syntax

If you plan to use an org-wide sender address, make sure that address already exists in Salesforce.

{% stepper %}
{% step %}

### Open the Document Template Editor

1. Navigate to **S-Docs Templates**.
2. Open your quote Document Template.
3. Click **Edit Template**.
4. Open **Email Settings**.

You are now in the tab that controls email defaults for this Document Template.
{% endstep %}

{% step %}

### Set the Default Subject

Use a subject pattern that tells the recipient what the email contains.

1. In **Email Subject Settings**, find **Subject**.
2. Enter this value:

{% code title="Email subject" %}

```
Quote for {!Opportunity.Name} - {!Opportunity.Account.Name}
```

{% endcode %}

3. Leave **Lock Subject** unchecked.
4. Leave **Require subject line** unchecked.

The email composer now opens with a prefilled subject.

Example output: `Quote for Renewal - Acme Corporation`

{% hint style="info" %}
Use single-brace Merge Fields like `{!Opportunity.Name}` in settings tabs. Use double-brace Merge Fields like `{{!Opportunity.Name}}` in the Document Template body.
{% endhint %}
{% endstep %}

{% step %}

### Set the Default Recipients

This prevents you from entering the same email addresses repeatedly.

1. Stay in **Email Settings**.
2. In **Email Recipient Settings**, find **To**.
3. Enter this value:

{% code title="To address" %}

```
{!Opportunity.Account.BillingEmail}
```

{% endcode %}

4. Leave **Lock To** unchecked.
5. Leave **CC**, **BCC**, and **Reply To** blank.

The email composer now pulls the main recipient from the related Opportunity account.

If the source field is blank, you can still enter an address manually.
{% endstep %}

{% step %}

### Set the Sender Behavior

Choose whether the email should come from you or from one shared address.

1. In **Email Sender Settings**, find **From**.
2. Select one of these options:
   * **Logged in user** for personal sending
   * Your org-wide email address for shared sending
3. Leave **Restrict to Org-Wide Addresses** unchecked if you want flexibility.
4. Leave **Enable user to choose/select from a picklist** unchecked.
5. Enable **Use Salesforce Email Signature** if your team uses Salesforce signatures.

This defines who the email appears to come from and whether your signature is added.
{% endstep %}

{% step %}

### Add Sending Guardrails

Use these options when you need tighter control over outbound email.

1. Scroll to **Other Email Settings**.
2. In **Email domain restriction**, enter approved domains if needed.

{% code title="Allowed domains" %}

```
yourcompany.com,partnerdomain.com
```

{% endcode %}

3. Enable **Lock Body** to prevent email-message edits.
4. Enable **Lock Subject** if the subject must stay fixed.

These settings help keep email content consistent and reduce sending mistakes.
{% endstep %}

{% step %}

### Save and Test the Email Flow

1. Click **Save**.
2. Open a test Opportunity.
3. Generate the document with your Document Template.
4. From the generated document, click **Email**.
5. Verify these values:
   * **Subject** is prefilled.
   * **To** is prefilled when source data exists.
   * **From** matches your selected sender option.
   * Domain restrictions behave as expected.
6. Send a test email.

You now have a Document Template that opens with consistent email settings.
{% endstep %}
{% endstepper %}

After testing, confirm these results:

* The subject follows your expected pattern.
* The recipient field pulls the expected email address.
* The sender option matches your team's process.
* Locked or restricted fields behave as expected.

## Applying guardrails and limits

### Follow Merge Field Rules

* **Use** single braces in settings tabs.
* If you mix syntax or casing, values can print as raw text or stay blank.

### Configure Sender Behavior

* **Use** an org-wide address only if it is already configured in Salesforce.
* **Expect** sender choices to follow your org's available email address rules.

### Configure Recipient Behavior

* **Check** that the source email field contains real data before testing.
* **Leave** `To` unlocked if users may need to correct or replace recipients.

### Follow Testing Rules

* **Test** with an Opportunity that has real account and email data.
* **Generate** a fresh document after each email settings change.
* **Verify** subject, recipients, sender, and restrictions every time.
* If you skip testing, email issues can surface after live sends.


# Create Your First Email Template

Create an HTML email template, add merge fields, and test default email behavior from an Opportunity record.

## What You'll Learn

* Create an HTML email template for `Opportunity`
* Add merge fields to the email body
* Configure default subject, recipient, and sender settings
* Test the template with a real Salesforce record
* Troubleshoot blank recipients and raw merge field output

## What You'll Build

In this tutorial, you will build a reusable quote delivery email template for `Opportunity`.

By the end, you will have:

* An HTML template that works as the email body
* A personalized message with `Opportunity` and `Account` merge fields
* A default subject and recipient value
* A tested email flow ready for document delivery

**Estimated time:** 15 minutes

## Prerequisites

Before you start, make sure you have:

* Access to **S-Docs Templates** in Salesforce
* Permission to create and edit S-Docs templates
* One test `Opportunity` with an `Account` and a valid email field
* Basic familiarity with merge fields such as `{{!Opportunity.Name}}`

If you plan to use an org-wide sender address, make sure it already exists in Salesforce.

{% stepper %}
{% step %}

### Step 1: Create the email template record

Start by creating the template record that will hold the email body and email settings.

1. Open the App Launcher.
2. Search for `S-Docs`.
3. Open **S-Docs Templates**.
4. Click **New**.
5. Set **Template Name** to a clear value, such as `Opportunity Quote Email`.
6. Set **Related To Type** to `Opportunity`.
7. Set **Template Format** to `HTML`.
8. Click **Save**.

What you just did:

* Created a template record for email content
* Tied the template to `Opportunity`
* Chose the format required for email body templates
  {% endstep %}

{% step %}

### Step 2: Open the template editor

Now open the editor where you will build the body and set email defaults.

1. Open the new template record.
2. Click **Template Editor**.

You are now in the editor for the new HTML template.
{% endstep %}

{% step %}

### Step 3: Build the email body

Start with a short message that uses a few merge fields.

Add a body like this:

{% code title="Email body" %}

```html
Hello {{!Opportunity.Account.Name}},
Thank you for reviewing {{!Opportunity.Name}}.
Please find your quote attached.
If you have questions, reply to this email and we will help.
```

{% endcode %}

You can type the content directly in the editor, or insert fields from the field picker and build the message around them.

What you just did:

* Added the visible email message
* Personalized the body with record data
* Used double-brace merge fields for template body content
  {% endstep %}

{% step %}

### Step 4: Set the default subject

Use a subject that tells the recipient exactly what the email contains.

1. Open **Email Settings**.
2. In **Email Subject Settings**, find **Subject**.
3. Enter this value:

{% code title="Email subject" %}

```
Quote for {!Opportunity.Name} - {!Opportunity.Account.Name}
```

{% endcode %}

4. Leave **Lock Subject** unchecked.

Example output: `Quote for Renewal - Acme Corporation`

{% hint style="info" %}
Use single-brace merge fields like `{!Opportunity.Name}` in settings tabs. Use double-brace merge fields like `{{!Opportunity.Name}}` in the template body.
{% endhint %}

What you just did:

* Added a reusable subject pattern
* Pulled record values into the subject
* Kept the subject editable for users
  {% endstep %}

{% step %}

### Step 5: Set the default recipient

Now define who receives the email by default.

1. Stay in **Email Settings**.
2. In **Email Recipient Settings**, find **To**.
3. Enter the merge field for your email source.

Example:

{% code title="To address" %}

```
{!Opportunity.Account.BillingEmail}
```

{% endcode %}

{% hint style="info" %}
If the merge field does not result into a value, feel free to use your personal email address for testing.
{% endhint %}

4. Leave **Lock To** unchecked.

Use the email field that fits your process best.

If your org stores email on another related record, use that field instead.

What you just did:

* Set a default recipient for the template
* Pulled the value from the source record
* Left the field open for user review and edits
  {% endstep %}

{% step %}

### Step 6: Set sender behavior and basic guardrails

Choose who the email appears to come from and apply any limits you need.

1. In **Email Sender Settings**, find **From**.
2. Select one of these options:
   * `Logged in user`
   * Your org-wide email address
     {% endstep %}

{% step %}

### Step 7: Save and test the template

Test the base version before you add more variations.

1. Click **Save**.
2. Open a test `Opportunity`.
3. Generate a document with the template.
4. Open the email action.
5. Verify these results:
   * **Subject** is prefilled
   * **To** is prefilled when the source field has data
   * The body shows merged record values
   * **From** matches your selected sender option

Send one test email when everything looks correct.

What you just did:

* Confirmed the template works with real record data
* Verified the body, subject, and recipient behavior
* Finished one working email template before adding refinements
  {% endstep %}
  {% endstepper %}

## Common Issues and Solutions

<details>

<summary>The subject shows raw merge field text</summary>

Check these items:

* Use single braces in **Email Settings**, such as `{!Opportunity.Name}`
* Do not use double braces in settings tabs
* Save the template and generate a fresh test

</details>

<details>

<summary>The recipient field is blank</summary>

Check these items:

* Confirm the source email field contains data on the test record
* Confirm the field path matches the record relationship you used
* Leave **To** unlocked if users may need to type the address manually

</details>

<details>

<summary>The email body does not personalize correctly</summary>

Check these items:

* Use double braces in the body, such as `{{!Opportunity.Name}}`
* Confirm the field path is valid for the template's **Related To Type**
* Regenerate the email after each body change

</details>

<details>

<summary>The sender option I want is not available</summary>

Check these items:

* Confirm the org-wide email address already exists in Salesforce
* Confirm your user can access that sender option
* Test with `Logged in user` first if you need to isolate the issue

</details>

<details>

<summary>The template does not appear in the email workflow</summary>

Check these items:

* Confirm the template uses the correct **Related To Type**
* Confirm the template is available for the object you are testing
* Generate from a record that matches the template object

</details>

## What You've Learned

✅ Created an HTML email template for `Opportunity`\
✅ Added merge fields to the email body\
✅ Configured default subject, recipient, and sender settings\
✅ Tested the template with a real Salesforce record\
✅ Learned the most common fixes for email template issues

## Next Steps

* Use [Configure Template Settings: Email](/quick-start/template-building/customize-template-settings-email) to go deeper on sender controls, domain restrictions, and locked fields.
* Use [Generate and Email Your Document](/quick-start/getting-started/generate-and-email-your-document) to test the full end-user workflow.
* Use [Get Started with Merge Fields](/quick-start/template-building/how-to-auto-fill-customer-data-into-templates) if you want more field placement practice.

## Practice Exercise

Build a second email template for `Opportunity` that includes:

1. A subject with `Opportunity.Name`
2. A recipient pulled from a related email field
3. A short body with at least two merge fields
4. One test email sent from a real record

Bonus challenges:

* Switch the sender to an org-wide email address
* Add a domain restriction
* Lock the body after the base version works


# Create Your First Word Template

Create a Microsoft Word template, add S-Docs syntax, upload the file, and test DOCX generation.

## What You'll Learn

* Create a DOCX template record for S-Docs
* Generate Microsoft template syntax from the template editor
* Place bracketed merge fields into a Word document
* Add conditional logic and related list syntax to a DOCX file
* Upload the finished DOCX file and test generation

## What You'll Build

In this tutorial, you will build a simple Word-based quote template for `Opportunity`.

By the end, you will have:

* A DOCX template record tied to `Opportunity`
* A Word document with bracketed S-Docs merge fields
* A conditional note that appears only for one stage
* A related list pattern you can paste into a Word table
* A finished DOCX file uploaded back to S-Docs

**Estimated time:** 20 minutes

## Prerequisites

Before you start, make sure you have:

* Access to **S-Docs Templates** in Salesforce
* Permission to create or edit templates
* Microsoft Word or another editor that saves valid `.docx` files
* One test `Opportunity` with an Account, Stage, and Amount
* Basic familiarity with merge fields such as `{{!Opportunity.Name}}`

{% hint style="info" %}
DOCX syntax follows the same Microsoft template pattern used by PPTX and XLSX templates.
{% endhint %}

{% stepper %}
{% step %}

### Step 1: Create the DOCX template record

Start by creating the Salesforce template record before you build the Word file.

1. Open the App Launcher.
2. Search for `S-Docs`.
3. Open **S-Docs Templates**.
4. Click **New**.
5. Set **Related To Type** to `Opportunity`.
6. Set **Template Format** to `DOCX`.
7. Enable **Enable New Microsoft Template Upload**.
8. Click **Save**.

This record gives you a place to configure settings and generate the syntax you will paste into Word.
{% endstep %}

{% step %}

### Step 2: Open the template editor and generate syntax

The template editor is your syntax builder for Microsoft templates.

1. Open the new template record.
2. Click **Template Editor**.
3. Use **Insert Field** to choose the fields you want in the document.
4. Copy each generated value from the output box.

For DOCX templates, merge fields, related lists, and conditional blocks must be enclosed in square brackets.

If you need literal bracket characters in the document, use `BRACKETOPEN` and `BRACKETCLOSE`.
{% endstep %}

{% step %}

### Step 3: Build the document body in Microsoft Word

Now create the visible document in Word.

Start with a simple quote header and summary.

Paste this pattern into your DOCX file:

{% code title="quote-summary.docx.txt" %}

```plaintext
Quote for [{{!Opportunity.Account.Name}}]

Opportunity: [{{!Opportunity.Name}}]
Stage: [{{!Opportunity.StageName}}]
Close Date: [{{!Opportunity.CloseDate}}]
Amount: [{{!Opportunity.Amount}}]
```

{% endcode %}

What you just did:

* Added basic merge fields for the base record
* Used the bracketed Microsoft template syntax
* Created a working first version before adding logic
  {% endstep %}

{% step %}

### Step 4: Add one conditional block

Use conditional logic when part of the document should appear only for some records.

Add this block below the summary:

{% code title="conditional-note.docx.txt" %}

```plaintext
[<!--RENDER={{!Opportunity.StageName}}=="Proposal/Price Quote"-->]
This quote is in active review.
[<!--ENDRENDER-->]
```

{% endcode %}

What you just did:

* Added a stage-based rule to the DOCX file
* Kept the full conditional block inside bracketed Microsoft syntax
* Created one safe pattern you can reuse with other fields later
  {% endstep %}

{% step %}

### Step 5: Save the DOCX file

Save the file locally before you upload it.

Use a clear file name such as `opportunity-quote-template.docx`.

After saving, reopen the file once to confirm the content and formatting still look correct.
{% endstep %}

{% step %}

### Step 6: Upload the DOCX file to the template

Upload the finished Word file back to the S-Docs template record.

If you are using S-Docs Summer 2025 (`v10.0`) or later:

1. Return to the template record.
2. Click **Upload Files**.
3. Select the `.docx` file.

If you are using an earlier version, upload the file from the template editor.

Once the upload completes, the template is ready for generation.

{% hint style="warning" %}
Microsoft templates with **Enable New Microsoft Template Upload** checked are generated through S-Docs LWCs or the SDK.
{% endhint %}
{% endstep %}

{% step %}

### Step 7: Generate a test document

Test the template with a real `Opportunity` record.

1. Open a test opportunity.
2. Generate the DOCX template.
3. Download or preview the generated file.
4. Verify the output.

Check these results:

* The account and opportunity names resolve correctly
* The stage and amount display real record values
* The conditional note appears only when the stage is `Proposal/Price Quote`
* No raw S-Docs syntax appears in the document
  {% endstep %}
  {% endstepper %}

## Common DOCX syntax patterns

Use the patterns below when you expand the template.

### Merge field syntax

DOCX templates require brackets around merge fields.

Use **Insert Field** in the template editor to generate the syntax.

Then:

1. Select the field.
2. Apply any formatting.
3. Copy the generated syntax.
4. Paste it into Microsoft Word.

### Related list syntax

To insert a related list into a DOCX template, generate the related list syntax and paste it into a prebuilt Word table.

Use **Insert Related List** at the top of the template editor to build the related list.

When the related list is ready:

1. Open the **Get Related List** tab in the related list menu.
2. Copy the generated source.
3. In Word, create a styling table with:
   * a header row with your intended header text
   * an odd row
   * an even row
4. Paste the related list code into the cell in the first column under the header.

{% hint style="info" %}
The same related list placement pattern used in Microsoft PowerPoint templates also applies to DOCX.
{% endhint %}

### Conditional logic syntax

Use **Insert Conditional Logic** at the top of the template editor to open the logic builder.

Build the condition, then copy the generated output into Word.

If the rendered content contains merge fields, those merge fields must also be enclosed in brackets.

{% code title="docx-conditional-logic.txt" %}

```plaintext
[<!--RENDER={{!Opportunity.Amount}} > 10000-->]
High-value quote
[<!--ENDRENDER-->]
```

{% endcode %}

{% hint style="warning" %}
Do not place `RENDER` tags on the same line as the `LINEITEMS` block.
{% endhint %}

### Additional syntax

#### Rich text images

To display images stored in rich text fields, use three curly braces instead of two.

{% code title="docx-rich-text-image.txt" %}

```plaintext
[{{{!Object.FieldName}}}]
```

{% endcode %}

To adjust image dimensions:

1. Open the **Document Options** tab in the template editor.
2. Scroll to **Other Options**.
3. Enter the size in **Rich Text Image Dimensions**.

#### Named queries

If you use named queries in a DOCX template, convert them to the bracketed Microsoft template syntax.

If the named query looks like this:

{% code title="named-query-standard.txt" %}

```plaintext
<!--{{!<LineItemsSOQL>
...
</LineItemsSOQL>}}-->
{{!myQuery1.fieldname}}
```

{% endcode %}

Update it to this:

{% code title="named-query-docx.txt" %}

```plaintext
[{{!<LineItemsSOQL>
...
</LineItemsSOQL>}}]
[{{!myQuery1.fieldname}}]
```

{% endcode %}

DOCX templates support named query `filter` and `offset`.

## Common Issues and Solutions

<details>

<summary>"The document shows raw merge field syntax"</summary>

Check these items:

* Confirm each merge field is wrapped in square brackets
* Confirm the merge field itself still uses `{{! ... }}`
* Reupload the DOCX file after fixing the syntax

</details>

<details>

<summary>"The document generates, but values are blank"</summary>

Check these items:

* Confirm the template uses **Related To Type** `Opportunity`
* Confirm the test record has values in the fields you used
* Recopy the field syntax from **Insert Field** if needed

</details>

<details>

<summary>"The conditional note never appears"</summary>

Check these items:

* Confirm both `RENDER` tags are wrapped in square brackets
* Confirm the compared value matches the record value exactly
* Test the same record value directly in the document first

</details>

<details>

<summary>"My related list formatting looks wrong"</summary>

Check these items:

* Confirm the related list code was pasted into the first cell under the header
* Confirm the Word table includes header, odd, and even rows
* Regenerate the related list syntax after query changes

</details>

<details>

<summary>"My latest DOCX changes do not show up"</summary>

Check these items:

* Save the Word file before uploading it
* Upload the newest version of the `.docx` file
* Generate a new document after each upload

</details>

<details>

<summary>"DOCX generation is not available"</summary>

Check these items:

* Enable **Enable New Microsoft Template Upload** on the template
* Confirm the template was uploaded as a `.docx` file
* Generate through an S-Docs LWC or the SDK when the new Microsoft upload flow is enabled

</details>

## What You've Learned

✅ Created a DOCX template record for `Opportunity`\
✅ Used the template editor to generate Microsoft template syntax\
✅ Added bracketed merge fields to a Word document\
✅ Added conditional logic and related list patterns\
✅ Uploaded and tested a DOCX template in S-Docs

## Next Steps

* Use [Template Attributes Tutorial](/quick-start/template-building/how-to-format-text-dates-and-currency) to format values inside the document.
* Use [Getting Started with Conditional Logic](/quick-start/template-building/conditional-logic-tutorial) to add more conditions.
* Use [Creating Your First Named Query](/quick-start/template-building/creating-your-first-named-query-tutorial) to reuse query results in Microsoft templates.
* Use [Build and Upload a PPTX Template](/quick-start/template-building/build-and-upload-a-pptx-template) if you also build PowerPoint templates.
* Use [Add S-Docs Lightning Components to a Record Page](/quick-start/document-generation/add-s-docs-lightning-components-to-a-record-page) to expose the template for record-page generation.

## Practice Exercise

Build a second DOCX template for `Opportunity` that includes:

1. A title with `Opportunity.Name`
2. A customer line with `Opportunity.Account.Name`
3. A stage-based conditional note
4. A related list placeholder in a Word table
5. One test generation from a real record

Bonus challenges:

* Add one more merge field from a related record
* Add a named query to the DOCX file
* Rebuild the same pattern for `Account`


# Create Your First PowerPoint Template

Create a Microsoft PowerPoint template, add S-Docs syntax, upload the file, and test PPTX generation.

## What You'll Learn

* Create a PPTX template record for S-Docs
* Generate Microsoft template syntax from the template editor
* Place bracketed merge fields into a PowerPoint presentation
* Add conditional logic and related list syntax to a PPTX file
* Upload the finished PPTX file and test generation

## What You'll Build

In this tutorial, you will build a simple PowerPoint-based quote template for `Opportunity`.

By the end, you will have:

* A PPTX template record tied to `Opportunity`
* A PowerPoint presentation with bracketed S-Docs merge fields
* A conditional note that appears only for one stage
* A related list pattern you can paste into a PowerPoint table
* A finished PPTX file uploaded back to S-Docs

**Estimated time:** 20 minutes

## Prerequisites

Before you start, make sure you have:

* Access to **S-Docs Templates** in Salesforce
* Permission to create or edit templates
* Microsoft PowerPoint or another editor that saves valid `.pptx` files
* One test `Opportunity` with an Account, Stage, and Amount
* Basic familiarity with merge fields such as `{{!Opportunity.Name}}`

{% hint style="info" %}
PPTX syntax follows the same Microsoft template pattern used by DOCX and XLSX templates.
{% endhint %}

{% stepper %}
{% step %}

### Step 1: Create the PPTX template record

Start by creating the Salesforce template record before you build the PowerPoint file.

1. Open the App Launcher.
2. Search for `S-Docs`.
3. Open **S-Docs Templates**.
4. Click **New**.
5. Set **Related To Type** to `Opportunity`.
6. Set **Template Format** to `PPTX`.
7. Enable **Enable New Microsoft Template Upload**.
8. Click **Save**.

This record gives you a place to configure settings and generate the syntax you will paste into PowerPoint.
{% endstep %}

{% step %}

### Step 2: Open the template editor and generate syntax

The template editor is your syntax builder for Microsoft templates.

1. Open the new template record.
2. Click **Template Editor**.
3. Use **Insert Field** to choose the fields you want in the presentation.
4. Copy each generated value from the output box.

For PPTX templates, merge fields, related lists, and conditional blocks must be enclosed in square brackets.

If you need literal bracket characters in the presentation, use `BRACKETOPEN` and `BRACKETCLOSE`.
{% endstep %}

{% step %}

### Step 3: Build the presentation body in Microsoft PowerPoint

Now create the visible presentation in PowerPoint.

Start with a simple quote title and summary slide.

Paste this pattern into your PPTX file:

{% code title="quote-summary.pptx.txt" %}

```plaintext
Quote for [{{!Opportunity.Account.Name}}]

Opportunity: [{{!Opportunity.Name}}]
Stage: [{{!Opportunity.StageName}}]
Close Date: [{{!Opportunity.CloseDate}}]
Amount: [{{!Opportunity.Amount}}]
```

{% endcode %}

What you just did:

* Added basic merge fields for the base record
* Used the bracketed Microsoft template syntax
* Created a working first version before adding logic
  {% endstep %}

{% step %}

### Step 4: Add one conditional block

Use conditional logic when part of the presentation should appear only for some records.

Add this block below the summary:

{% code title="conditional-note.pptx.txt" %}

```plaintext
[<!--RENDER={{!Opportunity.StageName}}=="Proposal/Price Quote"-->]
This quote is in active review.
[<!--ENDRENDER-->]
```

{% endcode %}

What you just did:

* Added a stage-based rule to the PPTX file
* Kept the full conditional block inside bracketed Microsoft syntax
* Created one safe pattern you can reuse with other fields later
  {% endstep %}

{% step %}

### Step 5: Save the PPTX file

Save the file locally before you upload it.

Use a clear file name such as `opportunity-quote-template.pptx`.

After saving, reopen the file once to confirm the content and formatting still look correct.
{% endstep %}

{% step %}

### Step 6: Upload the PPTX file to the template

Upload the finished PowerPoint file back to the S-Docs template record.

If you are using S-Docs Summer 2025 (`v10.0`) or later:

1. Return to the template record.
2. Click **Upload Files**.
3. Select the `.pptx` file.

If you are using an earlier version, upload the file from the template editor.

Once the upload completes, the template is ready for generation.

{% hint style="warning" %}
PPTX templates with **Enable New Microsoft Template Upload** checked are not compatible with legacy custom button generation.

They can only be generated through S-Docs LWCs or the SDK.
{% endhint %}
{% endstep %}

{% step %}

### Step 7: Generate a test document

Test the template with a real `Opportunity` record.

1. Open a test opportunity.
2. Generate the PPTX template.
3. Download or preview the generated file.
4. Verify the output.

Check these results:

* The account and opportunity names resolve correctly
* The stage and amount display real record values
* The conditional note appears only when the stage is `Proposal/Price Quote`
* No raw S-Docs syntax appears in the presentation
  {% endstep %}
  {% endstepper %}

## Common PPTX syntax patterns

Use the patterns below when you expand the template.

### Merge field syntax

PPTX templates require brackets around merge fields.

Use **Insert Field** in the template editor to generate the syntax.

Then:

1. Select the field.
2. Apply any formatting.
3. Copy the generated syntax.
4. Paste it into Microsoft PowerPoint.

### Related list syntax

To insert a related list into a PPTX template, generate the related list syntax and paste it into a prebuilt PowerPoint table.

Use **Insert Related List** at the top of the template editor to build the related list.

When the related list is ready:

1. Open the **Get Related List** tab in the related list menu.
2. Copy the generated source.
3. In PowerPoint, create a styling table with:
   * a header row with your intended header text
   * an odd row
   * an even row
4. Paste the related list code into the cell in the first column under the header.

{% hint style="info" %}
The same related list placement pattern used in Microsoft Word templates also applies to PPTX.
{% endhint %}

### Conditional logic syntax

Use **Insert Conditional Logic** at the top of the template editor to open the logic builder.

Build the condition, then copy the generated output into PowerPoint.

If the rendered content contains merge fields, those merge fields must also be enclosed in brackets.

{% code title="pptx-conditional-logic.txt" %}

```plaintext
[<!--RENDER={{!Opportunity.Amount}} > 10000-->]
High-value quote
[<!--ENDRENDER-->]
```

{% endcode %}

{% hint style="warning" %}
Do not place `RENDER` tags on the same line as the `LINEITEMS` block.
{% endhint %}

### Additional syntax

#### Rich text images

To display images stored in rich text fields, use three curly braces instead of two.

{% code title="pptx-rich-text-image.txt" %}

```plaintext
[{{{!Object.FieldName}}}]
```

{% endcode %}

To adjust image dimensions:

1. Open the **Document Options** tab in the template editor.
2. Scroll to **Other Options**.
3. Enter the size in **Rich Text Image Dimensions**.

{% hint style="info" %}
This setting controls the size of all images merged into the PPTX template from rich text fields.
{% endhint %}

#### Named queries

If you use named queries in a PPTX template, convert them to the bracketed Microsoft template syntax.

If the named query looks like this:

{% code title="named-query-standard.txt" %}

```plaintext
<!--{{!<LineItemsSOQL>
...
</LineItemsSOQL>}}-->
{{!myQuery1.fieldname}}
```

{% endcode %}

Update it to this:

{% code title="named-query-pptx.txt" %}

```plaintext
[{{!<LineItemsSOQL>
...
</LineItemsSOQL>}}]
[{{!myQuery1.fieldname}}]
```

{% endcode %}

PPTX templates support named query `filter` and `offset`.

## Common Issues and Solutions

<details>

<summary>"The presentation shows raw merge field syntax"</summary>

Check these items:

* Confirm each merge field is wrapped in square brackets
* Confirm the merge field itself still uses `{{! ... }}`
* Reupload the PPTX file after fixing the syntax

</details>

<details>

<summary>"The presentation generates, but values are blank"</summary>

Check these items:

* Confirm the template uses **Related To Type** `Opportunity`
* Confirm the test record has values in the fields you used
* Recopy the field syntax from **Insert Field** if needed

</details>

<details>

<summary>"The conditional note never appears"</summary>

Check these items:

* Confirm both `RENDER` tags are wrapped in square brackets
* Confirm the compared value matches the record value exactly
* Test the same record value directly in the presentation first

</details>

<details>

<summary>"My related list formatting looks wrong"</summary>

Check these items:

* Confirm the related list code was pasted into the first cell under the header
* Confirm the PowerPoint table includes header, odd, and even rows
* Regenerate the related list syntax after query changes

</details>

<details>

<summary>"My latest PPTX changes do not show up"</summary>

Check these items:

* Save the PowerPoint file before uploading it
* Upload the newest version of the `.pptx` file
* Generate a new document after each upload

</details>

<details>

<summary>"PPTX generation is not available"</summary>

Check these items:

* Enable **Enable New Microsoft Template Upload** on the template
* Confirm the template was uploaded as a `.pptx` file
* Generate through an S-Docs LWC or the SDK when the new Microsoft upload flow is enabled

</details>

## What You've Learned

✅ Created a PPTX template record for `Opportunity`\
✅ Used the template editor to generate Microsoft template syntax\
✅ Added bracketed merge fields to a PowerPoint presentation\
✅ Added conditional logic and related list patterns\
✅ Uploaded and tested a PPTX template in S-Docs

## Next Steps

* Use [Template Attributes Tutorial](/quick-start/template-building/how-to-format-text-dates-and-currency) to format values inside the presentation.
* Use [Getting Started with Conditional Logic](/quick-start/template-building/conditional-logic-tutorial) to add more conditions.
* Use [Creating Your First Named Query](/quick-start/template-building/creating-your-first-named-query-tutorial) to reuse query results in Microsoft templates.
* Use [Build and Upload a DOCX Template](/quick-start/template-building/create-your-first-word-template) if you also build Word templates.
* Use [Add S-Docs Lightning Components to a Record Page](/quick-start/document-generation/add-s-docs-lightning-components-to-a-record-page) to expose the template for record-page generation.

## Practice Exercise

Build a second PPTX template for `Opportunity` that includes:

1. A title with `Opportunity.Name`
2. A customer line with `Opportunity.Account.Name`
3. A stage-based conditional note
4. A related list placeholder in a PowerPoint table
5. One test generation from a real record

Bonus challenges:

* Add one more merge field from a related record
* Add a named query to the PPTX file
* Rebuild the same pattern for `Account`


# How to Format Text, Dates, and Currency

Format dates, numbers, checkboxes, and uppercase billing output with merge field attributes.

Use this tutorial when you want one template to control how values render in the document body.

## What it looks like

After setup, one generated invoice gives the user all of this:

* A readable invoice date, such as `April 9, 2026`
* A formatted amount, such as `$4,222,300.80`
* Checkbox icons for payment options
* An uppercase billing block for customer details
* Reusable merge field patterns you can copy into other templates

This is the right end state for invoice, quote, and order templates that need clean output without changing the source data.

## When to use template attributes

Use template attributes when you need to change how a field renders inside the template body.

**Best for:**

* Formatting dates and numbers for business documents
* Showing checkbox or radio output from boolean fields
* Transforming text case without changing Salesforce data
* Reusing the same merge field pattern across similar fields

Use another feature when the problem is different:

* Use [Configure Document Generation Template Settings](/quick-start/template-building/customize-template-settings-document-generation) when you need file naming, save behavior, or page layout.
* Use [Getting Started with Conditional Logic](/quick-start/template-building/conditional-logic-tutorial) when content should appear only when conditions pass.
* Use [Get Started with Calculations](/quick-start/template-building/get-started-with-calculations) when you need derived values such as deposits, tax, or due dates.
* Use [Adding Tables (Like Products or Contacts) to Your Document](/quick-start/template-building/adding-tables-like-products-or-contacts-to-your-document) when you need child records or table output.

## Build an invoice template with template attributes

### What you'll configure

* Basic merge field structure
* `format-date` for invoice date
* `format-number` for currency values
* `checkbox` for payment options
* `ToUpperCase` for billing fields

**Estimated time:** 20 minutes

### Prerequisites

Before you start, make sure you have:

* Access to **S-Docs Templates**
* Permission to create or edit templates
* An S-Docs template related to `Opportunity`
* A test Opportunity with an Amount, Close Date, and Account
* Basic familiarity with merge fields such as `{{!Opportunity.Name}}`

If you are brand new to S-Docs syntax, start with a basic merge field tutorial first.

{% stepper %}
{% step %}

### Step 1: Open or create the template

Start with an Opportunity template that will generate an invoice.

1. Go to **S-Docs Templates** in Salesforce.
2. Open an existing template or click **New Template**.
3. Set **Related To Type** to `Opportunity`.
4. Set **Template Format** to `PDF`.
5. Open the template editor.

You now have a place to add template attributes in the document body.
{% endstep %}

{% step %}

### Step 2: Start with plain merge fields

Start with raw values first. This makes the attribute changes obvious.

Add this near the top of the template:

{% code title="invoice-baseline.html" %}

```html
<h1>Invoice</h1>
<p>Opportunity: {{!Opportunity.Name}}</p>
<p>Invoice Date: {{!Opportunity.CloseDate}}</p>
<p>Amount Due: {{!Opportunity.Amount}}</p>
```

{% endcode %}

What you just did:

* Added three plain merge fields with no attributes
* Confirmed the base object and field paths are correct
* Created a before state for the next formatting steps

How to read the syntax:

* `{{!` starts the merge field
* `Opportunity.CloseDate` points to one field on the base record
* Attributes come after the field path
* `}}` closes the merge field
  {% endstep %}

{% step %}

### Step 3: Add a formatted invoice date

A date attribute turns raw Salesforce date output into invoice-ready text.

Add this near the top of the template:

{% code title="invoice-header.html" %}

```html
<h1>Invoice</h1>
<p>Invoice Date: {{!Opportunity.CloseDate format-date="MMMM d, yyyy"}}</p>
```

{% endcode %}

What you just did:

* Applied `format-date` to `Opportunity.CloseDate`
* Used `MMMM d, yyyy` for month name, day, and four-digit year
* Created a readable invoice header without changing the source field

Why this pattern matters:

* The field path stays the same
* Only the attribute changes the output
* You can reuse this pattern on any date field
  {% endstep %}

{% step %}

### Step 4: Format the invoice amount

A number attribute lets you keep raw numeric data in Salesforce while showing clean currency in the document.

Add this below the date:

{% code title="invoice-total.html" %}

```html
<h2>Invoice Total</h2>
<p><strong>Amount Due: ${{!Opportunity.Amount format-number="#,###.##"}}</strong></p>
```

{% endcode %}

What you just did:

* Applied `format-number` to the amount field
* Added commas and two decimal places with `#,###.##`
* Kept the dollar sign outside the attribute for predictable output

Pattern to remember:

* Start with the raw field: `{{!Opportunity.Amount}}`
* Add one space
* Add the attribute: `format-number="#,###.##"`
* Keep visible text, such as `$`, outside the merge field
  {% endstep %}

{% step %}

### Step 5: Add payment method checkboxes

Use checkbox attributes when the source field is a true Salesforce checkbox field.

If these fields do not exist yet, create `Payment_by_Check__c` and `Payment_by_Credit_Card__c` on `Opportunity` before continuing.

Then add this block:

{% code title="payment-methods.html" %}

```html
<h3>Payment Methods</h3>
<p>
  {{!Opportunity.Payment_by_Check__c checkbox="true"}} Check<br>
  {{!Opportunity.Payment_by_Credit_Card__c checkbox="true"}} Credit Card
</p>
```

{% endcode %}

What you just did:

* Rendered boolean fields as checkbox icons instead of `true` or `false`
* Kept the labels readable for the final document
* Used a pattern you can swap to `checkbox="black"` or `checkbox="radio"` later

Merge field rule:

* Put the label outside the merge field
* Keep the `checkbox` attribute inside the same field
  {% endstep %}

{% step %}

### Step 6: Add an uppercase billing block

Text attributes are useful when the document needs a formal display style.

Add this below the invoice header or near the customer section:

{% code title="billing-block.html" %}

```html
<p>
  <strong>Bill To:</strong><br>
  {{!Opportunity.Account.Name ToUpperCase="true"}}<br>
  {{!Opportunity.Account.BillingStreet ToUpperCase="true"}}<br>
  {{!Opportunity.Account.BillingCity ToUpperCase="true"}},
  {{!Opportunity.Account.BillingState ToUpperCase="true"}}
  {{!Opportunity.Account.BillingPostalCode}}
</p>
```

{% endcode %}

What you just did:

* Converted account name and address lines to uppercase in the output only
* Left the postal code unchanged
* Applied the same attribute pattern across several related fields

Pattern to remember:

* Keep each field separate
* Repeat the same attribute on each line you want transformed
* Leave fields unchanged when you want their original display
  {% endstep %}

{% step %}

### Step 7: Test a few merge field variations

Once the base version works, swap one pattern at a time.

Try one of these date alternatives:

{% code title="date-variations.html" %}

```html
{{!Opportunity.CloseDate format-date="MM/dd/yyyy"}}
{{!Opportunity.CloseDate format-date="dd.MM.yyyy"}}
{{!Opportunity.CloseDate format-date="EEEE, MMMM d, yyyy"}}
```

{% endcode %}

Try one of these number alternatives:

{% code title="number-variations.html" %}

```html
${{!Opportunity.Amount format-number="#,###"}}
€{{!Opportunity.Amount format-number="#.###,##"}}
£{{!Opportunity.Amount format-number="#,###.00"}}
```

{% endcode %}

What you just did:

* Reused the same merge field with different attributes
* Changed output without changing the Salesforce data
* Built patterns you can copy into quote or order templates
  {% endstep %}

{% step %}

### Step 8: Save and test the template

Generate the invoice from a real Opportunity before adding variations.

1. Click **Save** in the template editor.
2. Open a test Opportunity with the fields you used.
3. Generate the template.
4. Verify the output.

Check these results:

* The invoice date uses a readable format
* The amount shows commas and decimals
* The payment fields render as checkboxes
* The billing block appears in uppercase
* The raw merge fields no longer appear in their default Salesforce format
  {% endstep %}
  {% endstepper %}

## Guardrails and limits

### Merge field syntax rules

* **Always** start with `{{!` and end with `}}`.
* **Always** keep attributes inside the same merge field.
* **Always** leave a space between the field name and the first attribute.
* **Always** keep markup outside the merge field.
* If markup breaks the merge field, S-Docs prints the syntax as literal text.

### Date and number formatting rules

* **Use** lowercase `yyyy` for the year in `format-date` patterns.
* **Type** currency symbols outside `format-number`.
* If the pattern is wrong, values can render in an unexpected format or stay unformatted.

### Checkbox and output limits

* **Use** `checkbox` only with boolean fields.
* **Expect** checkbox rendering to work best in PDF templates.
* If you apply `checkbox` to the wrong field type, the document can show raw values instead of icons.

### Testing rules

* **Generate** one test document after each major syntax change.
* **Use** a record with real values and known checkbox states.
* If you skip testing, syntax problems usually surface only in final output.


# How to Show or Hide Content Automatically

Show or hide template sections with field checks, blank-value rules, and multi-part conditions.

Use this tutorial when one template must generate different output for different records.

## What it looks like

After setup, one quote can produce all of this:

* A VIP message only for high-value customers
* A phone line only when `Contact.Phone` has a value
* A California clause only for active contracts
* A finance compliance note only for matching industries
* Reusable rule patterns for other templates

This works well for quotes, contracts, and renewal documents.

## When to use conditional logic

Use conditional logic when content should appear only when record data passes a rule.

**Best for:**

* Hiding empty labels and optional sections
* Showing regional or industry-specific clauses
* Reusing one template across several customer scenarios

Use another feature when the job is different:

* Use [Template Attributes Tutorial](/quick-start/template-building/how-to-format-text-dates-and-currency) when you need formatting only.
* Use [Get Started with Calculations](/quick-start/template-building/get-started-with-calculations) when you need thresholds or derived values.
* Use [Creating Your First Named Query](/quick-start/template-building/creating-your-first-named-query-tutorial) when you need reusable query output.

## Build a quote template with conditional logic

### What you'll configure

* A basic `RENDER` block
* Empty-field checks with `!= 'NULL'`
* Multi-part rules with `&&` and `||`
* Keyword matching with `CONTAINS`
* A quick test plan for validating output

**Estimated time:** 20 minutes

### Prerequisites

Before you start, make sure you have:

* Access to **S-Docs Templates**
* Permission to create or edit templates
* An S-Docs template related to `Account`, `Contact`, or `Opportunity`
* Test records with known field values
* Basic familiarity with merge fields such as `{{!Account.Name}}`

If you are brand new to S-Docs syntax, start with a merge field tutorial first.

{% stepper %}
{% step %}

### Step 1: Open or create the template

Start with a template that should change by record data.

1. Go to **S-Docs Templates** in Salesforce.
2. Open an existing template or click **New Template**.
3. Set the correct base object.
4. Open the template editor.
5. Click **Source** if you want to paste syntax directly.

You now have a place to add conditional blocks.
{% endstep %}

{% step %}

### Step 2: Add a simple equality check

Start with one short block. This confirms the syntax works before you add more logic.

Add this where the VIP note should appear:

{% code title="vip-message.html" %}

```html
<!--RENDER='{{!Account.Customer_Type__c}}' == 'High Value' -->
<p><strong>VIP customer:</strong> Thank you for your continued business.</p>
<!--ENDRENDER-->
```

{% endcode %}

What you just did:

* Compared `Account.Customer_Type__c` to one exact text value
* Used `==` for an equality check
* Rendered the paragraph only when the condition passes

How to read the syntax:

* `{{!Account.Customer_Type__c}}` is the field being checked
* `==` means the value must match exactly
* `'High Value'` is the required text
  {% endstep %}

{% step %}

### Step 3: Hide a blank phone line

Use a null check when the label and value should appear together.

Add this block in the contact section:

{% code title="phone-line.html" %}

```html
<!--RENDER='{{!Contact.Phone}}' != 'NULL' -->
<p>Phone: {{!Contact.Phone}}</p>
<!--ENDRENDER-->
```

{% endcode %}

What you just did:

* Used `!=` for a not-equal check
* Compared the field to `NULL`
* Prevented an empty `Phone:` label from printing

This pattern works well for phone, email, title, and address lines.
{% endstep %}

{% step %}

### Step 4: Require two conditions with AND

Use AND logic when both checks must pass before showing content.

Add this clause below the customer summary:

{% code title="regional-clause.html" %}

```html
<!--RENDER=( '{{!Account.BillingState}}' == 'CA' && '{{!Account.Active_Contract__c}}' == 'True' ) -->
<p>Include the California active-contract clause in this quote.</p>
<!--ENDRENDER-->
```

{% endcode %}

What you just did:

* Used `&&` for AND logic
* Grouped both checks with parentheses
* Rendered the clause only when both values match

Read the condition in order:

* `BillingState` must equal `CA`
* `Active_Contract__c` must equal `True`
* `&&` means both statements must be true
  {% endstep %}

{% step %}

### Step 5: Match either value with OR

Use OR logic when one of several values should show the same content.

Add this example:

{% code title="west-coast-note.html" %}

```html
<!--RENDER=( '{{!Account.BillingState}}' == 'CA' || '{{!Account.BillingState}}' == 'OR' ) -->
<p>Apply the West Coast delivery language.</p>
<!--ENDRENDER-->
```

{% endcode %}

What you just did:

* Used `||` for OR logic
* Allowed either state to trigger the note
* Reused the same field in two checks

Use this pattern for state groups, segment groups, or status groups.
{% endstep %}

{% step %}

### Step 6: Match a keyword with CONTAINS

Use `CONTAINS` when the source text can vary.

Add this block in the compliance section:

{% code title="industry-keyword.html" %}

```html
<!--RENDER='{{!Account.Industry}}' CONTAINS 'Finance' -->
<p>Include the finance compliance checklist with this document.</p>
<!--ENDRENDER-->
```

{% endcode %}

What you just did:

* Searched within the full field value
* Matched text like `Finance Team` or `Global Finance`
* Avoided relying on one exact field value

If you need the inverse, use `NOT CONTAINS`.
{% endstep %}

{% step %}

### Step 7: Save and test the output

Test one rule at a time before combining more patterns.

1. Click **Save** in the template editor.
2. Generate the template from a record that should pass one rule.
3. Generate it again from a record that should fail.
4. Compare the output blocks.

Verify these results:

* The VIP note shows only for high-value customers
* The phone line shows only when `Contact.Phone` is populated
* The California clause shows only when both checks pass
* The finance note shows only when the keyword exists
  {% endstep %}
  {% endstepper %}

### Try these variations

Use these once the base version works.

An amount threshold:

{% code title="amount-threshold.html" %}

```html
<!--RENDER={{!Opportunity.Amount}} > 10000 -->
<p><strong>Manager review required.</strong></p>
<!--ENDRENDER-->
```

{% endcode %}

A negative keyword match:

{% code title="negative-keyword.html" %}

```html
<!--RENDER='{{!Case.Subject}}' NOT CONTAINS 'Urgent' -->
<p>Route this case through the standard workflow.</p>
<!--ENDRENDER-->
```

{% endcode %}

A combined customer and industry check:

{% code title="combined-condition.html" %}

```html
<!--RENDER=( '{{!Account.Type}}' == 'Customer' && '{{!Account.Industry}}' CONTAINS 'Finance' ) -->
<p>Apply the customer finance compliance clause.</p>
<!--ENDRENDER-->
```

{% endcode %}

## Guardrails and limits

### Syntax rules

* **Always** close each block with `<!--ENDRENDER-->`.
* **Always** keep the full label and value inside the same block.
* **Always** use exact field API names.
* If you miss the closing tag, later content can disappear.

### Operator rules

* **Use** `==` for exact matches.
* **Use** `!= 'NULL'` for blank-value checks.
* **Wrap** multi-part conditions in parentheses.
* If the operator is wrong, the block stays hidden.

### Text-matching rules

* **Match** text values exactly when you use `==`.
* **Use** `CONTAINS` when field values vary.
* **Check** capitalization and spacing in test data.
* If the value differs, S-Docs skips the block.

### Testing rules

* **Generate** one document after each major syntax change.
* **Test** one condition alone before combining conditions.
* **Use** records that clearly pass and fail each rule.
* If you skip this, debugging gets much slower.


# Advanced Data Pulling (For Admins)

Define a named query once, then reuse the returned values anywhere in your template.

## What You'll Learn

In this tutorial, you'll build a simple quote summary that pulls one reusable result from a SOQL query. By the end, you'll know how to:

* Create a named query with `<queryname>`
* Return data without rendering a table
* Reuse query results with `{{!QueryName.FieldName}}`
* Control which row is returned with `WHERE`, `ORDER BY`, and `LIMIT`
* Test and troubleshoot blank named query output

## What You'll Build

An Opportunity template that includes:

* The highest-value line item name
* The quantity for that line item
* The total price for that line item
* Reusable values you can place in the body, header, or footer

**Estimated time:** 20 minutes

## Prerequisites

Before starting, ensure you have:

* Access to S-Docs Templates in Salesforce
* Permission to create or edit templates
* An S-Docs template related to `Opportunity`
* At least one `OpportunityLineItem` record on your test opportunity
* Basic familiarity with merge fields such as `{{!Opportunity.Name}}`

If you are brand new to S-Docs syntax, complete a basic merge field tutorial first.

{% stepper %}
{% step %}
**Step 1: Open or Create Your Template**

Start with an Opportunity template where you want to show data outside a table.

1. Navigate to **S-Docs Templates** in Salesforce
2. Open an existing template or click **New Template**
3. Choose `Opportunity` as the related object
4. Open the template editor
5. Click **Source** if you want to paste the query directly

You now have a place to add a named query.
{% endstep %}

{% step %}
**Step 2: Add Your First Named Query Block**

Named queries use a SOQL block plus a reusable query name.

Add this block near the top of your template:

```xml
<!--{{!
<lineitemsSOQL>
  <class>none</class>
  <queryname>TopLineItem</queryname>
  <soql>
    SELECT Name, Quantity, TotalPrice
    FROM OpportunityLineItem
    WHERE OpportunityId = '{{!Opportunity.Id}}'
    ORDER BY TotalPrice DESC
    LIMIT 1
  </soql>
</lineitemsSOQL>
}}-->
```

What you just did:

* Used `<class>none</class>` to stop S-Docs from rendering a table
* Used `<queryname>TopLineItem</queryname>` to store the result under one name
* Used `<soql>` to return one line item for the current opportunity

How to read it:

* `WHERE OpportunityId = '{{!Opportunity.Id}}'` ties the query to the current record
* `ORDER BY TotalPrice DESC` sorts the largest line item first
* `LIMIT 1` returns only that first row

{% hint style="warning" %}
The query name is case-sensitive.

Use the exact same value later in your merge fields.
{% endhint %}
{% endstep %}

{% step %}
**Step 3: Reuse the Returned Values**

Now place merge fields anywhere below the query block.

```plaintext
Top line item: {{!TopLineItem.Name}}
Quantity: {{!TopLineItem.Quantity}}
Total: ${{!TopLineItem.TotalPrice #,###.00}}
```

What you just did:

* Referenced the named query with `TopLineItem`
* Pulled field values from the query result
* Formatted the total as currency

The merge field pattern is:

`{{!QueryName.FieldName}}`

If the query name or field name does not match, the output will be blank.
{% endstep %}

{% step %}
**Step 4: Understand What Makes the Output Work**

Named queries only expose fields that you include in the `SELECT` clause.

In this example:

* `TopLineItem` comes from `<queryname>`
* `Name`, `Quantity`, and `TotalPrice` come from `SELECT`
* The query block must appear before the merge fields that use it

If you want to output another field later, add it to the query first.

Example:

```xml
SELECT Name, Quantity, TotalPrice, UnitPrice
```

Then you can use:

```plaintext
Unit price: ${{!TopLineItem.UnitPrice #,###.00}}
```

{% endstep %}

{% step %}
**Step 5: Change Which Record the Query Returns**

Named queries are useful because you control exactly which row is stored.

Try this variation if you want the lowest-priced line item instead:

```xml
<!--{{!
<lineitemsSOQL>
  <class>none</class>
  <queryname>LowestLineItem</queryname>
  <soql>
    SELECT Name, Quantity, TotalPrice
    FROM OpportunityLineItem
    WHERE OpportunityId = '{{!Opportunity.Id}}'
    ORDER BY TotalPrice ASC
    LIMIT 1
  </soql>
</lineitemsSOQL>
}}-->
```

What changed:

* `ORDER BY TotalPrice ASC` sorts from smallest to largest
* `LowestLineItem` creates a second reusable query result

Use `WHERE`, `ORDER BY`, and `LIMIT` together when you need one specific row.
{% endstep %}

{% step %}
**Step 6: Use the Same Query Result in Multiple Places**

Once a named query runs, you can reuse it anywhere later in the template.

Example:

```html
<h2>Quote Summary</h2>
<p>Top line item: {{!TopLineItem.Name}}</p>
<p>Quantity: {{!TopLineItem.Quantity}}</p>
<p>Total: ${{!TopLineItem.TotalPrice #,###.00}}</p>
<p>This quote is led by {{!TopLineItem.Name}}.</p>
```

What you just did:

* Ran the SOQL once
* Reused the same values several times
* Kept the template shorter and easier to maintain

This is the main reason to use named queries instead of repeating logic.
{% endstep %}

{% step %}
**Step 7: Save and Test Your Template**

Now test the query with a real opportunity.

1. Click **Save** in the template editor
2. Generate the template from an opportunity with line items
3. Confirm the highest-value line item appears
4. Compare the output against the actual line items on the opportunity

What to verify:

* The template runs from `Opportunity`
* The opportunity has at least one line item
* The query includes every field you reference later
* The query name matches your merge fields exactly
  {% endstep %}

{% step %}
**Step 8: Experiment with Variations**

Once the basics work, try a few common variations.

**Variation 1: Return a relationship field**

```xml
SELECT PricebookEntry.Product2.Name, Quantity, TotalPrice
FROM OpportunityLineItem
WHERE OpportunityId = '{{!Opportunity.Id}}'
ORDER BY TotalPrice DESC
LIMIT 1
```

Then output:

```plaintext
Product: {{!TopLineItem.PricebookEntry.Product2.Name}}
```

**Variation 2: Filter to a smaller set of rows**

```xml
SELECT Name, Quantity, TotalPrice
FROM OpportunityLineItem
WHERE OpportunityId = '{{!Opportunity.Id}}'
AND Quantity > 1
ORDER BY TotalPrice DESC
LIMIT 1
```

**Variation 3: Add another field to the same query**

```xml
SELECT Name, Quantity, TotalPrice, ServiceDate
FROM OpportunityLineItem
WHERE OpportunityId = '{{!Opportunity.Id}}'
ORDER BY TotalPrice DESC
LIMIT 1
```

Then output:

```plaintext
Service date: {{!TopLineItem.ServiceDate}}
```

Try one variation at a time, then regenerate the document to confirm the result.
{% endstep %}
{% endstepper %}

## Common Issues and Solutions

<details>

<summary>Issue 1: "The merge fields are blank"</summary>

Problem: The named query block runs, but the output fields do not show values.

Solution:

* Verify the query actually returns a row for the current record
* Check that the query name matches exactly, including capitalization
* Confirm every referenced field is included in the `SELECT` clause
* Make sure the merge fields appear below the named query block

</details>

<details>

<summary>Issue 2: "A table shows up instead of plain text"</summary>

Problem: The query output renders like a related list.

Solution:

* Make sure the block uses `<class>none</class>`
* Check that you did not replace it with a table class name
* Regenerate the document after saving the change

</details>

<details>

<summary>Issue 3: "The wrong row is returned"</summary>

Problem: You expected one record, but a different row appears.

Solution:

* Review the `WHERE` clause first
* Check the `ORDER BY` direction, `ASC` or `DESC`
* Use `LIMIT 1` when you only want one row
* Test the SOQL logic against real record data

</details>

<details>

<summary>Issue 4: "A relationship field is blank"</summary>

Problem: A field like product name does not show in the output.

Solution:

* Include the full relationship path in `SELECT`
* Use the same full path in the merge field
* Verify the related record actually exists on that row

</details>

<details>

<summary>Issue 5: "The query works in one place but not another"</summary>

Problem: Some references resolve, but earlier ones do not.

Solution:

* Place the named query before every section that uses it
* Avoid referencing the query result above the query block
* Keep the query block near the top of the template when possible

</details>

## What You've Learned

Congratulations! You've built a template with a reusable named query and learned:

✅ How to create a named query with `<queryname>`\
✅ How to prevent table output with `<class>none</class>`\
✅ How to reuse query values with `{{!QueryName.FieldName}}`\
✅ How to control the returned row with `WHERE`, `ORDER BY`, and `LIMIT`\
✅ How to test and troubleshoot blank output

## Next Steps

Now that you've mastered the basics, you can:

### Expand Your Queries

* Pull relationship fields into your output
* Return a different row with sorting and filters
* Add more fields to one reusable query
* Build multiple named queries in one template

### Combine with Other Features

* Use named queries with conditional logic
* Pair named queries with calculations
* Reuse named query output inside component templates
* Mix named queries with standard merge fields

### Practice More

* Build a quote summary for the top-priced line item
* Show a service date only for the returned line item
* Add a second named query for a different product row

**Recommended reading:**

* Named Query Working Examples
* How to: Advanced Data Retrieval with Named Queries
* Named Query Structure
* Named Queries In Microsoft Templates (DOCX, PPTX, XLSX)

## Practice Exercise

To reinforce what you've learned, build an Opportunity template that includes:

1. A named query for the highest-value `OpportunityLineItem`
2. The line item name, quantity, and total price in plain text
3. One repeated use of the same query result in a second section
4. A variation that returns the lowest-priced line item instead
5. A test using one opportunity that has line items and one that does not

Bonus challenges:

* Add a relationship field such as `PricebookEntry.Product2.Name`
* Add another field to the same query and output it later
* Create a second named query with a different filter


# Adding Tables (Like Products or Contacts) to Your Document

Build a simple related-record table pattern you can adapt to many S-Docs templates.

### Example output

Your finished document can look like this:

| Opportunity           | Stage                | Close Date | Amount |
| --------------------- | -------------------- | ---------- | -----: |
| Renewal - Northwind   | Proposal/Price Quote | 2026-05-15 |  25000 |
| Expansion - Northwind | Negotiation/Review   | 2026-06-01 |  40000 |
| Services Add-On       | Qualification        | 2026-06-20 |  12000 |

## What You'll Learn

* Build a related list table from a parent record
* Query `Opportunity` records from an `Account` template
* Match table headers to `<column>` tags in the right order
* Test the output before adding filters
* Reuse the same pattern with other object pairs

## What You'll Build

In this tutorial, you will build an account pipeline summary that lists related opportunities in a table.

This walkthrough uses `Account` as the base object and `Opportunity` as the child object.

The finished template will include:

* An account summary header
* A four-column opportunity table
* A related list query tied to the current account
* One safe variation that only shows open opportunities

**Estimated time:** 15 minutes

## Prerequisites

Before you start, make sure you have:

* Access to **S-Docs Templates** in Salesforce
* Permission to create or edit templates
* A template related to `Account`
* A test account with at least two related `Opportunity` records
* Basic familiarity with merge fields such as `{{!Account.Name}}`

If you want a shorter intro first, use [Insert Data Tables](/sdocs/advanced-template-logic/related-lists).

{% stepper %}
{% step %}

### Step 1: Open or create the template

Start with an `Account` template so the query can use the current account ID.

1. Go to **S-Docs Templates**.
2. Open an existing template or click **New Template**.
3. Set **Related To Type** to `Account`.
4. Open the template editor.

You now have a base template that can query child records from the current account.
{% endstep %}

{% step %}

### Step 2: Add the account summary header

Add a small header first.

This confirms your base merge fields resolve before you add the related list.

{% code title="account-summary-header.html" %}

```html
<h1>Account opportunity summary</h1>
<p>Account: {{!Account.Name}}</p>
<p>Owner: {{!Account.Owner.Name}}</p>
```

{% endcode %}

What you just did:

* Confirmed the template runs from `Account`
* Added visible fields to test the base record context
* Created a simple header above the opportunity table
  {% endstep %}

{% step %}

### Step 3: Add the table shell

Create the visible table structure first.

Then place the query block inside the table body.

{% code title="opportunity-table-shell.html" %}

```html
<table class="table1">
  <thead>
    <tr>
      <th>Opportunity</th>
      <th>Stage</th>
      <th>Close Date</th>
      <th>Amount</th>
    </tr>
  </thead>
  <tbody>
  </tbody>
</table>
```

{% endcode %}

What you just did:

* Defined the columns the reader will see
* Left space for the related list query
* Created a reusable table layout for child records
  {% endstep %}

{% step %}

### Step 4: Add the related list block

This example uses `Opportunity` as the child object.

It pulls records related to the current `Account`.

{% code title="account-opportunity-related-list.xml" %}

```xml
<table class="table1">
  <thead>
    <tr>
      <th>Opportunity</th>
      <th>Stage</th>
      <th>Close Date</th>
      <th>Amount</th>
    </tr>
  </thead>
  <tbody><!--{{!
<lineitemsSOQL>
  <class>table1</class>
  <soql>
    SELECT Name, StageName, CloseDate, Amount
    FROM Opportunity
    WHERE AccountId = '{{!Account.Id}}'
    ORDER BY CloseDate DESC
  </soql>
  <column>Name</column>
  <column>StageName</column>
  <column>CloseDate</column>
  <column>Amount</column>
</lineitemsSOQL>
}}--></tbody>
</table>
```

{% endcode %}

What this does:

* Queries `Opportunity` records for the current account
* Ties the query to the base record with `WHERE AccountId = '{{!Account.Id}}'`
* Sorts the rows by `CloseDate`
* Prints one field per `<column>` tag

How to read the block:

* `<lineitemsSOQL>` starts the related list query
* `<class>` controls the output style
* `<soql>` defines which child rows to return
* Each `<column>` prints one value in the row
  {% endstep %}

{% step %}

### Step 5: Match the headers and columns

The table only works cleanly when the header order matches the `<column>` order.

In this example:

* `Opportunity` maps to `Name`
* `Stage` maps to `StageName`
* `Close Date` maps to `CloseDate`
* `Amount` maps to `Amount`

Rules to follow:

* Every displayed value needs a matching `<column>` tag
* Every `<column>` value must appear in the `SELECT` clause
* The first header must match the first `<column>`

If the order does not match, the wrong values appear under the wrong headers.
{% endstep %}

{% step %}

### Step 6: Save and test the template

Test the base version before you add any variations.

1. Click **Save**.
2. Open a test account with related opportunities.
3. Generate the document.
4. Compare the document rows with the related records in Salesforce.

Verify these results:

* The header shows the expected account
* The table shows one row per related opportunity
* The rows belong to the current account only
* The values appear under the correct headers

Once this works, you have a reusable starting pattern.
{% endstep %}

{% step %}

### Step 7: Try one simple variation

Now add one safe filter.

This version only returns open opportunities.

{% code title="filtered-account-opportunity-related-list.xml" %}

```xml
<lineitemsSOQL>
  <class>table1</class>
  <soql>
    SELECT Name, StageName, CloseDate, Amount
    FROM Opportunity
    WHERE AccountId = '{{!Account.Id}}'
    AND IsClosed = false
    ORDER BY CloseDate ASC
  </soql>
  <column>Name</column>
  <column>StageName</column>
  <column>CloseDate</column>
  <column>Amount</column>
</lineitemsSOQL>
```

{% endcode %}

What changed:

* Added `AND IsClosed = false`
* Kept the same table structure
* Narrowed the output without changing the base pattern

Change one thing at a time.

Then generate again and confirm the result.
{% endstep %}
{% endstepper %}

## Common Issues and Solutions

<details>

<summary>"My table shows no rows"</summary>

Check these items:

* Confirm the template runs from `Account`
* Confirm the test account has related `Opportunity` records
* Verify the `WHERE` clause uses `AccountId = '{{!Account.Id}}'`
* Test with a record you know has child records

</details>

<details>

<summary>"My values are under the wrong headers"</summary>

Check these items:

* Compare the header order with the `<column>` order
* Make sure each header has one matching query field
* Add fields one at a time when expanding the table

</details>

<details>

<summary>"One column is blank"</summary>

Check these items:

* Verify that field appears in the `SELECT` clause
* Verify the same field appears in the matching `<column>` tag
* Confirm the returned records actually contain data in that field

</details>

<details>

<summary>"The wrong records are returned"</summary>

Check these items:

* Review the relationship field in the `WHERE` clause
* Confirm the base merge field points to the current record
* Remove extra filters and test the base query first

</details>

<details>

<summary>"How do I adapt this to another object pair?"</summary>

Use this swap pattern:

* Change the base template object
* Change the child object in `FROM`
* Change the relationship field in `WHERE`
* Change the selected fields, headers, and `<column>` tags together

Keep the overall table structure the same.

</details>

## What You've Learned

✅ Built a related list table from an `Account` template\
✅ Queried `Opportunity` records with `<lineitemsSOQL>`\
✅ Tied the query to the current base record\
✅ Matched headers to `<column>` tags in the correct order\
✅ Reused one example pattern that can scale to other objects

## Next Steps

### Adapt the pattern

* Replace `Opportunity` with `Contact` on an `Account` template
* Change the visible columns for a different use case
* Add one more field and test it by itself

### Combine it with other features

* Use [Getting Started with Conditional Logic](/quick-start/template-building/conditional-logic-tutorial) to show the table only when related opportunities exist
* Use [Template Attributes Tutorial](/quick-start/template-building/how-to-format-text-dates-and-currency) to format dates, numbers, and output values inside the table
* Use [Creating Your First Named Query](/quick-start/template-building/creating-your-first-named-query-tutorial) when you need one reusable result outside a table

## Practice Exercise

Build an `Account` template that includes:

1. A header with `Account.Name` and `Account.Owner.Name`
2. A four-column related list table for opportunities
3. One query tied to the current account
4. A test run against an account with related opportunities
5. One filtered variation that only shows open opportunities

Bonus challenges:

* Rebuild the same pattern for `Account` and `Contact`
* Change the sort order
* Add one more displayed field


# Setup Calculations

Learn the basic math tag patterns for numbers, dates, conditions, and null-safe output.

## What You'll Learn

In this tutorial, you'll build a quote summary that uses calculation tags to produce clean numeric and date output. By the end, you'll know how to:

* Calculate a deposit amount with `<MATH>`
* Calculate a remaining balance from the same source field
* Add days to a date with `type="date"`
* Use a calculation result inside conditional logic
* Prevent blank numeric fields from causing errors

## What You'll Build

An Opportunity quote summary that includes:

* The opportunity amount
* A 10% deposit amount
* A remaining balance
* A follow-up date 30 days after close
* A manager review note for larger deals

**Estimated time:** 15 minutes

## Prerequisites

Before starting, ensure you have:

* Access to S-Docs Templates in Salesforce
* Permission to create or edit templates
* An S-Docs template related to `Opportunity`
* A test opportunity with values in `Amount` and `CloseDate`
* Basic familiarity with merge fields such as `{{!Opportunity.Amount}}`

If you are brand new to S-Docs syntax, complete a basic merge field tutorial first.

{% hint style="info" %}
If you insert fields with the field picker, remove any auto-added number or date formatting before using those fields inside `<MATH>` tags.
{% endhint %}

{% stepper %}
{% step %}
**Step 1: Open or Create Your Template**

Start with an Opportunity template where you want to show calculated values.

1. Navigate to **S-Docs Templates** in Salesforce
2. Open an existing template or click **New Template**
3. Choose `Opportunity` as the related object
4. Open the template editor
5. Click **Source** if you want to paste the syntax directly

You now have a place to add calculation tags.
{% endstep %}

{% step %}
**Step 2: Add Your First Calculation**

Add a quote summary section with a 10% deposit calculation.

{% code title="deposit-example.html" %}

```html
<h2>Quote Summary</h2>
<p>Opportunity Amount: ${{!Opportunity.Amount}}</p>
<p>
  Deposit Due (10%):
  $<MATH format-number="#,###.00">{{!Opportunity.Amount}} * 0.10</MATH>
</p>
```

{% endcode %}

What you just did:

* Used `<MATH>` to multiply the opportunity amount by `0.10`
* Added `format-number="#,###.00"` for commas and two decimals
* Kept the original field visible for comparison
  {% endstep %}

{% step %}
**Step 3: Add the Remaining Balance**

Now calculate the amount left after the deposit.

{% code title="remaining-balance.html" %}

```html
<p>
  Remaining Balance:
  $<MATH format-number="#,###.00">
    {{!Opportunity.Amount}} - ( {{!Opportunity.Amount}} * 0.10 )
  </MATH>
</p>
```

{% endcode %}

What you just did:

* Subtracted the deposit from the full amount
* Used parentheses so the deposit is calculated first
* Kept spaces around operators so S-Docs reads the math correctly
  {% endstep %}

{% step %}
**Step 4: Add a Date Calculation**

Use a date calculation when you need a due date, reminder date, or follow-up date.

{% code title="follow-up-date.html" %}

```html
<p>
  Follow-Up Date:
  <MATH type="date" format-date="MMMM d, yyyy">
    {{!Opportunity.CloseDate}} + DAYS(30)
  </MATH>
</p>
```

{% endcode %}

What you just did:

* Started the expression with a date field
* Added `type="date"` so S-Docs treats the expression as date arithmetic
* Formatted the result as a readable date like `April 23, 2026`
  {% endstep %}

{% step %}
**Step 5: Use a Calculation Inside Conditional Logic**

You can evaluate a calculated result before showing a message.

Add this block below the quote summary:

{% code title="math-in-render.html" %}

```html
<!--RENDER=((<MATH>{{!Opportunity.Amount}} - ( {{!Opportunity.Amount}} * 0.10 )</MATH>) > 10000) -->
<p><strong>Manager review required.</strong> This deal exceeds the high-value threshold.</p>
<!--ENDRENDER-->
```

{% endcode %}

What you just did:

* Calculated the remaining balance inside the condition
* Compared that result to `10000`
* Rendered the note only when the threshold is passed
  {% endstep %}

{% step %}
**Step 6: Make the Calculation Safe for Blank Values**

Blank numeric fields can cause `Invalid double` and related errors.

Use `replaceall` to substitute a blank value with `0`.

{% code title="null-safe-math.html" %}

```html
<p>
  Deposit Due (safe version):
  $<MATH format-number="#,###.00">
    {{!Opportunity.Amount replaceall=" ,0"}} * 0.10
  </MATH>
</p>
```

{% endcode %}

What you just did:

* Replaced a blank amount with `0`
* Protected the math expression from null-style numeric errors
* Created a pattern you can reuse with optional numeric fields
  {% endstep %}

{% step %}
**Step 7: Save and Test Your Template**

Now test the calculation output with a real opportunity.

1. Click **Save** in the template editor
2. Generate the template from an opportunity with `Amount` and `CloseDate`
3. Check the deposit, remaining balance, and follow-up date
4. Test again with a larger amount to trigger the manager review note

What to verify:

* The deposit shows 10% of the opportunity amount
* The remaining balance equals the amount minus the deposit
* The follow-up date is 30 days after close
* The manager review note appears only when the balance is above `10000`
  {% endstep %}

{% step %}
**Step 8: Try a DOCX Variation**

If your template format is DOCX, wrap the full math expression in square brackets.

{% code title="docx-math-example.txt" %}

```plaintext
[<math>{{!Opportunity.Amount}} * 0.10</math>]
```

{% endcode %}

What changed:

* The calculation uses bracketed Microsoft template syntax
* The full math block stays inside the brackets
* The same formula logic still applies
  {% endstep %}
  {% endstepper %}

## Common Issues and Solutions

<details>

<summary>Issue 1: "The result does not show commas or decimals"</summary>

Problem: The number calculates, but the output is not formatted.

Solution:

* Add `format-number` on the `<MATH>` tag itself
* Use a pattern like `#,###.00`
* Regenerate the document after saving the change

</details>

<details>

<summary>Issue 2: "I get an Invalid double error"</summary>

Problem: One of the numeric fields in the expression is blank.

Solution:

* Replace blank values with zero using `replaceall=" ,0"`
* Test the source record to confirm the numeric field has data
* Apply the same null-safe pattern to every optional numeric field in the calculation

</details>

<details>

<summary>Issue 3: "Date math fails with a date format error"</summary>

Problem: S-Docs does not recognize the first value in the expression as a date.

Solution:

* Make sure the expression uses `<MATH type="date">`
* Start the expression with a date field such as `{{!Opportunity.CloseDate}}`
* If you use a static value, format it as `yyyy-MM-dd`

</details>

<details>

<summary>Issue 4: "The subtraction result looks wrong"</summary>

Problem: The total does not match the expected deposit or balance.

Solution:

* Add parentheses around the inner calculation
* Keep spaces around operators like `+`, `-`, `*`, and `/`
* Test the deposit formula by itself before combining it with a second expression

</details>

<details>

<summary>Issue 5: "The manager review note never appears"</summary>

Problem: The conditional block stays hidden even for large deals.

Solution:

* Check the threshold value in the `RENDER` condition
* Confirm the calculation returns a number before the comparison
* Test the same calculation outside the conditional block first

</details>

## What You've Learned

Congratulations! You've built a template with calculation tags and learned:

✅ How to calculate a percentage with `<MATH>`\
✅ How to calculate a remaining balance from one field\
✅ How to add days to a date with `type="date"`\
✅ How to use a math result inside `RENDER` logic\
✅ How to prevent blank-value errors with `replaceall`

## Next Steps

Now that you've mastered the basics, you can:

### Expand Your Calculations

* Add tax, subtotal, or discount calculations
* Build date offsets for reminders and due dates
* Reuse the same calculation pattern in other template sections

### Combine with Other Features

* Add conditional messages with [How to Show or Hide Content Automatically](/quick-start/template-building/conditional-logic-tutorial)
* Reuse queried values with [Advanced Data Pulling (For Admins)](/quick-start/template-building/creating-your-first-named-query-tutorial)
* Format related output with [How to Format Text, Dates, and Currency](/quick-start/template-building/how-to-format-text-dates-and-currency)

### Practice More

* Add a late-fee calculation to an invoice template
* Show approval language only above a calculated threshold
* Build due-date logic for contract follow-up steps

## Practice Exercise

To reinforce what you've learned, build an invoice-style Opportunity template that includes:

1. A subtotal based on `Opportunity.Amount`
2. A 7% tax calculation
3. A final total that adds subtotal and tax
4. A payment due date 14 days after `CloseDate`
5. An approval note that appears only when the final total is greater than `25000`

Bonus challenges:

* Make every numeric field null-safe
* Add a second threshold message for totals above `50000`
* Convert one calculation to DOCX syntax


# Building Reusable Template Sections

## Component Templates Tutorial

### The Scenario: Sending a Welcome Packet to New Employees

Imagine you work in HR. Every time someone is hired, you send a Welcome Packet. But not everyone gets the same packet.

* **Situation A** - John is hired in the Sales department.\
  He should receive the **Sales Welcome Section**.
* **Situation B** - Maria is hired in Engineering.\
  She should receive the **Engineering Welcome Section**.
* **Situation C** - Emily is a Remote employee.\
  She should also receive the **Remote Work Policy Section**.

**The Old Way:** You create different templates to address each team which would be hard to maintain and easy to pick wrong one. Example:

* Sales Welcome Template
* Engineering Welcome Template
* Sales + Remote Policy Template
* Engineering + Remote Policy Template

***

### The S-Docs Way

**You create One Parent Template and** + **Small Reusable Components**

The parent decides what to include.

***

{% stepper %}
{% step %}
**Step 1: Create the Parent Template**

This is your main Welcome Packet.

Example:

```
<h1>Welcome to the Company!</h1>
<p>We are excited to have you join us.</p>
```

This part never changes.
{% endstep %}

{% step %}
**Step 2: Create Simple Components**

Now create small reusable sections.

Template Format → **Component**

**Component 1: Sales Welcome Section**

```
<h2>Welcome to the Sales Team!</h2>
<p>You will be working with leads, clients, and revenue targets.</p>
```

**Component 2: Engineering Welcome Section**

```
<h2>Welcome to Engineering!</h2>
<p>You will be building and maintaining our product systems.</p>
```

**Component 3: Remote Work Policy Section**

```
<h2>Remote Work Policy</h2>
<p>Review the remote work guidelines and equipment policy.</p>
```

Each of these is a standard Component template.
{% endstep %}

{% step %}
**Step 3: Insert Components into Parent**

Now inside the Parent Template, add a Component Merge Field where the section should appear.

**Static component**

```
{{{{!Sales Welcome Section}}}}
```

That inserts the component named `Sales Welcome Section`.

**Department-Based Dynamic Component**

Let’s assume we have a field:

```
Employee.Department__c
```

It contains either:

* Sales
* Engineering

Now we write:

```
{{{{!Welcome {{!Employee.Department__c}} Section}}}}
```

What happens?

If Department = Sales\
→ It loads: **Welcome Sales Section**

If Department = Engineering\
→ It loads: **Welcome Engineering Section**

That’s dynamic components in the simplest form.
{% endstep %}

{% step %}
**Step 4: Adding the Remote Policy Only If Needed**

Now we check:

If Employee.Remote\_\_c = TRUE

We add the Remote Work Policy Section.

```
<!--RENDER={{!Employee.Remote__c}} == true -->
{{{{!Remote Work Policy Section}}}}
<!--ENDRENDER-->
```

Now:

Remote employee → section is included\
Office employee → section is skipped
{% endstep %}
{% endstepper %}

***

## What Just Happened?

You built:

* 1 Parent Template
* 3 Small Components

And parent template decides what to include.

No duplicate templates.\
No manual decisions.\
No errors.

***

## Even Simpler Model

Think of it like this:

Parent Template = Table of Contents\
Components = Chapters

The parent says:

* Always include Chapter 1
* Include Chapter 2 if Sales
* Include Chapter 3 if Engineering
* Include the remote policy section if Remote

That’s it.

***

## When Should You Use Components?

Use them when:

* A section repeats across templates
* A section is large (legal, pricing, policy)
* A section may appear conditionally
* You want cleaner, more readable parent templates

***

## When NOT to Use Components

Don’t use a component for:

* A single line of text
* Tiny conditional phrases
* One-time content

Components are for **sections**, not single sentences.


# Translate Document Content

Build a translated S-Docs template with data translation maps, Translation Workbench, and translated related list values.

## What You'll Learn

In this tutorial, you'll build a translated S-Docs template and test it end to end. By the end, you'll know how to:

* Translate regular field output with data translation maps
* Translate picklist values and field labels with Salesforce Translation Workbench
* Translate related list picklist values with `toLabel()`
* Configure template language settings correctly
* Generate a test document and verify the output

## What You'll Build

A template that can generate an Opportunity document in another language.

Your translated document can include:

* Regular field values translated with a data map
* Picklist values translated with Salesforce translations
* Field labels translated in the document body
* Related list picklist values translated in query output

**Estimated time:** 25 minutes

## Prerequisites

Before you start, make sure you have:

* Permission to edit S-Docs templates
* Permission to manage Salesforce translations
* An existing S-Docs template to test with
* A sample record with data you can translate
* Translation Workbench enabled in Salesforce

If you need to translate the S-Docs interface itself, see [Translating the S-Docs App Menus](/quick-start/document-generation/s-docs-ui-translation-tutorial).

{% stepper %}
{% step %}
**Step 1: Choose a Template and a Target Language**

Open the template you want to translate.

For this tutorial, use one target language such as French, German, or Spanish.

Pick a few values you want to translate first:

* A regular text or formula field value
* A picklist field value
* A field label
* A picklist field inside a related list

Keeping the first test small makes troubleshooting much easier.
{% endstep %}

{% step %}
**Step 2: Create a Data Translation Map**

Use a data translation map for regular field output that does not come from Salesforce picklist translations.

1. Open the App Launcher.
2. Search for **S-Docs Setup**.
3. Open **S-Docs Setup**.
4. Scroll to **Translate Data/UI**.
5. Click **Go To S-Docs Translation Page**.
6. Enter your language name, such as `French`.
7. Click **Define new translations for this language**.
8. In **Data Translations**, click **Add New Section**.
9. Enter a section name such as `Opportunity Values`.
10. Click **Add New Field**.
11. Enter the original value.
12. Enter the translated value.
13. Repeat for each value you need.
14. Click **Save**.

Example map:

* `North Region` → `Région Nord`
* `Renewal Pending` → `Renouvellement en attente`
* `Executive Review` → `Examen de direction`

{% hint style="info" %}
When you save a new language, S-Docs creates translation template records automatically. Do not edit those records directly.
{% endhint %}
{% endstep %}

{% step %}
**Step 3: Add Data Map Translation to Merge Fields**

Add the `translate="data-map"` attribute to merge fields that should use your data map.

Example:

```html
{{!Opportunity.Region_Text__c translate="data-map"}}
```

Use this on fields whose output exactly matches a value in your translation map.

If the source value is not in the map, S-Docs will output the original value.
{% endstep %}

{% step %}
**Step 4: Set the Template Data Language**

Your template must point to the same language name you created on the translation page.

1. Open your S-Docs template record.
2. Find the **Data Language** field.
3. Enter the exact language name you created earlier.
4. Save the template.

If your language name is `French`, the template must also use `French`.

This value must match exactly.
{% endstep %}

{% step %}
**Step 5: Add Salesforce Translation Workbench Translations**

Use Translation Workbench for picklist values and field labels.

From Salesforce Setup:

1. Search for **Translate**.
2. Open **Translate**.
3. Set **Language** to your target language.

To translate a picklist value:

1. Set **Setup Component** to **Picklist Value**.
2. Select the object.
3. Find the field.
4. Enter the translated picklist values.
5. Save.

To translate a field label:

1. Set **Setup Component** to **Custom Field**.
2. Set **Aspect** to **Field Label**.
3. Enter the translated label.
4. Save.

Standard Salesforce field labels usually already include Salesforce translations. Custom field labels usually need manual translation.
{% endstep %}

{% step %}
**Step 6: Enable Template Language for Translation Workbench**

Templates need a Salesforce language code when you want Translation Workbench output in generated documents.

1. In Setup, open **Object Manager**.
2. Open **SDoc Template**.
3. Open **Page Layouts**.
4. Edit your template layout.
5. Add the **Language** field to the template detail section.
6. Save the layout.
7. Open **Fields & Relationships**.
8. Open the **Language** field.
9. Add the language code you need, such as `FR`, `DE`, or `ES`.

After that, go back to the template record and select the language code.

Use `FR` for French, `DE` for German, or the code that matches your Salesforce translation language.
{% endstep %}

{% step %}
**Step 7: Add Translation Workbench Attributes to Merge Fields**

Add `translate="true"` to picklist merge fields and field label merge fields.

For a picklist field value:

```html
{{!Opportunity.StageName translate="true"}}
```

For a field label:

```html
{{!Label.Opportunity.StageName translate="true"}}
```

Use this method for values Salesforce already knows how to translate.

{% hint style="info" %}
Use data maps for regular text values. Use Translation Workbench for picklists and labels.
{% endhint %}
{% endstep %}

{% step %}
**Step 8: Translate Related List Picklist Values with `toLabel()`**

If a related list query returns a picklist value, add `toLabel()` in the SOQL query.

Example:

```html
<!--{{!
<lineitemssoql>
<class>table873</class>
<soql>SELECT Product2.Name, toLabel(Color__c) FROM OpportunityLineItem WHERE OpportunityId='{{!Opportunity.Id}}'</soql>
<column>rownum</column>
<column>Product2.Name</column>
<column>Color__c</column>
</lineitemssoql>
}}-->
```

This tells Salesforce to return the translated label for that picklist field.

Keep the column name aligned with the selected field.

If you need raw query output without table formatting, use `class` set to `none`.
{% endstep %}

{% step %}
**Step 9: Handle Unicode or Right-to-Left Output**

If your translated template includes languages such as Japanese, Arabic, or Hebrew, enable Unicode support.

1. Open the template.
2. Go to **Document Options**.
3. Enable **Template contains international characters (Unicode fonts)**.
4. If needed, set **Unicode Enforcement Level** to **Strict**.

For right-to-left merge field output:

```html
{{!Account.Name rtl="true"}}
```

For right-to-left static text and merge fields together:

```html
<rtl>مرحبا {{!Account.Name}}</rtl>
```

If you work with right-to-left languages often, see [How To: Work with Right-to-Left Languages](/sdocs/advanced-template-logic/template-attributes/template-attributes-how-to-guides/how-to-work-with-right-to-left-languages).
{% endstep %}

{% step %}
**Step 10: Generate a Test Document**

Now test the full flow.

1. Open a record that matches your template.
2. Generate the document.
3. Verify each translation type:
   * Data map fields show translated values
   * Picklist fields show translated labels
   * Field labels display in the target language
   * Related list picklists display translated labels
4. Compare the output with the original Salesforce data.

If one translation type fails, test that part separately before changing the rest of the template.
{% endstep %}

{% step %}
**Step 11: Fix Common Issues**

Use this checklist when translations do not appear.

**Data map fields stay in English**

* Confirm the template **Data Language** exactly matches the defined language name
* Confirm the output value exactly matches a value in the data map
* Confirm the merge field includes `translate="data-map"`

**Picklist values do not translate**

* Confirm Translation Workbench has a translation for that picklist value
* Confirm the template **Language** field is set to the correct Salesforce language code
* Confirm the merge field includes `translate="true"`

**Field labels do not translate**

* Confirm the label is available in Salesforce translations
* Confirm custom field labels were translated manually
* Confirm the label merge field includes `translate="true"`

**Related list values do not translate**

* Confirm the field is a picklist
* Confirm the query uses `toLabel(FieldName)`
* Confirm the template language code matches the translation language
  {% endstep %}
  {% endstepper %}

## What You've Learned

You now know how to combine both S-Docs and Salesforce translation features in one template.

You can now:

* Translate regular field output with data maps
* Translate picklist values and field labels with Translation Workbench
* Translate related list picklists with `toLabel()`
* Support Unicode and right-to-left output when needed

## Next Steps

For deeper reference material, see:

* [Translating the S-Docs App Menus](/quick-start/document-generation/s-docs-ui-translation-tutorial)
* [How to Format Text, Dates, and Currency](/quick-start/template-building/how-to-format-text-dates-and-currency)
* [Adding Tables (Like Products or Contacts) to Your Document](/quick-start/template-building/adding-tables-like-products-or-contacts-to-your-document)
* [Advanced Data Pulling (For Admins)](/quick-start/template-building/creating-your-first-named-query-tutorial)


# Configure Document Generation On Your Record Page

Add the Generate Documents and Documents components to a Lightning record page, configure common options, and test the full admin setup.

## What You'll Build

In this tutorial, you'll add S-Docs Lightning Web Components to a Salesforce Lightning record page.

By the end, you'll have:

* A **Generate Documents (S-Docs)** component on a record page
* A **Documents (S-Docs)** component below it
* Optional email, refresh, versioning, and Live Edit features configured
* A tested record-page workflow for end users

## Prerequisites

Before starting, make sure you have:

* Complete [Create Your First Template](/quick-start/getting-started/create-your-first-template)
* Permission to edit Lightning record pages
* A test record for that object
* Access to Lightning App Builder
* The target object's API name, such as `Account`, `Opportunity`, or `Case`

If you plan to enable optional features, also confirm:

* You have an HTML email template ready for email actions
* Your template supports Live Edit if you want inline editing
* Your template is configured correctly for the output format you want to generate

{% hint style="info" %}
Documents generated from these components are saved as Salesforce Files and linked to the record.
{% endhint %}

{% stepper %}
{% step %}

#### Step 1: Pick the record page and test record

Choose the object where users will generate documents.

Then open one real record for that object.

Use this record later to test the page after configuration.
{% endstep %}

{% step %}

#### Step 2: Open Lightning App Builder

1. Open your test record.
2. Click on the **Settings/Gear** Icon
3. Select **Edit Page**

**Or**

1. Click **Setup**.
2. Go to **Object Manager**.
3. Open your target object.
4. Select **Lightning Record Pages**.
5. Open the page you want to edit.
6. Click **Edit**.

This opens **Lightning App Builder**.
{% endstep %}

{% step %}

#### Step 3: Add the Generate Documents component

1. In the component panel, search for **S-Docs**.
2. Drag **Generate Documents (S-Docs)** onto the page.
3. Place it where users should start the workflow.

A top section or left column usually works best.
{% endstep %}

{% step %}

#### Step 4: Configure Generate Documents (S-Docs)

Select the component and set the core properties.

Recommended starting configuration:

* **Title:** `Templates to Generate`
* **Object API Name:** your base object, such as `Account`
* **Template Name** or **Template IDs or Names:** choose the templates users should see
* **Notify User:** enabled
* **Open Preview:** enabled if users should review documents immediately

Use these options only when needed:

* **Allow Users to Select Templates** when users should choose from multiple templates
* **Reuse Template for Multiple Documents** when one template should generate several documents in one flow
  {% endstep %}

{% step %}

#### Step 5: Add the Documents component

1. Search for **S-Docs** again.
2. Drag **Documents (S-Docs)** onto the same page.
3. Place it directly below **Generate Documents (S-Docs)**.

This gives users a clean top-to-bottom workflow:

1. Generate documents
2. Review generated files
3. Email, refresh, edit, or inspect versions
   {% endstep %}

{% step %}

#### Step 6: Configure Documents (S-Docs)

Select **Documents (S-Docs)** and configure the features your users need.

Recommended starting configuration:

* **Title:** `Generated Documents`
* **Object API Name:** the same object used in the Generate Documents component

Optional configuration:

* Add an **Email Template** if users should send documents with a predefined message
* Enable **Automatically Open Email Editor** if users usually email right after generation
* Enable **Show Refresh** if users need to update document data after record changes
* Enable **Show Versions** if users need version history on refreshed or edited documents
  {% endstep %}

{% step %}

#### Step 7: Save and activate the page

1. Click **Save**.
2. Click **Activate** if the page is not already active.
3. Assign the page as needed for app, record type, or profile.

Then return to your test record.
{% endstep %}

{% step %}

#### Step 8: Test document generation

On the record page:

1. Find **Templates to Generate**.
2. Generate one document.
3. Confirm the document appears in **Generated Documents**.
4. Confirm the file is linked to the record.
5. If **Open Preview** is enabled, confirm the preview opens automatically.

Your base record-page setup is now complete.
{% endstep %}
{% endstepper %}

## Turn On Optional Features

Use the options below to expand the workflow.

### Send generated documents by email

Configure an [email template](/quick-start/template-building/create-your-first-email-template) in the **Documents (S-Docs)** component when users send the same type of message often.

You can also enable **Automatically Open Email Editor** to open email right after generation.

For setup details, see [How To: Sending Generated Documents via Email](/sdocs/automation-and-document-lifecycle/workflows/sending-generated-documents-via-email-s-docs-lwc).

### Refresh document data

Enable **Show Refresh** in the **Documents (S-Docs)** component when users need updated field values in an existing document.

Refresh updates the document content and creates a new version.

For details, see [How To: Refresh Document Data Within the Documents](/sdocs/automation-and-document-lifecycle/workflows/refresh-document-data-within-the-documents-s-docs-lwc).

### Show document versions

Enable **Show Versions** when users need to review earlier document states.

This works best with **Refresh Data** and **Live Edit**.

For details, see [How To: View Document Versions in the Documents LWC](/sdocs/automation-and-document-lifecycle/workflows/view-document-versions-in-the-documents-lwc).

### Enable Live Edit

Live Edit is controlled on the template.

To enable it:

1. Open the S-Docs template record.
2. Open the template editor.
3. Go to **Document Options**.
4. Under **Attachment & File Options**, enable **Allow Edit**.
5. Save the template.

After that, users can edit supported generated files from the **Documents (S-Docs)** component.

For details, see [How To: Editing Generated Documents](/sdocs/automation-and-document-lifecycle/workflows/editing-generated-documents-live-edit).

## Recommended Admin Setup

For most internal Lightning record pages, start with this pattern:

* **Generate Documents (S-Docs)** at the top
* **Documents (S-Docs)** directly below it
* **Notify User** enabled
* **Open Preview** enabled
* **Show Refresh** enabled when record data changes often
* **Show Versions** enabled when auditability matters
* A predefined [email template](/quick-start/template-building/create-your-first-email-template) when users send the same document type repeatedly

This keeps generation and post-generation actions in one place.

## Common Issues

<details>

<summary>Templates do not appear in the Generate Documents component</summary>

Check these items:

* The template is built for the same base object as the record page
* The template name or ID was entered correctly
* The user has access to the template
* The component's **Object API Name** matches the record page object

</details>

<details>

<summary>The document generates, but it does not appear in Generated Documents</summary>

Check these items:

* Both components use the same object configuration
* The document was created as a Salesforce File
* The page was saved and activated after configuration
* The record was refreshed after generation

</details>

<details>

<summary>Refresh or Versions options do not appear</summary>

Check these items:

* **Show Refresh** is enabled for refresh actions
* **Show Versions** is enabled for version history
* The page was saved and activated after changes

</details>

<details>

<summary>Edit does not appear for a generated document</summary>

Check these items:

* **Allow Edit** is enabled on the template
* The generated format supports Live Edit
* The document came from a template that has Live Edit enabled

</details>

<details>

<summary>DOCX generation does not work as expected</summary>

Check the template configuration.

For DOCX output, enable **New Microsoft Template Upload** on the template.

</details>

## What You've Built

You now have a Lightning record page where users can:

* Generate documents from S-Docs templates
* Review generated files without leaving the record
* Email documents
* Refresh document data
* View document versions
* Edit supported documents when Live Edit is enabled

## Related Guides

Use these pages when you want to expand the setup:

* [Configure Document Generation](/quick-start/getting-started/configure-document-generation)
* [Configure Email Sending On Your Record Page](/quick-start/document-generation/configure-email-sending-on-your-record-page)
* [Generate and Email Your Document](/quick-start/getting-started/generate-and-email-your-document)

{% hint style="info" %}
The **S-Docs Usage Metrics** component is configured on a Home page, not a record page. Use that component separately when you want admin usage reporting.
{% endhint %}


# Configure Email Sending On Your Record Page

## What You'll Learn

* Connect an HTML email template to **Documents (S-Docs)**
* Preload email content when users send generated files
* Enable automatic email open after document generation
* Test the full record-page email workflow
* Troubleshoot missing templates and blank email defaults

## What You'll Build

In this tutorial, you will configure an `Opportunity` record page so users can send generated documents with a predefined email template.

By the end, you will have:

* One **Documents (S-Docs)** component tied to an HTML email template
* Optional automatic email open after generation
* A tested send-by-email workflow from the record page
* One repeatable admin setup for end users

**Estimated time:** 10 minutes

## Prerequisites

Before you start, make sure you have:

* Access to a Lightning record page that already includes **Documents (S-Docs)**
* Permission to edit Lightning record pages
* One active S-Docs HTML email template for the same base object, such as `Opportunity`
* One test record for that object
* Basic familiarity with the **Documents (S-Docs)** component
* Complete [Configure Document Generation On Your Record Page](/quick-start/document-generation/add-s-docs-lightning-components-to-a-record-page)
* Complete [Create Your First Email Template](/quick-start/template-building/create-your-first-email-template)

{% stepper %}
{% step %}

### Step 1: Open the record page in Lightning App Builder

Start on a real record for the object that uses your S-Docs setup.

For this example, use an `Opportunity`.

1. Open Salesforce.
2. Go to **Opportunities**.
3. Open one test opportunity.
4. Click the **Gear** icon.
5. Click **Edit Page**.

This opens **Lightning App Builder** for the current record page.
{% endstep %}

{% step %}

### Step 2: Select the Documents component

Now open the settings for the component that holds generated files.

1. In the page canvas, click **Documents (S-Docs)**.
2. Go to the properties panel on the right.
3. Confirm you selected the document-list component, not **Generate Documents (S-Docs)**.

You are now in the correct place to control email behavior for generated files.
{% endstep %}

{% step %}

### Step 3: Set the email template

Choose the S-Docs email template that should load when users send a document.

1. In the component properties, find **Email Template** or **Email Template Name**.
2. Enter the exact template name, or select it if a list appears.
3. Confirm the template is built for the same object as the page, such as `Opportunity`.

{% hint style="info" %}
Each **Documents (S-Docs)** component can use one email template at a time.
{% endhint %}

{% hint style="warning" %}
The selected template must use the `HTML` format. PDF templates do not load as email body templates.
{% endhint %}

What you just did:

* Connected one reusable email template to the component
* Set the default body content for the send workflow
* Matched the component to one object-specific template
  {% endstep %}

{% step %}

### Step 4: Turn on automatic email open if needed

Use this option when users usually email the document right after generation.

1. Stay in the **Documents (S-Docs)** properties panel.
2. Find **Automatically Open Email Editor**.
3. Enable the checkbox if you want the email editor to open right after generation.

Leave this off if users usually review the file before sending.

What you just did:

* Chose whether email starts automatically
* Reduced one click for high-volume send workflows
* Kept the record-page flow aligned with your team's process
  {% endstep %}

{% step %}

### Step 5: Save and activate the page

Save the component changes before testing.

1. Click **Save**.
2. Click **Activate** if Salesforce prompts you.
3. Confirm the page assignment if you manage app, record type, or profile assignments.
4. Return to the test record.

The updated page is now ready for a live test.
{% endstep %}

{% step %}

### Step 6: Generate a test document

Create one fresh document before you test the email workflow.

1. Find **Generate Documents (S-Docs)** on the same record page.
2. Generate one document from a test template.
3. Wait for the document to appear in **Documents (S-Docs)**.

{% hint style="info" %}
If the document does not appear right away, refresh the record page once.
{% endhint %}

This gives you a current file to use in the email test.
{% endstep %}

{% step %}

### Step 7: Open the email workflow and verify the result

Now confirm the component loads the expected template.

If **Automatically Open Email Editor** is enabled, the email editor may already be open.

If it is not open:

1. Find the generated document in **Documents (S-Docs)**.
2. Select the document if needed.
3. Click **Send** or **Email**.

Then verify these results:

* The email editor opens
* The expected HTML email template loads
* The subject and body match the template
* The generated document is attached
* The **To** field is populated if the template provides a value

What you just did:

* Confirmed the component-level email setup works
* Verified the user sees the expected email content
* Finished one complete record-page send test
  {% endstep %}
  {% endstepper %}

## Common Issues and Solutions

<details>

<summary>The email template does not load</summary>

Check these items:

* The component uses the correct template name
* The selected template uses the `HTML` format
* The template **Related To Type** matches the component object
* The page was saved and activated after the change

</details>

<details>

<summary>The email editor opens, but the recipient is blank</summary>

Check these items:

* The email template has a valid **To** value configured
* The source record contains data in the email field used by the template
* The merge field path in the template points to a real field on the current record or related record

If you still need to configure the template, use [Create Your First Email Template](/quick-start/template-building/create-your-first-email-template).

</details>

<details>

<summary>Automatically Open Email Editor does not trigger</summary>

Check these items:

* **Automatically Open Email Editor** is enabled on **Documents (S-Docs)**
* The document was newly generated from the same record page
* The page was saved after the setting changed
* Both S-Docs components are on the same active record page

</details>

<details>

<summary>The wrong email template appears</summary>

Check these items:

* You edited the correct **Documents (S-Docs)** component in App Builder
* The page does not include a second document-list component with a different template
* The template name entered in the property matches the intended record exactly

</details>

<details>

<summary>The send action is missing or unavailable</summary>

Check these items:

* A generated document exists in **Documents (S-Docs)**
* The user has permission to send email from Salesforce
* The page includes the full S-Docs record-page setup

If the record page still needs setup, use [Configure Document Generation On Your Record Page](/quick-start/document-generation/add-s-docs-lightning-components-to-a-record-page).

</details>

## What You've Learned

✅ Connected an HTML email template to **Documents (S-Docs)**\
✅ Enabled optional automatic email open after generation\
✅ Tested the email workflow from a Lightning record page\
✅ Verified template content and attachment behavior\
✅ Learned the most common fixes for record-page email setup

## Next Steps

* Use [Create Your First Email Template](/quick-start/template-building/create-your-first-email-template) to build the HTML template that loads in the email editor.
* Use [Configure Template Settings: Email](/quick-start/template-building/customize-template-settings-email) to control subjects, recipients, sender options, and restrictions.
* Use [Generate and Email Your Document](/quick-start/getting-started/generate-and-email-your-document) to test the end-user workflow from the record page.
* Use [Configure Document Generation On Your Record Page](/quick-start/document-generation/add-s-docs-lightning-components-to-a-record-page) if you still need the full component setup.

## Practice Exercise

Configure one test record page so users can send a generated quote with a predefined email template.

1. Open one test `Opportunity` record page in **Lightning App Builder**.
2. Set an HTML email template on **Documents (S-Docs)**.
3. Enable **Automatically Open Email Editor**.
4. Save the page and generate one document.
5. Confirm the email editor opens with the expected template and attachment.

Bonus challenges:

* Test the same setup with automatic email open turned off
* Update the email template subject and verify the new value loads
* Add this setup to another object's record page


# Adding S-Docs to Customer Portals (Experience Cloud)

S-Docs Lightning Web Components (LWCs) allow Experience Cloud users to generate and manage documents directly from Salesforce record pages. When configured correctly, these components enable community users to generate documents, view previously generated files, and perform post-generation actions without leaving the Experience Cloud site.

This page covers how to configure the **Generate Documents (S-Docs)** and **Documents (S-Docs)** Lightning Web Components for use within an Experience Cloud site.

## Sharing Settings for S-Docs in Experience Cloud

In addition to base object sharing, S-Docs custom objects must be shared correctly for LWCs to function as expected.

Ensure external sharing settings are configured for the base object used by your S-Docs templates:

### S-Docs Custom Object Sharing

S-Docs uses custom objects to store templates, generated documents, and relationships to base records. The following objects must be shared with community users:

* **SDOC\_\_SDTemplate\_\_c** – S-Docs templates
* **SDOC\_\_SDoc\_\_c** – Generated documents
* **SDOC\_\_SDRelationship\_\_c** – Relationship between documents and base records

If sharing is not configured correctly:

* Templates selected in the LWCs will not appear for end users
* Generated documents may not be visible

***

## Permission Sets for Community Users

S-Docs LWCs rely on Apex classes that must be accessible to Experience Cloud users.

### October ’23 Release and Later

Starting with the **October ’23 release**, S-Docs provides a managed permission set:

* **SDocs LWC Community User**

Assign this permission set directly to community users.

***

## Configuring the S-Docs LWCs

### Step 1: Open Experience Cloud Builder

{% stepper %}
{% step %}
**Open Experience Cloud Builder**

1. Navigate to **Setup → All Sites**
2. Open **Builder** for the Experience Cloud site
3. Select the record detail page where documents should be generated
   {% endstep %}

{% step %}
**Choose Component Placement**

Decide where document generation and document history should appear for users.

Common patterns include:

* A dedicated **“S-Docs” tab** on the record page
* A section within the record detail layout

The layout should align with how users are expected to generate and manage documents.
{% endstep %}

{% step %}
**Add S-Docs Components**

From the component panel:

1. Search for **S-Docs**
2. Drag and drop the following components:

   * **Generate Documents (S-Docs)**
   * **Documents (S-Docs)**

   <figure><img src="https://1474071652-files.gitbook.io/~/files/v0/b/gitbook-x-prod.appspot.com/o/spaces%2Fv7v0UNK83URKB2C83QVU%2Fuploads%2FtqNL9SZXyYE5y2MUWuww%2Fimage.png?alt=media&amp;token=c0bb4d5d-7cb4-40e1-9c2c-b06006eddf1f" alt=""><figcaption></figcaption></figure>

{% endstep %}
{% endstepper %}

***

## Configure Generate Documents (S-Docs) LWC

Select the **Generate Documents (S-Docs)** component to access its configuration panel.

### Configuration Options:

* **Title**\
  Header displayed to users (default: *Templates to Generate*)
* **Template IDs or Names**\
  Comma-separated list of S-Docs template IDs or names
* **Notify User**\
  Displays a notification when document generation completes
* **Open Preview**\
  Automatically opens a document preview after generation
* **Record Id**\
  Do not modify (defaults to `{!recordId}`)
* **Object API Name**\
  API name of the base object (e.g., `Account`, `Case`, `Custom_Object__c`)

<figure><img src="https://1474071652-files.gitbook.io/~/files/v0/b/gitbook-x-prod.appspot.com/o/spaces%2Fv7v0UNK83URKB2C83QVU%2Fuploads%2FwvLdoQ6vnZkdrwOfgVSV%2Fimage.png?alt=media&amp;token=86c2b086-d41b-4c2a-b3df-e6379ddddce9" alt=""><figcaption><p>Object referenced here is Contract</p></figcaption></figure>

{% hint style="info" %}
Important: Set the Object API Name before configuring other properties to avoid errors.
{% endhint %}

***

## Configure Documents (S-Docs) LWC

Select the **Documents (S-Docs)** component to configure document visibility and post-generation actions.

### Configuration Options:

* **Title**\
  Header displayed to users (default: *Generated Documents*)
* **Email Template**\
  Record ID of the S-Docs email template to enable emailing documents
* **Automatically Open Email Editor**\
  Opens the email composer automatically after document generation
* **Record Id**\
  Do not modify (defaults to `{!recordId}`)
* **Object API Name**\
  API name of the base object. For example: Account

<figure><img src="https://1474071652-files.gitbook.io/~/files/v0/b/gitbook-x-prod.appspot.com/o/spaces%2Fv7v0UNK83URKB2C83QVU%2Fuploads%2FC13A5NMJbXKXpOzWjfFX%2Fimage.png?alt=media&amp;token=43c1b713-834b-4018-a2d9-3fdc3f505498" alt=""><figcaption><p>Object referenced here is Contract</p></figcaption></figure>

***

## Preview and Publish

{% stepper %}
{% step %}
**Preview**

1. Preview the Experience Cloud site to verify configuration
   {% endstep %}

{% step %}
**Publish**

1. Publish the site once validation is complete
   {% endstep %}
   {% endstepper %}


# Getting Started: Automate Document Generation

Build a Salesforce Screen Flow that generates a PDF document with S-Docs.

## Objectives

In this tutorial, you will build a simple record-page flow that generates one PDF from an `Opportunity`.

#### Learn to:

* Create a Salesforce Screen Flow for S-Docs generation
* Pass the current `Opportunity` record into the flow with `recordId`
* Configure the **Generate Document** Apex action
* Add a launch action to the `Opportunity` record page
* Test PDF generation from a real record

#### By the end, you will have:

* One Screen Flow that generates the document
* One S-Docs generation action tied to a fixed template
* One confirmation screen after generation
* One generated PDF saved back to the record

***Estimated time:** 15 minutes*

## Prerequisites

Before you start, make sure you have:

* Permission to create, save, and activate Salesforce Flows
* Permission to edit Lightning record pages
* Complete [Create Your First Template](/quick-start/getting-started/create-your-first-template)

{% hint style="info" %}
Generated files usually appear in **Files**. Some orgs also use **Documents & Attachments**.
{% endhint %}

{% stepper %}
{% step %}

#### Step 1: Create the Screen Flow

Start with a basic Screen Flow.

1. Go to **Setup** → **Flows**
2. Click **New Flow**
3. Choose **Screen Flow**
4. Click **Create**

<figure><img src="https://1474071652-files.gitbook.io/~/files/v0/b/gitbook-x-prod.appspot.com/o/spaces%2Fv7v0UNK83URKB2C83QVU%2Fuploads%2FdvhfXauoxBjXuWyy2eUR%2Fimage.png?alt=media&amp;token=a4f89c20-097b-421b-97dc-033470769311" alt=""><figcaption></figcaption></figure>

<figure><img src="https://1474071652-files.gitbook.io/~/files/v0/b/gitbook-x-prod.appspot.com/o/spaces%2Fv7v0UNK83URKB2C83QVU%2Fuploads%2FsF4B5D50D9AHuI4pMwmU%2Fnew-screen-automation.png?alt=media&amp;token=d56f784f-fdb6-422f-9153-8348fbefb742" alt=""><figcaption></figcaption></figure>

<figure><img src="https://1474071652-files.gitbook.io/~/files/v0/b/gitbook-x-prod.appspot.com/o/spaces%2Fv7v0UNK83URKB2C83QVU%2Fuploads%2FkVvPWGq3pAiuWCcvmcRy%2Fnew-screen-flow.png?alt=media&amp;token=39b44c99-d4f7-4558-8d01-e99fa4ce182f" alt=""><figcaption></figcaption></figure>

#### What you completed:

* Created the flow container
* Started a flow you can place on a Lightning record page
  {% endstep %}

{% step %}

#### Step 2: Create the `recordId` input variable

The flow needs the current `Opportunity` ID from the record page.

1. Open the **Manager** tab in the Toolbox in Flow Builder
2. Click **New Resource**
3. Set **Resource Type** to **Variable**
4. Set **API Name** to `recordId`
5. Set **Data Type** to **Text**
6. Enable **Available for input**
7. Click **Done**

<figure><img src="https://1474071652-files.gitbook.io/~/files/v0/b/gitbook-x-prod.appspot.com/o/spaces%2Fv7v0UNK83URKB2C83QVU%2Fuploads%2FA2QUOBT2T3GOLj4EPCQa%2Fimage.png?alt=media&amp;token=fc2994b8-8408-4763-8e30-dae6ae334a46" alt=""><figcaption></figcaption></figure>

#### What you completed:

* Created the standard record-page flow variable
* Gave the flow a base record to generate against
  {% endstep %}

{% step %}

#### Step 3: Add the Generate Document action

Now add the S-Docs action that creates the document.

1. Click the **+** after **Start**
2. Choose **Action**
3. Search for `Generate Document`
4. Select `apex-SDOC__GenerateDocumentInvocable`
5. Set **Label** to `Generate Document`
6. Set **API Name** to `Generate_Document`

<figure><img src="https://1474071652-files.gitbook.io/~/files/v0/b/gitbook-x-prod.appspot.com/o/spaces%2Fv7v0UNK83URKB2C83QVU%2Fuploads%2FUxMKibfsEiVOe4186HeF%2Fimage.png?alt=media&amp;token=c649d91e-fae0-4e2f-b56c-500e8986cfaa" alt="" width="313"><figcaption></figcaption></figure>

#### What you completed:

* Added the invocable S-Docs action to the flow
* Created the step that performs document generation
  {% endstep %}

{% step %}

#### Step 4: Configure the action inputs

Map the flow to the record and template.

In **Set Input Values**:

1. Set **Base Record ID** to `{!recordId}`
2. Enter the exact S-Docs template name in the template input field
3. Leave other values at their defaults unless your use case requires them
4. Click **Done**

<figure><img src="https://1474071652-files.gitbook.io/~/files/v0/b/gitbook-x-prod.appspot.com/o/spaces%2Fv7v0UNK83URKB2C83QVU%2Fuploads%2FyzYuJUz0B3HrlyvyGOF0%2Fimage.png?alt=media&amp;token=aa9c268a-0bdb-47b1-9c33-f43d9dd1fe1e" alt="" width="375"><figcaption></figcaption></figure>

Use the exact template name from the S-Docs template record.

#### What you completed:

* Connected the action to the current `Opportunity`
* Fixed the flow to one S-Docs template for repeatable output
  {% endstep %}

{% step %}

#### Step 5: Add the confirmation screen

Add a simple end screen after generation.

1. Click the **+** after the S-Docs action
2. Choose **Screen**
3. Set **Label** to `Document Created`
4. Set **API Name** to `Document_Created`
5. Add a **Display Text** component
6. Use a short message such as:

{% code title="Confirmation message" %}

```
Document generated successfully. 
Check Files or Documents & Attachments to view or download it.
```

{% endcode %}

7. Click **Done**
   {% endstep %}

{% step %}

#### Step 6: Name the flow

Give the flow a clear, fixed name.

1. Click **Save**
2. Enter `Generate Opportunity PDF`
3. Click **Save**
   {% endstep %}

{% step %}

#### Step 7: Activate the flow

Make the flow available for use on a record page.

1. Click **Activate**

After activation, the flow is ready to place on the record page
{% endstep %}

{% step %}

#### Step 8: Create the flow action

Create the record-page action that launches the flow.

1. Go to **Setup** → **Object Manager**
2. Select **Opportunity**
3. Click **Buttons, Links, and Actions**
4. Click **New Action**
5. Set **Action Type** to **Flow**
6. Select your flow from the **Flow** dropdown
7. Enter a clear **Label**, such as `Generate Document`
8. Click **Save**

<figure><img src="https://1474071652-files.gitbook.io/~/files/v0/b/gitbook-x-prod.appspot.com/o/spaces%2Fv7v0UNK83URKB2C83QVU%2Fuploads%2FXpQYgSmwE3gCXlTZeN4B%2Fimage.png?alt=media&amp;token=00b0a557-86ee-4d2e-b5eb-fc79b89e44fb" alt=""><figcaption></figcaption></figure>

#### What you completed:

* Created a reusable flow action for `Opportunity`
* Prepared the flow for record-page placement
  {% endstep %}

{% step %}

#### Step 9: Add the action to the Opportunity record page

Place the action where users can launch it.

If your org uses traditional **Page Layouts (common practice)**:

1. Go back to **Object Manager** → **Opportunity**
2. Open **Page Layouts**
3. Select the layout you want to edit
4. Click **Mobile & Lightning Actions**
5. Drag your new flow action into **Salesforce Mobile and Lightning Experience Actions**
6. Click **Save**

If your org uses **Dynamic Actions (Modern, simple)**:

1. Open a real `Opportunity` record
2. Click **Gear** → **Edit Page**
3. Click the **Highlights Panel**
4. Click **Add Action** in the properties panel
5. Select your new flow action
6. Click **Done**
7. Click **Save**
8. Click **Activate**

#### What you completed:

* Added a launch point on the record page
* Made the flow available to end users in the right context
  {% endstep %}

{% step %}

#### Step 10: Test document generation

Run the flow from a real record.

1. Return to the test `Opportunity` record
2. Click the new flow action on the record page
3. Let the flow finish
4. Check the record for the generated file

<figure><img src="https://1474071652-files.gitbook.io/~/files/v0/b/gitbook-x-prod.appspot.com/o/spaces%2Fv7v0UNK83URKB2C83QVU%2Fuploads%2F8Wn4qmpF6O2b2UbOx9aG%2Fimage.png?alt=media&amp;token=c83f9a54-5a2b-4f57-9759-d0cfbde06019" alt=""><figcaption></figcaption></figure>

<figure><img src="https://1474071652-files.gitbook.io/~/files/v0/b/gitbook-x-prod.appspot.com/o/spaces%2Fv7v0UNK83URKB2C83QVU%2Fuploads%2FzfA3L6fvc3tJ3PwrP4yw%2Fimage.png?alt=media&amp;token=478fb64a-e986-44b9-9274-68edce99b5ef" alt=""><figcaption></figcaption></figure>

#### Verify results:

* The flow completes without an error
* The document is generated from the expected template
* The PDF is linked to the same `Opportunity`
* The file appears in **Files** or **Documents & Attachments**
  {% endstep %}
  {% endstepper %}

## Common Issues and Solutions

<details>

<summary>I cannot find the Generate Document action</summary>

Check these items:

* S-Docs is installed in the org
* Your user can access S-Docs Apex actions
* You searched for `Generate Document` inside **Action**

</details>

<details>

<summary>The flow action does not appear on the record page</summary>

Check these items:

* The flow is **Active**
* You created the action with **Action Type** set to **Flow**
* The action was added to **Dynamic Actions** or the page layout
* The record page or page layout was saved after the change

</details>

<details>

<summary>The flow works in debug, but not from the record page</summary>

Check these items:

* The flow includes a text variable named `recordId`
* `recordId` is marked **Available for input**
* The record page launches the flow from a record context
* The running user can access the flow and S-Docs action

</details>

<details>

<summary>The flow finishes, but no document is created</summary>

Check these items:

* The template name matches the S-Docs template exactly
* The template is related to `Opportunity`
* The running user can access the template
* The `Opportunity` record has the data the template expects

</details>

<details>

<summary>I do not see the generated file on the record</summary>

Check these items:

* Refresh the record page
* Check **Files**
* Check **Documents & Attachments** if your org still uses it
* Confirm the document generated against the same record you launched from

</details>

## What You've Learned

✅ Created a Screen Flow for S-Docs generation\
✅ Passed the current record into the flow with `recordId`\
✅ Configured the **Generate Document** Apex action\
✅ Added the flow action to the `Opportunity` record page\
✅ Tested PDF generation from a live record

## Next Steps

* Use [Create Your First Template](/quick-start/getting-started/create-your-first-template) to build the template used by the flow.
* Use [Configure Document Generation For Your Record Page](/quick-start/document-generation/add-s-docs-lightning-components-to-a-record-page) to add a fuller record-page generation workflow.

## Practice Exercise

Build a second version of this flow for another template.

1. Copy the flow.
2. Change the template input to a second `Opportunity` template.
3. Create a second flow action for the copied flow.
4. Add the new action to a test record page.
5. Generate a document from a real record.
6. Confirm the second file appears on the same record.

Bonus challenges:

* Create one version for `Account`
* Add clearer confirmation text after generation
* Test the flow with two different records and compare the output


# Getting Started: Automate Emails

Extend a Salesforce Screen Flow to email a generated S-Docs document.

## What You'll Learn

* Extend a Screen Flow to email a generated S-Docs file
* Add the S-Docs **Send Email** action after document generation
* Pass the generated `SDoc ID` into the email action as an attachment
* Reuse an S-Docs email template for the message body
* Test the full generate-and-email flow from a real record

## What You'll Build

In this tutorial, you will update the `Opportunity` flow from [Generate Documents Using Flows](/quick-start/document-generation/getting-started-automate-document-generation).

By the end, you will have:

* One Screen Flow that generates a document
* One S-Docs email action after generation
* One outbound email that uses an S-Docs email template
* One generated PDF attached to the sent email

**Estimated time:** 10 minutes

## Prerequisites

Before you start, make sure you have:

* Complete [Create Your First Email Template](/quick-start/template-building/create-your-first-email-template)
* Complete [Getting Started: Automate Document Generation](/quick-start/document-generation/getting-started-automate-document-generation)

{% hint style="info" %}
The email action needs a valid recipient source. Use your S-Docs email template defaults, or map a recipient value in the flow action.
{% endhint %}

{% stepper %}
{% step %}

### Step 1: Open the existing flow

Start with the flow you built for document generation.

1. Go to **Setup**.
2. Open **Flows**.
3. Open your existing flow, such as `Generate Opportunity PDF`.

You are now back in the flow that already generates the document.
{% endstep %}

{% step %}

### Step 2: Add the Send Email action

{% hint style="warning" %}
Ensure you are choosing the correct Send Email action. You will see the S-Docs namespace listed in the invocable action.
{% endhint %}

Insert the email step after document generation.

1. Click the **+** between **Generate Document** and **Document Created**.
2. Choose **Action**.
3. Search for `Send Email`.
4. Select the S-Docs send email action.
5. Set **Label** to `Send Email`.
6. Set **API Name** to `Send_Email`.

What you just did:

* Added the second S-Docs action to the flow
* Placed email sending after the file is created
  {% endstep %}

{% step %}

### Step 3: Configure the core email inputs

Map the action to the same record, template, and generated file.

In **Set Input Values**:

1. Set **Base Record ID** to `{!recordId}`.
2. Enter the exact value for **S-Docs Email Template Name or ID**.
3. Set **Attachments** to the `SDoc ID` output from **Generate Document**.
4. Click **Done**.

Use the exact S-Docs email template name or record ID.

What you just did:

* Connected the email action to the current `Opportunity`
* Told the action which S-Docs email template to use
* Attached the file created by the previous step
  {% endstep %}

{% step %}

### Step 4: Add recipient overrides only when needed

Your email template may already control recipients, subject, or body.

Only map extra values in the flow when you need to override that behavior.

Common optional inputs include:

* **Recipient Email Address** when the template does not set a default recipient
* **CC** or **BCC** when your process requires extra recipients
* **Subject Line** when the flow must override the template default

Keep the first version simple.

Test the base flow before you add overrides.
{% endstep %}

{% step %}

### Step 5: Update the confirmation screen

Make the final screen match the new workflow.

1. Open the **Document Created** screen.
2. Update the **Display Text** message.
3. Use a short message such as:

{% code title="Confirmation message" %}

```
Document generated and emailed successfully.
Check your inbox and the record files for the result.
```

{% endcode %}

4. Click **Done**.

What you just did:

* Updated the user-facing result message
* Confirmed the flow now handles generation and email
  {% endstep %}

{% step %}

### Step 6: Save and activate the new flow version

Make the updated flow available on the record page.

1. Click **Save**.
2. Save the flow as a new version.
3. Click **Activate**.

Your existing record-page flow action can now run the updated version.
{% endstep %}

{% step %}

### Step 7: Test the full flow from an Opportunity record

Run the flow from a real record.

1. Open a test `Opportunity`.
2. Launch the flow from the record page.
3. Let the flow complete.
4. Verify the generated file appears on the record.
5. Verify the email arrives.
6. Open the email and confirm the generated PDF is attached.

Check these results:

* The flow completes without an error
* The correct email template is used
* The generated file is linked to the same `Opportunity`
* The email includes the generated document as an attachment
  {% endstep %}
  {% endstepper %}

## Common Issues and Solutions

<details>

<summary>I cannot find the Send Email action</summary>

Check these items:

* S-Docs is installed in the org
* You added an **Action**, not another element type
* You searched for `Send Email` in the action picker
* Your user can access S-Docs Apex actions

</details>

<details>

<summary>The email sends, but the document is not attached</summary>

Check these items:

* **Attachments** is mapped to the `SDoc ID` output from **Generate Document**
* The generate step runs before the email step
* The document was created successfully during the same flow run

</details>

<details>

<summary>The flow finishes, but no email arrives</summary>

Check these items:

* The email template is active
* The flow provides a valid recipient
* The recipient email address is real and accessible
* Your org allows outbound email from the selected sender

</details>

<details>

<summary>The wrong email content appears</summary>

Check these items:

* The **S-Docs Email Template Name or ID** matches the intended template
* The template contains the subject and body you expect
* The flow is not overriding the subject or recipients unexpectedly

</details>

<details>

<summary>The updated flow does not run from the record page</summary>

Check these items:

* The newest flow version is **Active**
* The existing flow action still points to this flow
* The record page or page layout was saved after earlier action setup

</details>

## What You've Learned

✅ Extended a Screen Flow to email a generated S-Docs file\
✅ Added the S-Docs **Send Email** action after document generation\
✅ Passed the generated `SDoc ID` into the email action\
✅ Reused an S-Docs email template in the flow\
✅ Tested the full generate-and-email workflow from a live record

## Next Steps

* Use [Configure Template Settings: Email](/quick-start/template-building/customize-template-settings-email) to set default recipients, subject, and sender behavior.
* Use [Generate Documents Using Flows](/quick-start/document-generation/getting-started-automate-document-generation) if you need to rebuild the base flow first.
* Use [Generate and Email Your Document](/quick-start/getting-started/generate-and-email-your-document) to review the end-user workflow on a record page.

## Practice Exercise

Extend the same flow to send a second email scenario.

1. Copy the flow.
2. Change the email template input to a different S-Docs email template.
3. Activate the copied flow.
4. Launch it from a test record.
5. Confirm the second email uses the new message content and still includes the generated PDF.

Bonus challenges:

* Override the recipient in the flow instead of the template.
* Add a custom subject for one flow variation.
* Repeat the same pattern for an `Account` flow.


# Translating the S-Docs App Menus

Translate the S-Docs user interface for one language, test it with a user, and verify the translated workflow.

## What You'll Learn

In this tutorial, you'll translate the S-Docs user interface for one language and test it with a real user flow. By the end, you'll know how to:

* Import a prebuilt UI translation template
* Create custom UI translations manually
* Match S-Docs translations to Salesforce user language settings
* Test translated S-Docs pages end to end
* Troubleshoot missing or partial UI translations

## What You'll Build

A translated S-Docs user experience for one target language.

Your translated UI can cover:

* Generate Documents
* Edit Document
* Send Email
* Contact Lookup
* Attach Files
* Upload Files
* Mass Merge

**Estimated time:** 20 minutes

## Prerequisites

Before you start, make sure you have:

* Permission to manage S-Docs setup
* Permission to import S-Docs templates
* Permission to edit Salesforce user settings or test with a user who can change their own language
* One target language chosen, such as French, German, or Spanish

If you also need translated document output, see [Document Content Translation Tutorial](/quick-start/template-building/document-content-translation-tutorial).

{% stepper %}
{% step %}
**Step 1: Choose Your Translation Method**

S-Docs supports two ways to translate the UI:

* Import a prebuilt translation template
* Enter custom translations on the S-Docs Translation page

Use the prebuilt template when S-Docs already provides your target language.

Use custom translations when you need a language not provided out of the box, or when you want to adjust the wording.
{% endstep %}

{% step %}
**Step 2: Try the Fastest Option First**

If your language is available, start with the prebuilt template.

Download the matching translation package:

* [Translation Template: Spanish](https://kb.sdocs.com/wp-content/uploads/S-Docs-Translation-Spanish.zip)
* [Translation Template: German](https://kb.sdocs.com/wp-content/uploads/S-Docs-Translation-German.zip)
* [Translation Template: French](https://kb.sdocs.com/wp-content/uploads/S-Docs-Translation-French.zip)
* [Translation Template: Polish](https://kb.sdocs.com/wp-content/uploads/S-Docs-Translation-Polish.zip)
* [Translation Template: Japanese](https://kb.sdocs.com/wp-content/uploads/S-Docs-Translation-Japanese.zip)

After downloading the `.zip` file, import it with the S-Docs template migrator.

If your language is not listed, continue to the next step and build the translations manually.
{% endstep %}

{% step %}
**Step 3: Confirm the Imported Translation Was Added Correctly**

After import, locate the translation template record in Salesforce.

Check these settings:

* **Available for Use** is unchecked
* **Initially Visible** is unchecked

That is expected.

This record is not a document template. It only supplies translated S-Docs UI text.
{% endstep %}

{% step %}
**Step 4: Open the S-Docs Translation Page for Custom UI Translation**

Use this path when you want to create or edit translations yourself.

1. Open the App Launcher.
2. Search for **S-Docs Setup**.
3. Open **S-Docs Setup**.
4. Scroll to **Translate Data/UI**.
5. Click **Go To S-Docs Translation Page**.

This page lets you manage both UI translations and data translations.
{% endstep %}

{% step %}
**Step 5: Create or Select a Language**

On the translation page:

* Select an existing language if you already created one
* Or enter a new language name and create it

Use the same language naming consistently across S-Docs and Salesforce.

For example, if users work in French, use `French` consistently.
{% endstep %}

{% step %}
**Step 6: Enter UI Translations by Section**

In the **UI Translations** area, add translations for each section you need.

Common sections include:

* Generate Documents page
* Edit Document page
* Send Email page
* Contact Lookup window
* Attach Files window
* Upload Files tab
* Mass Merge interface

For each entry:

1. Read the English text on the left.
2. Enter the translated text on the right.
3. Continue through the page until each needed label is translated.
4. Click **Save**.

Start with the pages your team uses most often.

That usually means **Generate Documents**, **Send Email**, and **Attach Files** first.

{% hint style="info" %}
When you save a new language, S-Docs creates system translation template records automatically. Do not edit those records directly.
{% endhint %}
{% endstep %}

{% step %}
**Step 7: Set a Test User to the Target Salesforce Language**

S-Docs UI translation follows the user's Salesforce language.

To test the translation:

1. Open Salesforce Setup.
2. Go to **Users**.
3. Open a test user.
4. Set the user's **Language** to the target language.
5. Save.

If users manage their own preferences, they can change this in their personal settings instead.

Use a real test user whenever possible. That gives you the most accurate result.
{% endstep %}

{% step %}
**Step 8: Test the Main S-Docs Workflow**

Now verify the translated UI in the places users actually work.

Run this quick flow:

1. Open a record with S-Docs enabled.
2. Open **Generate Documents**.
3. Verify the page labels and buttons are translated.
4. Generate a document.
5. Open **Send Email**.
6. Verify the email page labels are translated.
7. Open **Attach Files** or **Contact Lookup** if your flow uses them.
8. Verify those labels are translated too.

If your team uses Mass Merge, test that screen separately.
{% endstep %}

{% step %}
**Step 9: Check for Partial Translation**

It is common to see a mix of translated and untranslated text during early testing.

If that happens:

* Go back to the translation page
* Find the untranslated section
* Add the missing entries
* Save again
* Refresh the test flow

Complete coverage usually takes one or two passes.
{% endstep %}

{% step %}
**Step 10: Fine-Tune the Wording**

After the first test, review the translated text with an internal user or native speaker.

Look for:

* Labels that are technically correct but awkward
* Terms that do not match your internal language standards
* Buttons or prompts that should use shorter wording

Update the translations and retest the same workflow.

Small wording changes can make the UI much easier to use.
{% endstep %}

{% step %}
**Step 11: Troubleshoot Common Problems**

Use this checklist when translations do not appear as expected.

**Nothing is translated**

* Confirm the test user's Salesforce **Language** matches the translated language
* Confirm you saved the translation entries
* Confirm the translation template was created successfully

**Only some labels are translated**

* Confirm you completed every relevant UI section
* Add any missing entries and test again

**Wrong language appears**

* Confirm the user is assigned to the correct Salesforce language
* Confirm your language naming matches expected Salesforce naming

**Imported translation does not seem active**

* Confirm you imported the correct language package
* Confirm you are testing with a user set to that language
  {% endstep %}
  {% endstepper %}

## What You've Learned

You now know how to translate the S-Docs UI with either a prebuilt package or custom translations.

You can now:

* Import supported language packs
* Create and edit UI translations manually
* Test UI translations with user language settings
* Refine missing or awkward translated text

## Next Steps

For deeper reference material, see:

* [Translating the S-Docs User Interface (UI)](https://github.com/kvantiem-sdocs/Quick-Start-Documentation/tree/main/advanced-template-logic/translations/translating-the-s-docs-user-interface-ui.md)
* [Document Content Translation Tutorial](/quick-start/template-building/document-content-translation-tutorial)
* [Translating Document Content in S-Docs](https://github.com/kvantiem-sdocs/Quick-Start-Documentation/tree/main/advanced-template-logic/translations/translating-document-content-in-s-docs.md)


# First Step: Installing S-Sign

This page will walk you through the installation process for the S-Sign Package.

## S-Sign Quick Install Guide: Salesforce Lightning

This guide provides a step-by-step walkthrough for installing and configuring S-Sign, a 100% native e-signature solution for Salesforce.

***

### Phase 1: Installation

Unlike S-Docs, S-Sign is not available on the AppExchange. To install S-Sign:

1. Request Link: Contact [**S-Docs Sales**](https://www.sdocs.com/about?qgad=703925338752\&qgterm=s-docs\&gad_source=1\&gad_campaignid=21410070609\&gbraid=0AAAAADBYf9M1VfW8vCUAWRql9uBDlauQm\&gclid=Cj0KCQjwkYLPBhC3ARIsAIyHi3RenceVMoyo3g4ObZ837vOb6Fs4hHTibU0llZAvHIQDl9J3B40IJVcaAsW7EALw_wcB#contact-us\&utm_campaign=AVA-Brand\&utm_source=adwords\&utm_medium=ppc\&utm_term=s-docs\&hsa_kw=s-docs\&hsa_net=adwords\&hsa_grp=165564168842\&hsa_cam=21410070609\&hsa_acc=6588399060\&hsa_tgt=kwd-940841427764\&hsa_ver=3\&hsa_ad=703925338752\&hsa_mt=e\&hsa_src=g) to obtain the latest installation link.
2. Installation Type: Select **Install for Admins Only**.
3. Environment: It is highly recommended to setup and test in a Sandbox before installing in Production.
4. Verification: Navigate to **Setup > Installed Packages** to ensure S-Sign and S-Docs version numbers are up to date.
5. Permissions: Assign either the **S-Sign User** or **S-Sign Administrator** permission set to yourself and relevant users.

{% hint style="info" %}
**Major Package Versions for S-Docs and S-Sign must align to ensure proper functionality.** Please contact your Customer Success Manager or S-Docs Support to request patch links corresponding to your organization's current version.
{% endhint %}

***


# Manage User Access

This page will explain how to assign or renew licenses to S-Sign Users, as well as walk through permission sets provided by the manage practices.

***

### S-Sign License Key Considerations (Fresh Installation/Renewal)

#### Phase 0: License Key Update Pre-Work

#### Important Pre-Check

If you plan to add or change licensed users during this renewal, you must first assign them via the Salesforce Installed Packages interface before updating the key:

1. Navigate to **Setup > Installed Packages**.
2. Find the **S-Sign package** and click **Manage Licenses**.
3. Click **Add Users** and **select all users who require a license**.

***

#### Phase 1: Updating the S-Sign License Key

1. Open the **App Launcher** in the upper left corner and click **View All**.
2. Locate and click **S-Docs Setup.**
3. Navigate to **S-Sign License Key Page.**
4. **Enter your new license key into the License Key field.**
5. Click **Update License Key.**
6. Confirm that you receive a **Success** message.

***

### 🔑 Internal User Permissions

These sets are intended for your standard Salesforce users and system administrators.

#### SSign Administrator

* Description: The highest level of access for S-Sign management.
* Key Capabilities: \* Grants full access to the S-Sign Setup page.
  * Enables the S-Docs Template Editor for creating and modifying S-Sign enabled templates.
  * Allows configuration of global S-Sign settings and custom integrations.

#### SSign User

* Description: The standard permission set for internal employees who need to facilitate the signing process.
* Key Capabilities: \* Provides the ability to generate and send S-Sign requests from Salesforce records.
  * Allows users to track the status of envelopes they have initiated.
  * *Note: This set contains certain permissions that are incompatible with restricted Experience Cloud profiles.*

***

### 🌐 Experience Cloud & Guest Permissions

These sets are optimized for external-facing environments and specialized portal users.

#### SSign Experience Cloud User

* Description: Specifically tailored for Experience Cloud (Community) users.
* Key Capabilities: \* Grants portal users the ability to send S-Sign requests.
  * Why it's used: It excludes specific system permissions found in the "SSign User" set that cannot be technically assigned to certain Experience Cloud license types, preventing deployment errors.

#### S-Sign Site Guest User

* Description: A mandatory permission set for the public-facing side of the signing process.
* Key Capabilities: \* Provides the necessary access for the Site Guest User profile to interact with S-Docs and S-Sign.
  * Ensures that external signers (who do not have a Salesforce login) can view the document and submit their signature via the S-Sign Site.
  * *Note: This permission set is intend to be applied to the S-Sign Site Site Guest User*

***

### ⏳ Legacy Permissions

#### S-Sign Site Internal User (Legacy)

* Description: A specialized permission set for specific older configurations.
* Key Capabilities: \* Grants access to S-Docs/S-Sign specifically for users who are authenticated via the SSign Connected App.
  * Generally used in legacy environments or specific architectural setups where the Connected App is the primary driver for S-Sign actions.

***

{% hint style="info" %}
Note: **Permission Sets give functional access** to object, apex classes, visual force pages, and more. **Sharing Settings give record level** access to S-Docs and S-Sign Objects. It is recommended to limit record level access and extend access through **Sharing Rules**.
{% endhint %}


# Configure Global Settings

### ⚙️ Phase 2: Configuration

#### Step 1: Create Remote Site Settings

S-Sign uses SendGrid to ensure verification emails bypass Salesforce email limitations.

* Navigate to **Setup > Remote Site Settings > New Remote Site**.
* Remote Site Name: `SSign_Email_Verification_Site`
* Remote Site URL: `https://api.sendgrid.com`
* Active: Ensure this box is checked.

#### Step 2: Create a Salesforce Site

This allows external signers to access and sign documents within your Salesforce environment.

1. Navigate to **Setup > Sites**.
2. Register a Domain: If you haven't already, register a **Force.com domain**.
3. Create New Site: Click New and fill in the following:
   * **Site Label:** `S-Sign Site`
   * **Site Name:** `S_Sign_Site`
   * **Active:** Check this box.
   * **Active Site Homepage:** Set to `Under Construction`.
   * **CRITICAL:** Uncheck "Lightning Features for Guest Users" for security compliance.
4. Assign Visualforce Pages: On the Site Detail page, scroll to Site Visualforce Pages, click Edit, and add:
   * `SDOC.SDTemplateHTML`
   * `SSign.SSMultiSign`
   * `SSign.SSCreateSig`
   * `SSign.SSTemplatePDF`
   * `SSign.SSVerify`
   * `SSign.SSViewEnvIncl`
5. Security Check: Navigate to **Setup > Session Settings** and ensure "**Use Lightning Web Security for Lightning web components and Aura components**" is Checked.

#### Step 3: Create a Lookup Field

You must link your specific Salesforce object to the S-Sign Envelope object.

*Note: Skip this step if using Standard objects like Opportunity, Contact, Quote and Account; the lookup field is pre-configured for these out-of-the box.*

1. Navigate to **Object Manager > S-Sign Envelope** (Object)
2. Go to **Fields & Relationships > New**
3. Data Type: Select **`Lookup Relationship`**
4. Related To: Select your desired object (e.g., a Custom Object).
5. Naming Convention (Custom Objects): \* **Field Label**: Name of the object.
   * Field Name: Object API name ending in `_c` (not `__c`). *Example: `CustomObject_c`*.

#### Step 4: Provide Site Info

1. Navigate to **S-Docs Setup > Go To S-Sign Setup Page**.
2. Site URL: Copy the URL from your Salesforce Site (from Step 2).
   * Use the URL ending in `secure.force.com` if available.
   * Ensure it begins with `https://`.
3. Click **Set Site Info & Assign Permissions**.

#### Step 5: License Management

1. On the S-Sign Setup page, click Go To S-Sign License Page.
2. Enter Key: Input your license key provided by S-Docs.
3. Assign Users: Select users from the list and click Add Selected Users.

***

### 🛡️ Phase 3: Production-Specific Steps

#### Step 5B: Assign Licenses to Site Guest User

1. Navigate to **Setup > Sites > \[Your S-Sign Site]**.
2. Click **Public Access Settings > View Users**.
3. Click the **Site Guest User** record.
4. Scroll to Managed Packages and click **Assign Licenses**.
5. Add both **SDocs** and **SSign**.

Note: This step is only required in Production environments.

#### Step 5C: Establish Org-Wide Email Address

To ensure confirmation and subsequent emails are sent correctly, you’ll need to have an Organization-Wide Email Address configured.

* If you **already have a valid Organization-Wide Email Address set up**, and it matches your Site Guest User email, you can **skip this step**.
* If not, please follow the steps below:

1. Go to **Setup → Organization-Wide Addresses → Add**
2. Add an email address that matches the **Site Guest User email**
3. Select **“Allow All Profiles to Use this From Address”** and complete the verification
4. Update the **Site Guest User record** so its email matches this address

**Note:** This setup is required for sending confirmation and subsequent emails successfully. If the Site Guest User is not configured with a valid Org-wide email address you may notice emails after the first initial request not being sent out.

**Optional:** Set Organization-Wide Address for all notification emails.

Salesforce now requires email domain verification for outgoing emails, which may not be possible for your **External Users (Experience Cloud Site Users)** using, for example, a gmail.com email. Configure this option to have all notifications (confirmations, next signer requests, decline notifications) sent from an Org-Wide Address.

1. Navigate to **S-Docs Setup > Go To S-Sign Setup Page**.
2. Scroll to **S-Sign Custom Settings** and locate the setting **From address for notification emails**
3. Select your preferred Org-wide address
4. Click **Save Settings**

***

### 💡 Pro Tips

* Keep Tabs Minimum: Avoid having multiple Setup tabs open to prevent settings from being overwritten.
* Bulk Licensing: Use the global function `SSIGN.SSLicensesController.addSSignUserLicenses(userIds)` in Apex to assign licenses to large groups of users simultaneously.


# Customize Organization Wide Settings

This guide outlines the features and settings available on the S-Sign Setup Page. This page serves as the central administrative hub for managing licenses, site configurations, and global e-signature

***

## 🛠️ S-Sign Configuration Guide

### 1. Accessing the Setup Page

Depending on your version of S-Docs, you can access the configuration page via the following routes:

* S-Docs 4.381+: App Launcher > S-Docs Setup > Click Go to S-Sign Setup Page.
* For Legacy Versions: \*

Production: `https://login.salesforce.com/apex/SSIGN__SSConfig`

* Sandbox: `https://test.salesforce.com/apex/SSIGN__SSConfig`

***

### 2. Licensing Management

The S-Sign Licensing Page section allows administrators to manage user access and view subscription health. To access the S-Sign Licensing page, navigate to App Launcher → S-Docs Setup → S-Sign Licensing.

| **Feature**     | **Description**                                                  |
| --------------- | ---------------------------------------------------------------- |
| Key Entry       | Provides access to the S-Sign License Key Page                   |
| Org Usage       | View expiration dates, total licenses, and currently used seats. |
| User Assignment | Add or remove licenses for specific Salesforce users.            |
| Internal User   | Quickly assign a license to the designated S-Sign Internal User. |

***

### 3. Essential S-Sign Configurations

This section connects S-Sign to your Salesforce Site, which is required for external signers to access documents.

* Site Label & URL: Syncs the Salesforce Site created during installation.
* Permissions Automation: Use the Set Site Info & Assign Permissions button to automatically assign the "S-Sign Guest User" permission set.
* Automation Settings: Enable Reminder and Expiration emails globally (specific timing is configured at the template level).

***

Based on the article and the interface shown in your image, here is the updated Custom Settings & Branding section. This breakdown aligns each UI element from your screenshot with its functional explanation from the documentation.

***

### 4. S-Sign Custom Settings & Branding

The S-Sign Custom Settings section on the configuration page allows you to fine-tune the signer experience, automate document storage, and apply organizational branding.

#### 📝 Document & Audit Settings

* Show audit trail during signing process
  * *Behavior:* By default, the audit trail is only appended after all signatures are collected. Checking this allows signers to see the audit details (e.g., when previous signers viewed/signed) in real-time during the process.
* Insert Audit Document as Attachment on base record
  * *Behavior:* Standard behavior saves signed documents as Salesforce Files. Enabling this creates the document as a legacy Attachment on the S-Sign Envelope and clones it to the base record.

#### 📧 Email Configuration

* From address for notification emails
  * *Behavior:* Allows you to select a pre-configured Salesforce Org-Wide Address to act as the standard "Sender" for all S-Sign outgoing mail.
* Reply To Address
  * *Behavior:* Specifies where signer replies are sent.
* Use Requester Email for Reply To
  * *Behavior:* If checked, the "Reply-To" field will dynamically update to the email address of the specific Salesforce user who initiated the e-signature request.

#### 🖋️ Signer Experience & Signature Style

* Enable Same Tab Signing (Experience Cloud)
  * *Behavior:* Optimized for Salesforce Communities; ensures the signing interface opens in the current tab rather than a popup.
* Disable Text-To-Signature (Selected in image)
  * *Behavior:* Forces signers to physically draw their signature using a mouse or touch screen. They will not be able to type their name to generate a signature.
* Abbreviate Initials when using Text-To-Signature by default
  * *Behavior:* Automatically converts typed names into initials (e.g., "Jane Doe" becomes "J.D.").
* Show Timestamp and Signer Name on Signature Images
  * *Behavior:* Hard-codes the signer’s printed name and the date/time of signing directly underneath the signature image on the final PDF.
* Default Text-To-Signature font
  * *Behavior:* Allows you to pick the default aesthetic for typed signatures. Your image shows options like *Aquafina Script*, *Alex Brush*, and *Allura*.

#### 🏢 Branding & Compliance

* Electronic Disclosures Statement URL

  * *Behavior:* Links to your company's specific legal disclosure or "Consent to do business electronically" document.

  Note: It is not possible to completely remove the consent checkbox due to esignature legal requirements.
* Custom Logo URL
  * *Behavior:* Replace the standard S-Sign logo with your own. Provide a URL to an image file (hosted in Salesforce Documents or externally) to brand the signing toolbar and consent screens.
* Use custom S-Sign Site Guest User permission set
  * *Behavior:* Overrides the default S-Sign permissions. Use this if your security team requires a more restrictive or specific set of permissions for the Site Guest User.

***

{% hint style="info" %}
Note: After making changes to any of these fields, you must click the Save Settings button at the bottom of the section to apply them to your Salesforce org.
{% endhint %}


# Configure E-Signature Template

This guide details how to configure S-Docs templates to function with S-Sign for e-signature requests. A standard sign request typically requires two templates: an HTML template (the email body) and a

S-Sign allows you to add e-signature capabilities to your S-Docs template. To set this up, you typically need two templates:

1. **An HTML Template**: Functions as the body of the signature request email.
2. **A PDF Template**: The actual document that requires a signature.

This page will progress the end user through **configuring the S-Sign Enabled PDF Template**

***

### 1. Enabling S-Sign on Your Templates

Before you can use S-Sign features, you must manually enable the functionality for the PDF template.

#### How to Access:

* Open your S-Docs Template record.
* Click the Template Editor button.
* Navigate to the Advanced Options tab.

#### Action:

* **Enable S-Sign: Check the Enable S-Sign checkbox**
* *Note:* Once checked on a PDF template, a new S-Sign panel will appear on the left side of the Template Editor.

***

### 3. Configuring the PDF Document Template

The PDF template contains the actual fields (signatures, dates, text boxes) that the signer will interact with.

#### The S-Sign Sidebar Menu

Once S-Sign is enabled for a PDF, a sidebar appears with three primary menus:

**A. Signer Profiles**

* How to Access: Click the Signer Profiles tab in the S-Sign sidebar.
* What it does: Defines *who* needs to sign. You can set:
  * Email Address: The recipient's email (supports merge fields like `{{!Opportunity.Owner.Email}}`).
  * Signing Order: Determines if signers must sign in a specific sequence (e.g., Signer 1 must finish before Signer 2 receives the email).
  * Verification Type: Choose between "Email PIN" (2-factor auth) or "None."
* More Information can be found on [Define Signer Profile & Routing](/s-sign/template-configuration-fields-profiles-settings/define-signer-profile-and-routing)

**B. S-Sign Field Types**

* How to Access: Click the S-Sign Field Types tab.
* What it does: Allows you to drag or copy tags for different input types into your document.
* Key Fields:
  * Signature: The core field that opens the signature pad.
  * Initials: A smaller box for initials.
  * Checkboxes: Can be grouped for "Select at least X" logic.
  * Date: Automatically captures the date of signing.
  * Text/Picklist: For collecting additional data from the signer.
* More Information can be found on [Customize S-Sign Fields & Inputs](/s-sign/template-configuration-fields-profiles-settings/customize-s-sign-fields-and-inputs)

**C. S-Sign Template Settings**

* How to Access: Click the S-Sign Template Settings tab.
* What it does: Controls global behavior for this specific document.
* More information can be found on the [Customize Template & Signer Settings](/s-sign/template-configuration-fields-profiles-settings/customize-template-and-signer-settings) or the [Reminder and Expiration Settings](/s-sign/automation-and-envelope-lifecycle/customize-automated-actions/reminder-and-expiration-settings)

***

#### Pro-Tip: Testing Your Template

Always use the S-Docs Button on a sample record to generate the documents. Select both the HTML and PDF templates. If configured correctly, S-Docs will present the "Send S-Sign Request" page where you can verify the recipient's email before firing off the request.

***

### 📧 Configuring the HTML Template

The HTML template serves as the outbound email sent to the signer.

1. Open the Template: Navigate to the S-Docs Template Editor for your specific HTML template.
2. Enable S-Sign:
   * Click on the Advanced Options tab.
   * Check the Enable S-Sign checkbox.
3. Insert the Sign Link:
   * Go to the Template Body tab and click the Source button.
   * Paste the following HTML code where you want the "Sign Here" link to appear:

     HTML

     ```
     <a href="[[SIGN_LINK]]" target="_blank">Click Here to Sign</a>
     ```
   * *Note:* `[[SIGN_LINK]]` is a merge field that automatically generates the unique signing URL for the recipient.
4. Optional Merge Fields: You can use `[[DOCUMENT_NAME]]` within the email body to dynamically display the name of the PDF document being sent.
5. Save: Click Save to apply changes.

***

### 📄 Configuring the PDF Template

The PDF template is the actual document that will contain the signature fields and other data capture points.

1. Open the Template: Navigate to the S-Docs Template Editor for your PDF template.
2. Enable S-Sign:
   * Click on the Advanced Options tab.
   * Check the Enable S-Sign checkbox.
3. Access S-Sign Fields:
   * Once enabled, an S-Sign panel will appear on the left side of the Template Editor.
4. Insert Signature/Input Fields:
   * Use the dropdown menu in the S-Sign panel to select a field type (e.g., Signature, Initials, Text, Checkbox, Date, or Picklist).
   * Copy the generated field tag and paste it directly into the template body where you want the field to appear.
   * *Example:* Placing the tag after "Please Sign Here:" will create a signature box at that exact location in the generated document.
5. Save: Click Save to apply changes.

***

### 🛠️ Legacy Instructions

*Use these instructions only if you are using an older version of S-Sign.*

1. HTML Template:
   * In Advanced Options, set the E-Sign Vendor dropdown to SSIGN.
   * In the Source page, use the tag: `<a href="[[[SIGNLINK]]]" target="_blank">Click Here to Sign</a>`.
   * Use `[[[DOCUMENTNAME]]]` to display the document name.
2. PDF Template:
   * Place the merge field `[[[SIGNATURE]]]` wherever the signature is required.
   * *Note:* The recipient signs once, and all instances of this tag are replaced with the same signature image.

***

### 💡 Important Notes

* In-Person Signing: If you are using S-Sign for in-person signing, the HTML email template is not required.
* Two-Part Requirement: Remember that an e-signature request will only work if both the HTML email and the PDF document are S-Sign enabled.


# Configure Signature Request Email Template

This guide provides a comprehensive overview of how to create and configure S-Sign enabled HTML templates for S-Docs.

In the S-Sign ecosystem, a signature request typically requires two distinct S-Docs templates: a PDF template (the document to be signed) and an HTML template (the body of the email sent to the signer).

The HTML template acts as the delivery vehicle for your signature request. Follow the steps below to configure it correctly.

***

### 🛠️ Step 1: Enable S-Sign for the HTML Template

Before the HTML template can function as a signature request email, you must explicitly enable the S-Sign functionality within the template settings.

1. Open your HTML Template in the S-Docs Template Editor.
2. Navigate to the Advanced Options tab.
3. Locate and check the Enable S-Sign checkbox.
   * *Note for Legacy Users:* If you are using an older version, you may need to select "SSIGN" from the E-Sign Vendor dropdown menu instead.

#### Email recipients come from S-Sign profiles

Once you enable S-Sign on the HTML template, the **To** field no longer appears in the **Email Settings** tab.

S-Sign uses signer profiles to decide who receives the signature request email. If you need to change recipients, update the signer profiles instead of the HTML template email settings.

<figure><img src="https://1474071652-files.gitbook.io/~/files/v0/b/gitbook-x-prod.appspot.com/o/spaces%2Fv7v0UNK83URKB2C83QVU%2Fuploads%2FLcPoPr2MkCNviy1msVD7%2Fimage.png?alt=media&amp;token=99c597c9-6e9e-4162-84d3-a29d69718312" alt=""><figcaption></figcaption></figure>

***

### 🔗 Step 2: Insert the Signature Link

The most critical element of the HTML template is the `[[SIGN_LINK]]` merge field. This field dynamically generates the unique URL that takes your recipient to the secure signing portal.

#### Action: Adding the Link to the Source

To ensure the link is clickable and professional, you should embed it in an HTML anchor tag.

1. In the Template Editor, click the Source button to view the HTML code.
2. Paste the following code where you want the "Sign" button or link to appear:

   HTML

   ```
   <a href="[[SIGN_LINK]]" target="_blank" style="background-color: #0070d2; color: white; padding: 10px 20px; text-decoration: none; border-radius: 4px;">
       Click Here to Sign
   </a>
   ```
3. Explanation of the Field:
   * `[[SIGN_LINK]]`: This is the S-Sign merge field. When the email is sent, S-Sign replaces this tag with a unique, encrypted URL specific to that signer and document.

***

### 💡 Key Functionality & Tips

| **Feature**       | **Description**                                                                                                                                               |
| ----------------- | ------------------------------------------------------------------------------------------------------------------------------------------------------------- |
| Purpose           | The HTML template defines exactly what the signer sees in their inbox. It should provide context for why they are receiving the document.                     |
| In-Person Signing | If you are using S-Sign for In-Person Signing, an HTML email template is not required, as the signer will interact with the document directly on your device. |
| Branding          | Because this is an HTML template, you can use standard HTML/CSS to include your company logo, brand colors, and professional signatures to increase trust.    |
| Merge Fields      | You can include standard Salesforce merge fields (like `{{!Account.Name}}`) alongside the S-Sign link to personalize the email.                               |


# Manage Delivery & Signing Experience

This page will walk user's through how to generate documents and send out e-Signature requests using the Generate Documents and Generated Documents LWCs introduced by the managed package.

***

### Phase 1: Add the Lightning Web Components (LWC) to the Object Record

Ensure the LWCs are correctly added to the Object Record

1. Navigate to the **Object Record** where document generation will occur
2. Navigate to the **Cog Icon** in the top right corner > **Select Edit Page**
3. Search for **S-Docs in the components search field**
4. Drag and drop the **Documents and Generate Documents** LWCs onto the page

***

### Phase 2: Configure the LWCs

Clicking into the dragged in components also users to customize the LWC with a number of settings

1. In the **Generate Documents LWC**, select the S-Sign Enabled Template to be used during document generation
2. In the **Documents LWC**, select the S-Sign Enabled Email Template that will be used to send out contracts
3. Configure both LWCs with any additional settings or filters deemed necessary. For more information on these settings, check out[ Configure Document Generation](https://sdocs-1.gitbook.io/sdocs-help-center/quick-start/document-generation/add-s-docs-lightning-components-to-a-record-page)

***

### Phase 3: Generate the Document and Engage Electronic Signature

1. Select the template in the **Generate Documents LWC and click Generate**
2. After generation, the Generated Documents LWC will populate with the new S-Doc
3. Select the **Checkbox** next to the generated document > then click **Send**
4. The Generated Documents Email Editor will populate with the Custom HTML Email Template where any **revisions to From Address, To Address, CC address, Subject, and Email Body can be made**
5. Select **Send**

{% hint style="info" %}
It is not necessary to attach the generated document in the outbound email for the signer experience. The active signer will engage the signer experience through the signing link provided in the email body.
{% endhint %}

***

### Phase 4: Alternative Signing Method: Sign-in-Person

Alternatively to sending contracts out for electronic signature via email, the Generated Documents LWC offers the ability to Sign-in-Person directly from the object record.

1. Select the **Checkbox** next to the generated document
2. Select the dropdown arrow > eSign
3. The user will be navigated into the Signing Experience to complete the contract


# Inserting Merge Fields

Learn how merge fields work in S-Docs, then choose the right guide for Template Editor, Microsoft templates, or focused troubleshooting.

Use this section to learn how merge fields bring Salesforce data into an S-Docs template.

Merge fields act as placeholders for record data.

When you generate a document, S-Docs replaces each field with the right value.

Start here to choose the guide that fits your template type and experience level.

{% hint style="info" %}
If you are new to merge fields, start with **Get Started With Merge Fields**.

Use **Merge Fields With Template Editor** for standard S-Docs templates.

Use **Merge Fields With Microsoft Templates** for DOCX, PPTX, and XLSX files, where merge fields must stay inside square brackets.
{% endhint %}

### Start with the path that fits your goal

If you are new to merge fields, start with the beginner guide.

If you are adding fields in the S-Docs editor, use the Template Editor guide.

If you are building a Microsoft template, use the Microsoft guide for the bracket syntax.

If you need a specific fix or formatting pattern, use the additional resources.

<table data-card-size="large" data-column-title-hidden data-view="cards"><thead><tr><th>Title</th><th>Description</th><th data-card-target data-type="content-ref">Target</th></tr></thead><tbody><tr><td><strong>Get Started With Merge Fields</strong></td><td>Start here if you are new to Salesforce merge fields and want a simple introduction.</td><td><a href="/quick-start/template-building/how-to-auto-fill-customer-data-into-templates">Auto-fill customer data in Document Templates</a></td></tr><tr><td><strong>Merge Fields With Template Editor</strong></td><td>Learn the standard merge field syntax, how to insert fields, and which attributes to use most often.</td><td><a href="/sdocs/template-architecture/inserting-merge-fields/merge-fields-with-template-editor">Merge Fields With Template Editor</a></td></tr><tr><td><strong>Merge Fields With Microsoft Templates (DOCX, PPTX, XLSX)</strong></td><td>Use the bracket-based syntax required for Word, PowerPoint, and Excel templates.</td><td><a href="/sdocs/template-architecture/inserting-merge-fields/merge-fields-with-microsoft-templates-docx-pptx-xlsx">Merge Fields With Microsoft Templates (DOCX, PPTX, XLSX)</a></td></tr><tr><td><strong>Additional Resources</strong></td><td>Jump to focused articles for apostrophes, mailing addresses, deep relationship paths, and rich text output.</td><td><a href="/sdocs/template-architecture/inserting-merge-fields/additional-resources">Additional Resources</a></td></tr></tbody></table>

### What you can do with merge fields

* Insert record values into templates.
* Pull fields from parent and related records.
* Apply formatting for dates, numbers, and rich text.
* Use the right syntax for S-Docs and Microsoft templates.

### Browse by topic

* [Get Started With Merge Fields](/quick-start/template-building/how-to-auto-fill-customer-data-into-templates)
* [Merge Fields With Template Editor](/sdocs/template-architecture/inserting-merge-fields/merge-fields-with-template-editor)
* [Merge Fields With Microsoft Templates (DOCX, PPTX, XLSX)](/sdocs/template-architecture/inserting-merge-fields/merge-fields-with-microsoft-templates-docx-pptx-xlsx)
* [Additional Resources](/sdocs/template-architecture/inserting-merge-fields/additional-resources)

### Related note

Use [Format Data with Template Attributes](/sdocs/advanced-template-logic/template-attributes) when you need to control how merged values display after insertion.


# Special Merge Fields

Use special merge fields to pull document metadata, record IDs, page numbers, and generating user details into an S-Docs template.

## Special Merge Fields

Use this page when you need values that do not live on the source record.

Special merge fields pull data from the generated document, the generation context, or the current user.

Use them for document metadata, record ID formats, PDF page numbering, and user details.

### What you can do with special merge fields

* Show document values like ID, date, time, and format.
* Choose between 15-character and 18-character Salesforce record IDs.
* Add PDF page numbering and page counts.
* Output the generating user's name, email, department, or signature.

### When to use special merge fields

{% hint style="info" %}
Use a standard merge field when the value lives on the source record.
{% endhint %}

Use a special merge field when you need values like:

* the generated document ID
* the document date or time
* the 15-character or 18-character record ID
* page numbers in a PDF
* the generating user's email signature

### Special Merge Fields

| Merge Field                 | Output                                                                                    |
| --------------------------- | ----------------------------------------------------------------------------------------- |
| `{{!DocumentID}}`           | S-Doc ID of the generated document, such as `SD-174`. This is not a Salesforce record ID. |
| `{{!DocumentName}}`         | Value stored in the template's **Template Name** field.                                   |
| `{{!DocumentObject}}`       | Salesforce object type the document was generated for.                                    |
| `{{!DocumentDate}}`         | Date the document was generated.                                                          |
| `{{!DocumentDateSOW}}`      | Start-of-week date for the generated document.                                            |
| `{{!DocumentDateEOW}}`      | End-of-week date for the generated document.                                              |
| `{{!DocumentDateTime}}`     | Date and time the document was generated.                                                 |
| `{{!DocumentFormat}}`       | Output file type, such as `PDF` or `DOC`.                                                 |
| `{{!ObjectId18}}`           | 18-character Salesforce record ID for the source record.                                  |
| `{{!ObjectId15}}`           | 15-character Salesforce record ID for the source record.                                  |
| `{{!PageNumber}}`           | Current page number in the generated document.                                            |
| `{{!PageCount}}`            | Total page count in the generated document.                                               |
| `{{!UserFirstName}}`        | First name of the user who generated the document.                                        |
| `{{!UserLastName}}`         | Last name of the user who generated the document.                                         |
| `{{!UserName}}`             | Full name of the user who generated the document.                                         |
| `{{!UserOrganizationName}}` | Organization name of the user who generated the document.                                 |
| `{{!UserLoginName}}`        | Salesforce username of the user who generated the document.                               |
| `{{!UserEmail}}`            | Email address of the user who generated the document.                                     |
| `{{!UserDepartment}}`       | Department of the user who generated the document.                                        |
| `{{{!UserSignature}}}`      | Salesforce email signature of the user who generated the document.                        |

{% hint style="info" %}
`{{!PageNumber}}` and `{{!PageCount}}` are intended for PDF templates only.
{% endhint %}


# Merge Fields With Template Editor

Learn what merge fields are, how to add them to a template, and which attributes are most useful day to day.

## Inserting Merge Fields

Merge fields pull live Salesforce data into an S-Docs template.

They act as placeholders. At generation time, S-Docs replaces them with record values.

### What a merge field looks like

Use this pattern:

```
{{!Object.Field}}
```

Examples:

```
{{!Opportunity.Name}}
{{!Opportunity.Account.Name}}
{{!Contact.Email}}
```

You can also apply formatting attributes.

Example:

```
{{!Opportunity.CloseDate format-date="yyyy-MM-dd"}}
```

### How to add a merge field

{% stepper %}
{% step %}

### Choose the record value

Identify the object and field you want to merge.

Example: `Opportunity.Name`
{% endstep %}

{% step %}

### Insert the merge field into the template

Place your cursor where the value should appear.

Then insert or type the merge field syntax:

```
{{!Opportunity.Name}}
```

{% endstep %}

{% step %}

### Add an attribute if needed

Attributes change how the value renders.

Example:

```
{{!Opportunity.Amount format-number="#,###.##"}}
```

{% endstep %}

{% step %}

### Save and test

Generate a document from a real record.

Confirm the value and formatting are correct.
{% endstep %}
{% endstepper %}

### Quick examples

#### Plain text field

```
{{!Account.Name}}
```

#### Parent relationship field

```
{{!Opportunity.Account.Name}}
```

#### Number formatting

```
{{!Opportunity.Amount format-number="#,###.##"}}
```

#### Render rich text content

```
{{{!Object.Rich_Text_Field__c}}}
```

#### Replace characters or values

```
{{!Contact.LastName replaceAll="',\\'"}}
```

### Quick reference: common merge field attributes

This is a practical reference. It covers the most commonly documented attributes.

#### `replaceAll`

Replaces matching text inside the merged value.

Use it for cleanup, escaping, or value swaps.

```
{{!Object.Field replaceAll="old,new"}}
{{!Contact.LastName replaceAll="',\\'"}}
```

Use multiple pairs when needed.

{% hint style="info" %}
Use `#comma#` if a replacement value must contain a comma.
{% endhint %}

#### `format-number`

Formats numeric output.

```
{{!Opportunity.Amount format-number="#,###.##"}}
{{!test.unitprice format-number="-#.###,##"}}
```

Useful for currency, decimals, phone-like masks, and localized separators.

#### Rich text output and triple braces

Use triple braces when you want to preserve formatting from a rich text field.

```
{{{!Object.Rich_Text_Field__c}}}
```

Use this when you want line breaks or markup to remain in the output.

#### `format-date`

Formats date and datetime values.

Example:

```
{{!Opportunity.CloseDate format-date="yyyy-MM-dd"}}
```

Use this when you need a predictable date format.

### Common issues

* Wrong object or field API name
* Missing relationship path
* Special characters not escaped
* Rich text output not formatted as expected

### Related articles

* [Escape an Apostrophe Correctly in a Merge Field](broken://spaces/WKNnJmhJBQwhdk5WBFsi/pages/6bf519bef231ce5d7d8edc8cd875b27750faa0d7)
* [Mailing Address Fields](/sdocs/template-architecture/inserting-merge-fields/additional-resources/special-salesforce-mailing-address-fields)
* [CSS Styling with Merge Fields](/sdocs/template-architecture/template-authoring/css-styling-with-merge-fields)


# Merge Fields With Microsoft Templates (DOCX, PPTX, XLSX)

Learn how to add merge fields to DOCX templates and use the square-bracket syntax required in Microsoft Word files.

## Inserting Merge Fields in DOCX Templates

Merge fields pull live Salesforce data into a DOCX template.

They act as placeholders. At generation time, S-Docs replaces them with record values.

### What a DOCX merge field looks like

Use this pattern:

```plaintext
[{{!Object.Field}}]
```

Examples:

```plaintext
[{{!Opportunity.Name}}]
[{{!Opportunity.Account.Name}}]
[{{!Contact.Email}}]
```

DOCX templates require square brackets around the merge field.

DOCX also uses inline formatting syntax inside the field.

### How to add a merge field in a DOCX template

{% stepper %}
{% step %}

### Choose the record value

Identify the object and field you want to merge.

Example: `Opportunity.Name`
{% endstep %}

{% step %}

### Insert the merge field in Word

Place your cursor where the value should appear.

Then insert or type the DOCX merge field syntax:

```plaintext
[{{!Opportunity.Name}}]
```

{% endstep %}

{% step %}

### Add formatting if needed

Formatting stays inside the merge field.

Example:

```plaintext
[{{!Opportunity.Amount #,###.##}}]
```

{% endstep %}

{% step %}

### Upload and test

Upload the `.docx` file to the template.

Generate a document from a real record.

Confirm the value and formatting are correct.
{% endstep %}
{% endstepper %}

### Quick examples

#### Plain text field

```plaintext
[{{!Account.Name}}]
```

#### Parent relationship field

```plaintext
[{{!Opportunity.Account.Name}}]
```

#### Number formatting

```plaintext
[{{!Opportunity.Amount #,###.##}}]
```

#### Date formatting

```plaintext
[{{!Opportunity.CloseDate MM/dd/yyyy}}]
```

#### Merge field inside a conditional block

```plaintext
[<!--RENDER='{{!Opportunity.StageName}}' == 'Closed Won' -->]
  Closed amount: [{{!Opportunity.Amount #,###.##}}]
[<!--ENDRENDER-->]
```

### Quick reference: common DOCX merge field patterns

This is a practical reference for the patterns you will use most.

#### Standard field output

Use square brackets around the field.

```plaintext
[{{!Object.Field}}]
[{{!Opportunity.Account.Name}}]
```

#### Number formatting

Apply the format inside the field.

```plaintext
[{{!Opportunity.Amount #,###.##}}]
[{{!Opportunity.Amount $#,###.00}}]
```

#### Date formatting

Apply the date pattern inside the field.

```plaintext
[{{!Opportunity.CloseDate MM/dd/yyyy}}]
[{{!Opportunity.CreatedDate yyyy-MM-dd}}]
```

#### Replace characters or values

Use `replaceAll` inside the field.

```plaintext
[{{!Contact.LastName replaceAll=\"',\\\\'\"}}]
```

Use `#comma#` if a replacement value must contain a comma.

#### Named query output

Wrap the output field in square brackets.

```plaintext
[{{!TopItem.Name}}]
[{{!TopItem.TotalPrice #,###.##}}]
```

#### Conditional output

Wrap both `RENDER` tags in square brackets.

```plaintext
[<!--RENDER='{{!Contact.Phone}}' != 'NULL' -->]
  Phone: [{{!Contact.Phone}}]
[<!--ENDRENDER-->]
```

### Common issues

* Merge field prints as text because the square brackets are missing
* Field path is wrong or incomplete
* `replaceAll` syntax is malformed
* Query output field is not wrapped in square brackets
* Word proofreading markup breaks generation

{% hint style="warning" %}
If a DOCX file fails to generate, clear Word spelling and grammar marks before upload.
{% endhint %}

### Related articles

* [Microsoft Word (DOCX)](/sdocs/template-architecture/document-formats/docx-s-docs)
* [How to: Create a Table In Microsoft Templates (DOCX, PPTX, XLSX)](/sdocs/advanced-template-logic/related-lists/how-to-create-a-table-in-microsoft-templates-docx-pptx)
* [DOCX Generation Failure: SpellStart](/sdocs/template-architecture/document-formats/docx-s-docs/additional-resources/docx-generation-failure-spellstart)
* [Escape an Apostrophe Correctly in a Merge Field](broken://spaces/WKNnJmhJBQwhdk5WBFsi/pages/6bf519bef231ce5d7d8edc8cd875b27750faa0d7)


# Additional Resources

Use this section when you need a focused solution that does not fit a broader workflow page.

These articles cover uncommon formatting patterns, merge field fixes, and Salesforce-specific template behavior.

Use the links below to jump straight to the issue you need.

{% hint style="info" %}
Use the main workflow sections first when you need end-to-end setup.

Use this section when you already know the specific issue you need to solve.
{% endhint %}

### Start with the path that fits your goal

If a merge field breaks because of punctuation, start with apostrophe handling.

If you need better address output or deeper relationship traversal, use the Salesforce-focused guides.

If rich text adds extra spacing, start with the formatting article.

<table data-card-size="large" data-column-title-hidden data-view="cards"><thead><tr><th>Title</th><th>Description</th><th data-card-target data-type="content-ref">Target</th></tr></thead><tbody><tr><td><strong>Escape an Apostrophe Correctly in a Merge Field</strong></td><td>Prevent merge field failures when field values include apostrophes.</td><td><a href="broken://spaces/WKNnJmhJBQwhdk5WBFsi/pages/6bf519bef231ce5d7d8edc8cd875b27750faa0d7">Broken link</a></td></tr><tr><td><strong>Mailing Address Fields</strong></td><td>Format Salesforce address data with individual field components instead of compound address fields.</td><td><a href="/sdocs/template-architecture/inserting-merge-fields/additional-resources/special-salesforce-mailing-address-fields">Mailing Address Fields</a></td></tr><tr><td><strong>Quickly Traverse Five Levels</strong></td><td>Reference deeper Salesforce relationships in merge fields and SOQL.</td><td><a href="/sdocs/template-architecture/inserting-merge-fields/additional-resources/quickly-traverse-five-levels">Quickly Traverse Five Levels</a></td></tr><tr><td><strong>Rich Text Field Formatting Considerations</strong></td><td>Remove extra spacing and control paragraph tags in rich text output.</td><td><a href="/sdocs/template-architecture/inserting-merge-fields/additional-resources/concerns-with-using-rich-text-field-formatting">Rich Text Field Formatting Considerations</a></td></tr></tbody></table>

### What you can do with additional resources

* Fix merge fields that fail on apostrophes.
* Format mailing addresses with full control over layout.
* Traverse up to five relationship levels in queries and merge fields.
* Clean up rich text spacing in merge fields and related lists.

### Browse by topic

* [Escape an Apostrophe Correctly in a Merge Field](broken://spaces/WKNnJmhJBQwhdk5WBFsi/pages/6bf519bef231ce5d7d8edc8cd875b27750faa0d7)
* [Mailing Address Fields](/sdocs/template-architecture/inserting-merge-fields/additional-resources/special-salesforce-mailing-address-fields)
* [Quickly Traverse Five Levels](/sdocs/template-architecture/inserting-merge-fields/additional-resources/quickly-traverse-five-levels)
* [Rich Text Field Formatting Considerations](/sdocs/template-architecture/inserting-merge-fields/additional-resources/concerns-with-using-rich-text-field-formatting)


# Mailing Address Fields

## Salesforce mailing address fields

Salesforce “address” fields are **compound fields**. They bundle multiple values into one field.

### Use case

You need to show a customer’s mailing address in a template or document.

Examples:

* Emails (transactional and marketing)
* PDFs / generated letters
* Portals and customer-facing UIs

### Problem

Compound address fields (for example, `MailingAddress`, `BillingAddress`, `ShippingAddress`) are convenient to store, but they’re often **hard to format**.

* You can’t reliably control line breaks and punctuation.
* Styling can be inconsistent across channels.
* Parsing the combined value back into parts is fragile.

Salesforce details: <https://developer.salesforce.com/docs/atlas.en-us.api.meta/api/compound\\_fields\\_address.htm>

### Solution

Use the **individual address components** in your template and format them yourself.

Typical components:

* Street
* City
* State/Province
* Postal Code
* Country

In Salesforce objects, these usually appear as field pairs like:

* `MailingStreet`, `MailingCity`, `MailingState`, `MailingPostalCode`, `MailingCountry`

Format and place these fields in the order your audience expects. This gives you consistent rendering and full control over layout.


# Quickly Traverse Five Levels

Salesforce allows SOQL queries and merge fields to traverse up to five relationship levels. Understanding these levels helps leverage existing objects efficiently. Here’s a guide to navigating five levels:

* **Starting Point**: Identify the base object (e.g., Task, Opportunity, Case).
* **Relationship Levels**: Each step represents a related object or field traversed.

### Examples

#### Example 1: Opportunity to User (via Account)

Merge Field:

```
{!Opportunity.Account.Parent.Owner.Profile.Name}
```

**Levels Breakdown**:

1. Opportunity
2. Account (related to Opportunity)
3. Parent (parent Account of Account)
4. Owner (User who owns the parent Account)
5. Profile.Name (Profile name of the User)

#### Example 2: Account to Work Order Line Items

This example SOQL relationship query returns records from the parent object `Account` and its child objects `Contacts`, `Assets`, `WorkOrders`, and `WorkOrderLineItems`.

```sql
SELECT Name,
    (SELECT LastName,
        (SELECT AssetLevel,
            (SELECT Description,
                (SELECT LineItemNumber FROM WorkOrderLineItems)
            FROM WorkOrders)
        FROM Assets)
    FROM Contacts)
FROM Account
```


# Rich Text Field Formatting Considerations

Clean up extra spacing from rich text fields and control paragraph tags in merge fields and related lists.

Rich text fields often create extra spacing in generated documents.

{% hint style="info" %}
This behavior is most common when the rich text value is saved in Lightning Experience.
{% endhint %}

### Problem

Salesforce rich text values usually contain HTML such as `<p>` and `<br>`.

That can cause a few common issues:

* Extra blank lines between paragraphs
* Missing bold or italic styles when Unicode fonts are fully enabled
* Font substitution in PDF output, such as Times New Roman

### Solution 1: Clean up a merge field

Use this pattern when you output a single rich text field directly in the template.

{% code title="merge-field-example.html" %}

```html
<div style="font-family: sans-serif;">{{{!Object.fieldname replaceall="#LT#/p#GT##LT#
p#GT##LT#br#GT#,#LT#br#GT#,#LT#/p#GT##LT#p#GT#,#LT#br#GT#,#LT#p#GT#, ,#LT#/p#GT#, "}}}</div>
```

{% endcode %}

This replaces paragraph tags with single break tags and removes extra spacing.

#### Example

**Field value stored in Salesforce**

```html
<p>First line</p><p><br></p><p>Second line</p>
```

**Rendered output**

```
First line
Second line
```

{% hint style="warning" %}
Set **Unicode enforcement level** to `DATA`.
{% endhint %}

### Solution 2: Remove all paragraph tags in a related list

Use this option when a related list column should render as plain text with line breaks only.

{% code title="related-list-column-remove-all.xml" %}

```xml
<column replaceall="</p><p><br>,<br>,</p><p>,<br>,<p>, ,</p>, ">Description__c</column>
```

{% endcode %}

#### Example

{% code title="related-list-example-remove-all.xml" %}

```xml
<lineitemsSOQL>
  <soql>
    SELECT Description__c
    FROM Custom_Object__c
    WHERE Parent__c = '{{!Parent__c.Id}}'
  </soql>
  <column replaceall="</p><p><br>,<br>,</p><p>,<br>,<p>, ,</p>, ">Description__c</column>
</lineitemsSOQL>
```

{% endcode %}

**Field value stored in Salesforce**

```html
<p>Item one</p><p><br></p><p>Item two</p>
```

**Rendered output**

```
Item one
Item two
```

### Solution 3: Keep the first and last paragraph tags in a related list

Use this option when you want to preserve the outer paragraph wrapper and still remove the extra blank line in the middle.

{% code title="related-list-column-keep-outer.xml" %}

```xml
<column replaceall="</p><p><br>,<br>,</p><p>,<br>">Description__c</column>
```

{% endcode %}

#### Example

{% code title="related-list-example-keep-outer.xml" %}

```xml
<lineitemsSOQL>
  <soql>
    SELECT Description__c
    FROM Custom_Object__c
    WHERE Parent__c = '{{!Parent__c.Id}}'
  </soql>
  <column replaceall="</p><p><br>,<br>,</p><p>,<br>">Description__c</column>
</lineitemsSOQL>
```

{% endcode %}

**Field value stored in Salesforce**

```html
<p>Item one</p><p><br></p><p>Item two</p>
```

**Rendered output**

```html
<p>Item one<br>Item two</p>
```

### Tag reference

Use encoded tokens inside merge fields.

Use literal HTML tags inside related list column attributes.

| Token        | Represents |
| ------------ | ---------- |
| `#LT#p#GT#`  | `<p>`      |
| `#LT#/p#GT#` | `</p>`     |
| `#LT#br#GT#` | `<br>`     |
| `#QUOT#`     | `"`        |
| `#AMP#`      | `&`        |


# Style Templates

Learn how styling works in the S-Docs Template Editor, where to apply CSS, and which guides to use for common design tasks.

## Style Templates

Use this section when you need to control how an S-Docs template looks.

In S-Docs, styling is usually done directly in the **Template Editor**. You can style the document body with HTML and CSS, adjust page-level rendering in template settings, and use generated CSS blocks for features like related lists and PDF-Upload fields.

### How styling works in the Template Editor

Most styling work falls into one of these layers:

1. **Document structure**
   * Build layout with basic tables.
   * This gives you the most predictable output.
2. **CSS in the template body**
   * Add reusable rules in a `<style>` block.
   * Use inline styles for one-off formatting.
3. **Generated styling blocks**
   * Related lists inserted from the editor include CSS classes you can edit.
   * PDF-Upload fields include style controls for positioned text on the uploaded PDF.
4. **Dynamic styling with merge fields**
   * Use merge fields inside CSS when formatting should change by record.
5. **Template settings**
   * Use the editor tabs for page size, margins, preview behavior, and character rendering.

### Recommended approach

Start simple and build from the outside in:

{% stepper %}
{% step %}

### Build the layout first

Use basic tables for the main document structure.

This is the safest approach for PDF-style output.
{% endstep %}

{% step %}

### Add reusable CSS rules

Place shared rules in a `<style>` block near the top of the template.

Use this for fonts, spacing patterns, borders, and repeated classes.
{% endstep %}

{% step %}

### Add targeted inline styling

Use inline styles for single elements that need one-off formatting.

Keep these limited so the template stays easy to maintain.
{% endstep %}

{% step %}

### Add dynamic styling only when needed

Use merge fields inside CSS for values like colors, widths, or display states.

This is useful when formatting depends on Salesforce data.
{% endstep %}

{% step %}

### Finish with template-level settings

Use Page Settings and Document Options for page dimensions, margins, preview setup, and Unicode support.
{% endstep %}
{% endstepper %}

### Best practices

Keep these rules in mind when styling S-Docs templates:

* Use table-based layout, even for headers and footers.
* Avoid web-style layouts that depend on modern browser behavior.
* Prefer percent-based column widths over fixed pixels.
* Avoid margins when table spacing will do the job better.
* Minimize tags with built-in browser styling.
* Test preview output early with realistic record data.

{% hint style="info" %}
If a design needs exact visual placement on top of an existing form, use a PDF-Upload template. If you need more flexible layout control, use a standard template and style it in the body.
{% endhint %}

### Start with these guides

* [S-Docs Template Development Best Practices](/sdocs/template-architecture/template-authoring/s-docs-template-development-best-practices) for layout and CSS conventions.
* [Related List Tables and CSS](/sdocs/template-architecture/template-authoring/related-list-tables-and-css) for styling generated related list tables.
* [CSS Styling with Merge Fields](/sdocs/template-architecture/template-authoring/css-styling-with-merge-fields) for data-driven styling.
* [How to Add a Background Image or Watermark](/sdocs/template-architecture/template-authoring/how-to-add-a-background-image-or-watermark) for page background styling.
* [Template Formatting and Design](/sdocs/template-architecture/template-settings/header-and-footer-tabs) for page sizes, Unicode support, and preview setup.

### Common styling tasks

#### Change fonts, spacing, borders, or alignment

Do this in the template body with table markup, CSS classes, and inline styles.

#### Style a related list table

Insert the related list in the editor, then edit the generated CSS classes for the table, columns, and alternating rows.

#### Make styling depend on Salesforce data

Use merge fields inside a style attribute or CSS rule.

Example uses:

* Background color from a field
* Conditional text color
* Dynamic width for a progress-style bar

#### Add a background image or watermark

Use a background style rule on the page body.

#### Fix international character rendering

Use **Document Options** to enable Unicode support and adjust enforcement when needed.

### When to use which method

* Use **body CSS** for most visual formatting.
* Use **related list CSS** when the editor generates the table for you.
* Use **merge fields in CSS** when styling must change per record.
* Use **template settings** for page behavior and rendering controls.
* Use **PDF-Upload field styling** when placing fields on a fixed PDF design.


# Related List Tables and CSS

{% hint style="info" %}
This article refers to the standard related lists generated from the “Insert Related List” button in the template editor.
{% endhint %}

When inserting a related list, you will find the CSS block included. It will look something like this:

{% code overflow="wrap" %}

```
<style type="text/css">
table.table876 {border:solid black 1px;border-collapse:collapse;border-spacing:0px;font-family:Arial,Helvetica,sans-serif;font-size:10pt;width:100%;}
.table876header {text-align:center;border:solid black 1px;color:#ffffff;background-color:#000000;}
.table876footer {text-align:right;font-weight:bold;border:solid black 1px;height:30px;}
.table876RowEven{border:solid black 1px;background-color:#2ecc71;}
.table876RowOdd{background-color:#cdcdcd;border:solid black 1px;}
.table876col0{border:solid black 1px;text-align:left;}
.table876col1{border:solid black 1px;text-align:left;}
.table876col2{border:solid black 1px;text-align:left;}
</style>
```

{% endcode %}

What does this translate to for the table itself being generated?

* The “table.table876” attribute will contain the CSS that can style the entire table.
* The “.table876col#” attribute will contain the CSS that can style the 1st column. Each column is designated by a number after “col” and it starts at 0.
* Additionally, “.table876RowEven” and “.table876RowOdd” are used to style the odd/even rows of the table. This allows you to have things like alternating background colors for your table.

While this is standard-looking CSS, and it is, this is what S-Docs looks for when styling related list tables and the formatting is done to specifically format those tables. The table generator expects to see the above CSS to style the table, otherwise you will get basic defaults for all styling.


# S-Docs Template Development Best Practices

{% stepper %}
{% step %}

### Put everything inside basic tables, even headers and footers

Keep all layout and structure within basic HTML tables.
{% endstep %}

{% step %}

### Don’t use the same styling as a modern website.

Avoid modern webpage styling; prefer email/template-safe, table-based styles.
{% endstep %}

{% step %}

### Standard recommended style statement for a table

Use the following table declaration as the recommended starting point:

{% code title="Recommended table style" %}

```html
<table border="0" cellpadding=“0” cellspacing="0" style="border-collapse: collapse; border: none; font-family:Arial Unicode MS,sans-serif; font-size: 9pt; width: 100%;">
```

{% endcode %}
{% endstep %}

{% step %}

### Avoid using elements that have built-in styling

Do not use `<p>`, `<th>`, `<ul>`, `<li>`, or anything that has built-in browser styling.
{% endstep %}

{% step %}

### Only use `<span>` when necessary

Prefer minimal inline elements; reserve `<span>` for when it's required.
{% endstep %}

{% step %}

### Font-family considerations

Note: `Arial Unicode MS` sometimes will not show bolded text in Chrome's PDF preview, but it will once the template is downloaded.
{% endstep %}

{% step %}

### Avoid using margin

For spacing, prefer table-based techniques:

* For horizontal spacing use:

  <pre class="language-html" data-title="Horizontal spacing example"><code class="lang-html">&#x3C;tr>&#x3C;td style="line-height:20px;width:100%;">&#x26;nbsp;&#x26;nbsp;&#x3C;/td>&#x3C;/tr>
  </code></pre>
* Use extra blank columns for side margins.
  {% endstep %}

{% step %}

### Use percent for column widths

For column widths use percent values instead of px.
{% endstep %}
{% endstepper %}


# Adding a Background Image or Watermark

To add a background image or a watermark to your template, you’ll need to insert a small block of CSS styling into your document’s `<head>` section.

### Implementation

Copy and paste the code block below. This snippet ensures your image remains centered, fixed in place, and doesn't repeat across the page.

```
<style type="text/css">
  body {
    background-image: url("https://your.image.url");
    background-attachment: fixed; 
    background-position: center; 
    background-repeat: no-repeat;
    background-size: 400px; /* Adjust size as needed */
  }
</style>
```

### Quick Tips for Best Results:

* Image URL: Replace the placeholder URL with the direct link to your hosted image.
* Sizing: The `background-size` property is set to `400px`. You can change this to `cover` if you want the image to fill the entire screen, or adjust the pixel count to fit your watermark's design.
* Opacity: If the image is too bold and makes the text hard to read, you may want to use a pre-faded image file (PNG) for a true "watermark" effect.


# CSS Styling with Merge Fields

This how-to article will explain how you would use merge fields to add a layer of styling that could be tied to an object.

### ![thinking face](https://pf-emoji-service.prod-east.frontend.public.atl-paas.net/assets/standard/ef8b0642-7523-4e13-9fd3-01b65648acf6/32x32/1f914.png) Example Use Case <a href="#example-use-case" id="example-use-case"></a>

You have an object that has a specific field tied to a CSS element.

Example: An opportunity has a field you’d like to utilize as a CSS attribute. In this case, the opportunity has a Color field and a color associated with it.

![blue book](https://pf-emoji-service.prod-east.frontend.public.atl-paas.net/assets/standard/ef8b0642-7523-4e13-9fd3-01b65648acf6/32x32/1f4d8.png) Instructions

{% stepper %}
{% step %}
**Create the field**

* Go to Setup > Object Manager > the object you wish to update
* Go to Fields & Relationships and click the New button to create a new field
* Set as Text with a length of 255
  {% endstep %}

{% step %}
**Set the CSS attribute on the record**

* Go to the record you wish to update
* Add the CSS attribute to the field you just created (ex: #C2BFA5)
  {% endstep %}

{% step %}
**Leverage the CSS attribute in a template**

```
<div style="background-color:{{!Opportunity.test_color__c}};">TEST TEXT</div>
```

{% endstep %}
{% endstepper %}

#### Output

<figure><img src="https://1548664070-files.gitbook.io/~/files/v0/b/gitbook-x-prod.appspot.com/o/spaces%2FWKNnJmhJBQwhdk5WBFsi%2Fuploads%2FvxfiJ9N1A1LIbOH40Hzn%2Fimage.png?alt=media&amp;token=508ff7d6-c16f-42f4-bc8a-2cfa0e9ef2a6" alt=""><figcaption></figcaption></figure>

{% hint style="info" %}
There can be many other uses for CSS merge fields, this is just a single example.
{% endhint %}


# Table Formatting: How-To Guide

A practical guide for resolving common table formatting issues in S-Docs templates across DOC, DOC-NEW, and PDF formats.

***

### 1. Reducing Row and Cell Spacing

Applies to: `DOC`, `DOC-NEW`, `PDF`

Problem: Tables display excessive whitespace between rows or within cells.

Fix: Apply specific CSS and HTML attributes to the `<table>`, `<th>`, and `<td>` elements to collapse the default spacing.

**On `<th>` and `<td>` elements:**

Reduces spacing inside individual cells.

HTML

```
<td cellpadding="0" cellspacing="0" style="padding: 0; margin: 0;">
```

**On the `<table>` element:**

Reduces spacing between rows.

HTML

```
<table border-spacing="0" style="padding: 0; margin: 0;">
```

{% hint style="info" %}
If a `width` attribute is set on the table, the renderer may add spacing to fill that width. Try removing or reducing the width value if spacing persists after applying the styles above.
{% endhint %}

***

### 2. Handling Content Overflow & Dynamic Spacing

Problem: Tables don't auto-adjust when large amounts of data are pulled in, causing overflow or inconsistent gaps.

Fix: Use CSS as the primary tool for control. It offers more precision than DOCX but requires manual styling.

* Explicit Control: Use CSS on `<table>`, `<tr>`, `<td>`, and `<th>` elements to strictly define overflow behavior.
* Flatten Components: Avoid nesting components that contain tables inside another table. This often causes unpredictable spacing.
* Refactor Nested Layouts: If a template uses inserted components (e.g., for Plaintiff/Defendant sections), isolate and rework those components to remove table nesting.

***

### 3. Resolving Gaps in Dynamic Tables (LineItemsSOQL)

Problem: A gap appears between columns even when padding and spacing are set to zero.

Fix: This is usually a CSS conflict. Audit your template's inline styles for conflicting width, padding, or border declarations.

Checklist for success:

1. Ensure inner `<table>` elements have `width: 100%` and `border-collapse: collapse`.
2. Confirm `cellpadding="0"` and `cellspacing="0"` are applied to both outer and inner tables.
3. Verify no border/padding on a `<td>` is overriding the inner table layout.

Clean Inner Table Setup Example:

HTML

```
<table border="0" cellpadding="0" cellspacing="0" style="border-collapse: collapse; width: 99%;">
```

***

### 4. Fixing Overflow in PDF Documents

Problem: PDF tables do not auto-adjust cell sizes, causing text or images to bleed outside the table or page boundaries.

#### Text Overflow

Use the `breakeverynchars` attribute on your field column to force line breaks.

XML

```
<column breakeverynchars="40">YourFieldName__c</column>
```

#### Table Width Overflow & Missing Borders

Convert hardcoded pixel widths to percentage-based widths.

| **❌ Avoid**                     | **✅ Use**                     |
| ------------------------------- | ----------------------------- |
| `<table style="width: 600px;">` | `<table style="width: 99%;">` |

Alternatively, you can also add a 1px right margin to bring the table in 1px from the right with minimal impact for formatting.

{% code overflow="wrap" %}

```
table.table123 {margin-right:1px;}
```

{% endcode %}

***

#### Image Overflow

Locate the image tag and replace hardcoded widths with percentages:

HTML

```
<img src="..." style="width: 100%;" />
```

{% hint style="info" %}
If images are pasted into rich text fields by users, S-Docs cannot resize them automatically. You may need to use an Apex class or validation rules to enforce size limits at the point of upload.
{% endhint %}

***

### 5. Dynamic Table Solutions Summary

#### Use `allprefix` / `allpostfix` Instead of `prefix` / `postfix` for Nullable Fields

When a column has a `render` condition and the field value is null, `prefix` and `postfix` are only injected when the value is not null. This means closing tags like `</td></tr>` get swallowed entirely, breaking the table row structure. The fix is to use `allprefix` / `allpostfix` instead — these always render regardless of whether the field value is null, ensuring the row's HTML is always complete and valid.

{% hint style="info" %}
Attributes like prefix/postfix only show if the column value is not null. Use allprefix/allpostfix to ensure all table code is always inserted.
{% endhint %}

#### Avoid Inline Font-Family Quotes in Dynamic Columns

Fonts like `'Trebuchet MS'` use single quotes in CSS — and when embedded inside S-Docs `prefix` / `postfix` attribute strings (which are themselves single-quoted), this causes silent parsing issues. If border or row problems persist even after other fixes, move the font styling to a CSS class rather than embedding it inline in the column tag. This avoids quote-collision bugs that can be very hard to track down.

#### Transposing Data (Rows as Fields, Columns as Records) Requires a Structural Rethink

The standard `LineItemsSOQL` tag outputs one row per record. When the requirement is the *opposite* — field names as rows and each record as a column — a direct dynamic table won't achieve this out of the box. The solution is to build the static row structure in HTML first (one `<tr>` per field label), then use the dynamic SOQL tag to inject values into the correct column positions. With a known fixed number of records (e.g., exactly 3), this is entirely achievable by pre-defining the column layout.

#### Nested / Grouped Tables with Callable Apex or Related Lists

When the requirement is to group line items by a parent value (e.g., a Service SKU) and render a sub-table of child records beneath each parent, there are two approaches:

* Callable Apex — the most flexible route for complex grouping logic, allowing you to structure data into parent/child collections before it reaches the template
* Related List with a Formula Field — a simpler option that can work around the single-field `GROUP BY` limitation without requiring custom Apex, depending on the data model

Both options were validated as viable paths, with the choice depending on complexity and how far along the implementation is.

#### Dynamic Page-per-Item Layout with Conditional Section Display

For templates where each queried record needs its own page, the approach involves combining a component-based SOQL query with page break styling and careful use of static vs. dynamic sections:

* Elements that should appear only once (e.g., a header with spec number and revision) are placed *outside* the repeating block
* For dynamic item counts (e.g., total pages), a Salesforce formula field counting related records is the most reliable approach, as S-Docs doesn't natively expose a record count variable

***

### 6. Managing Table Page Breaks in S-Docs

This guide covers common issues and solutions for controlling how tables break across pages, specifically when dealing with borders, headers, and Callable Apex.

#### Basic Page Break Prevention

Issue: Prevent page breaks from splitting rows within a specific table.

Solution: Apply `page-break-inside: avoid` directly to the `<table>` tag.

HTML

```
<table style="page-break-inside: avoid">
  </table>
```

{% hint style="info" %}
Caveat: This works best when the table is small enough to fit on a single page. If the table is larger than one page, the entire element may be pushed to the next page, creating large gaps in your document.
{% endhint %}

***

#### Related List Flow & Repeating Headers

Issue: Ensuring related list rows flow naturally to the next page and headers repeat for readability.

Solution:

* Automatic Flow: S-Docs automatically breaks related list tables across pages by default—no special configuration is required.
* Repeating Headers: To repeat headers on every page, you must modify the template using the `sd:repeatheader` attribute.
* Manual Breaks: If you need to force a break for the entire table (rather than just repeating headers), apply the property to the `<table>` or `<tbody>` tags.

***

#### Complex Tables with Borders (Callable Apex)

Issue: Maintaining clean borders when a table spans multiple pages (e.g., ensuring a bottom border on Page 1 and a top border on Page 2).

#### Tested Solutions & Results

| **Approach**               | **Result**                                                                                                            |
| -------------------------- | --------------------------------------------------------------------------------------------------------------------- |
| Avoid on `<table>`         | Pushes entire table; loses bottom border on Page 1.                                                                   |
| Avoid on `<tbody>`         | Content still pushes rather than breaking cleanly.                                                                    |
| Avoid on `<tr>` and `<td>` | Success! Rows are pushed to the next page only if they would break in the middle, preserving individual cell borders. |
| CSS Classes                | Failed when using Callable Apex. The CSS was ignored.                                                                 |
| LIMIT/OFFSET               | Impractical for dynamic or user-driven row counts.                                                                    |

#### Final Recommendations for Borders

1. Inline Styling: For tables generated via Callable Apex, avoid CSS classes. Apply `style="page-break-inside: avoid"` directly to the `<tr>` or `<td>` tags.
2. sd:repeatheader: This is the best workaround for top borders. By repeating the `<thead>`, you ensure a top border exists on every new page.
   * *Note: The missing bottom border on the preceding page remains a known limitation.*
3. Component Templates (Method 2): Use Component Templates so each row renders independently. This allows row-level "avoid" logic to function most reliably.

***

#### 💡 TL;DR: Summary of What Works

* Small Tables: Use `page-break-inside: avoid` on the `<table>` or `<tbody>`.
* Row-Level Control: Apply `page-break-inside: avoid` directly to `<tr>` and `<td>` tags.
* Headers/Top Borders: Use the sd:repeatheader pattern from the KB.
* Callable Apex: Use inline styles or Method 2 components, as external/global CSS classes may not render correctly.

{% hint style="info" %}
Reference: For detailed implementation of headers, see the KB article: *Configure a Multi-Page Table to Repeat Its Header on Every Page.*
{% endhint %}

***

### Negative Currencies & RTF Table Layouts

This page covers formatting issues within S-Docs tables, specifically regarding negative currency notation and layout disruptions caused by Rich Text fields.

#### Formatting Negative Currency Values

Issue: Negative values render in accounting notation—e.g., `($500)`—instead of the standard negative sign format—e.g., `-$500`.

Solution: Add a hyphen (`-`) to the beginning of the `format-number` mask within the `<column>` tag. S-Docs recognizes this character as the indicator for negative sign formatting and will only apply it when the value is less than zero.

Correct Syntax:

HTML

```
<column prefix="$" format-number="-#,###.##">test.unitprice</column>
```

***

#### Layout Breaks with `type="rtf"`

Issue: When `type="rtf"` is applied to a table column (to handle Rich Text Area fields), the layout often breaks or `postfix` attributes (like `%`) fail to render correctly.

Cause:

S-Docs injects `<p>` (paragraph) tags when processing RTF content. These tags create block-level elements that push the `postfix` content to a new line or disrupt the table cell alignment.

Solution:

Use the `strip-html="true"` attribute on the column. This removes the injected `<p>` tags before the postfix is applied, allowing the data and the postfix to sit on the same line.

Correct Syntax:

XML

```
<column postfix="%" strip-html="true">test.unitprice</column>
```

***

#### 💡 Summary Table

| **Issue**           | **Cause**                    | **Fix**                         |
| ------------------- | ---------------------------- | ------------------------------- |
| ($100) vs -$100     | Default accounting format    | Use `format-number="-#,###.##"` |
| Broken Postfix (%)  | Injected `<p>` tags from RTF | Use `strip-html="true"`         |
| Layout Misalignment | Block-level HTML in cells    | Use `strip-html="true"`         |

{% hint style="info" %}
When dealing with Rich Text fields, `strip-html="true"` is often more reliable than `type="rtf"` if you only need the text content without the original HTML styling.
{% endhint %}


# Configure Template Settings

Welcome to the Template Settings hub! Once you have created the basic shell of your template and added your Salesforce merge fields, the S-Docs Template Editor gives you incredible control over how that document behaves.

Using the various configuration tabs inside the Template Editor, you can automate follow-up tasks, lock down security settings, change how the page visually renders, and even prompt users for custom data during generation.

<figure><img src="https://1548664070-files.gitbook.io/~/files/v0/b/gitbook-x-prod.appspot.com/o/spaces%2FWKNnJmhJBQwhdk5WBFsi%2Fuploads%2FvwLzpeuCImcPeiLAj2UM%2Fimage.png?alt=media&amp;token=f565bad3-c781-47bb-88e4-322793f8f487" alt=""><figcaption></figcaption></figure>

Because there are so many powerful configurations available, we have broken them down into specific, goal-oriented guides. Choose the category below that matches what you are trying to build:

### 1. Template Formatting and Design

Start here when you need to control how a document visually renders on the page.

* Learn how to: Configure custom page sizes (like mailing labels or business cards), handle international and non-English characters, and set up a live preview of your template using real Salesforce record data.
* Start with [Header And Footer Tabs](/sdocs/template-architecture/template-settings/header-and-footer-tabs) and [Page Settings Tab](/sdocs/template-architecture/template-settings/page-settings-tab).

### 2. Output and Automation Settings

Configure these settings to control what happens in the background the moment a user clicks "Generate."

* Learn how to: Create dynamic file names using Salesforce data, automatically attach generated documents to your Salesforce records (Files or Attachments), and automatically create follow-up tasks for your users.
* Continue with [Document Options Tab](/sdocs/template-architecture/template-settings/document-options-tab).

### 3. Email Delivery and Security

If you are sending documents directly out of Salesforce, these settings are critical for maintaining brand consistency and data security.

* Learn how to: Send emails from official Org-Wide Addresses (like `sales@yourcompany.com`), lock specific email fields so users cannot change them, and restrict outbound emails to approved domains.
* Open [Email Settings Tab](/sdocs/template-architecture/template-settings/email-settings-tab).

### 4. Advanced User Interactions

Sometimes a template needs to be flexible. These settings allow you to give your end-users controlled input during or immediately after the generation process.

* Learn how to: Create Runtime Prompts to ask users for specific information (like a delivery date or custom discount) during generation, and enable Live Edit to let users make minor text tweaks to the final document.
* Open [Broken mention](broken://spaces/v7v0UNK83URKB2C83QVU/pages/LOLVSUolwsbKl6uMKObi)

### 5. Template Lifecycle Management

This is an essential guide for Salesforce Administrators who need to manage their templates across multiple environments.

* Learn how to: Safely export a completed template from your Sandbox and import it into your Production org, including a checklist of prerequisites and troubleshooting steps for common migration errors.
* Open [Advanced Options Tab](/sdocs/template-architecture/template-settings/advanced-options-tab).


# Header And Footer Tabs

Use the Header and Footer tabs to add repeating content above and below the document body, including first-page-only and remaining-page layouts.

Use this section when you need content that repeats at the top or bottom of a generated document.

The **Header** and **Footer** tabs control content outside the main template body. Use them for letterhead, page numbers, disclaimers, branding, and other repeated elements.

In PDF templates, you can define one header or footer for the first page and another for the remaining pages. S-Docs places the document body between those regions during generation and repeats each section based on your settings.

{% hint style="info" %}
These settings belong to the parent PDF template. Component templates do not include Header or Footer tabs.
{% endhint %}

### How it works

* Add first-page content when page 1 needs a unique layout.
* Add remaining-page content when later pages should differ.
* Enable the first-page option for all pages when you want one consistent header or footer throughout the document.

### Common uses

* Show letterhead only on page 1.
* Repeat page numbers or legal text on every page.
* Keep branding outside the main body content.

### Related guides

* [Generating different headers on different pages in PDF templates](/sdocs/maintenance-and-troubleshooting/additional-troubleshooting/generating-different-headers-on-different-pages-in-pdf-templates)
* [Adding Headers & Footers from Components in PDF Templates](/sdocs/advanced-template-logic/build-reusable-templates/component-template-how-to-article/adding-headers-footers-from-components-in-pdf-templates)


# Multiple Pages with Different Page Margins

Use page-specific CSS and \`pagebody\` tags to apply different margins or orientation within one PDF template.

Use page-specific CSS when one PDF template needs different margins across pages.

This approach also works when one section needs a different page orientation.

### Problem

You need one generated PDF to use more than one page layout.

Common examples:

* a cover page with wide margins
* an embedded section with no margins
* a landscape page between portrait pages

Standard `body` styling is not enough for this case.

### Solution

Define named `@page` rules in CSS.

Then wrap each section in a `<pagebody>` tag with a matching class name.

S-Docs converts each `<pagebody>` tag to a `body` tag at runtime.

{% code title="multi-page-margins-example.html" %}

```html
<style type="text/css">
@page parentTemplate {
  margin: 1in;
}

body.parentTemplate {
  page: parentTemplate;
}

@page componentTemplate {
  margin: 0in;
  size: landscape;
}

body.componentTemplate {
  page: componentTemplate;
}
</style>

<pagebody class="parentTemplate">
Test Page 1
</pagebody>

<pagebody class="componentTemplate">
Test Page 2
</pagebody>

<pagebody class="parentTemplate">
Test Page 3
</pagebody>
```

{% endcode %}

### How it works

* `@page parentTemplate` sets the first margin profile.
* `@page componentTemplate` sets the second profile.
* `body.parentTemplate` and `body.componentTemplate` map each section to a page profile.
* Each `<pagebody>` block starts a new page context with its assigned settings.

### Example result

In the example above:

* **Test Page 1** uses `1in` margins
* **Test Page 2** uses `0in` margins and landscape orientation
* **Test Page 3** returns to `1in` margins

### Tips

* Keep each `<pagebody>` section self-contained.
* Use clear CSS names when you define multiple page layouts.
* Test the final PDF output, not just template preview.

### Related resources

* Review [PDF Rendering Considerations](/sdocs/template-architecture/document-formats/pdf-templates/pdf-rendering-considerations) for broader PDF limitations.
* Review MDN's [CSS `@page` reference](https://developer.mozilla.org/en-US/docs/Web/CSS/@page) for supported page-rule syntax.


# Page Settings Tab

Use Page Settings to control page size, orientation, margins, and measurement units in the Template Editor.

Use this page when you need to control the physical layout of a generated document.

**Page Settings** defines the page canvas before you style the template body.

Use it to choose page orientation, set a custom size, and control the printable area with margins.

{% hint style="info" %}
This tab covers page dimensions only.

Unicode settings live in [How to Handle International Characters](/sdocs/template-architecture/template-settings/document-options-tab/how-to-handle-international-characters).

Preview setup lives in [How to Set Up Template Preview](/sdocs/template-architecture/template-settings/advanced-options-tab/how-to-set-up-template-preview).
{% endhint %}

### What you can configure in Page Settings

The Page Settings tab includes these fields:

* **Page Layout** — choose **Portrait**, **Landscape**, or **Custom**.
* **Page Width** — set a custom page width when **Page Layout** is **Custom**.
* **Page Height** — set a custom page height when **Page Layout** is **Custom**.
* **Top Margin** — control space above the document body.
* **Bottom Margin** — control space below the document body.
* **Left Margin** — control space on the left side of the page.
* **Right Margin** — control space on the right side of the page.
* **Unit** — choose `inches`, `centimeters`, or `pixels`.

### What you can do on this tab

Use these settings to:

* switch between standard portrait and landscape output
* create custom page sizes for labels, cards, forms, or regional paper formats
* adjust margins for letterhead, binding, printers, and fixed-layout designs
* match layout requirements before you style the template body

###

{% hint style="info" %}
If you are using a template type built on a fixed uploaded PDF, page-level layout controls work differently.

Use [Upload Existing PDFs](/sdocs/template-architecture/document-formats/pdf-upload-format) when exact overlay placement matters more than page-size configuration.
{% endhint %}


# Page Settings Quick Reference

These settings control the physical dimensions and margins of your generated document.

#### Page Layout

**Purpose:** Set overall page orientation and dimensions

**Options:**

| Value     | Description                   | Dimensions             |
| --------- | ----------------------------- | ---------------------- |
| Portrait  | Standard vertical orientation | 8.5" × 11" (US Letter) |
| Landscape | Horizontal orientation        | 11" × 8.5" (US Letter) |
| Custom    | User-defined dimensions       | Any size               |

**Behavior:**

* Selecting Portrait or Landscape locks width and height fields
* Custom allows manual entry of dimensions
* Changing layout resets margins to defaults

***

#### Page Width

**Purpose:** Set the width of the page

**Syntax:** Numeric value

**Units:** Inches, Centimeters, or Pixels (based on Unit setting)

**Default:** 8.5 inches (Portrait), 11 inches (Landscape)

**Range:**

* Minimum: 1 inch (or equivalent)
* Maximum: 200 inches (or equivalent)
* Practical maximum: 17 inches (tabloid size)

**Examples:**

```
US Letter: 8.5 inches
A4: 21 cm
Business Card: 3.5 inches
Envelope: 9.5 inches
```

**Notes:**

* Only editable when Page Layout is "Custom"
* Consider printer capabilities
* Very large pages may have performance impact

***

#### Page Height

**Purpose:** Set the height of the page

**Syntax:** Numeric value

**Units:** Inches, Centimeters, or Pixels (based on Unit setting)

**Default:** 11 inches (Portrait), 8.5 inches (Landscape)

**Range:**

* Minimum: 1 inch (or equivalent)
* Maximum: 200 inches (or equivalent)
* Practical maximum: 14 inches (legal size)

**Examples:**

```
US Letter: 11 inches
A4: 29.7 cm
Business Card: 2 inches
Legal: 14 inches
```

**Notes:**

* Only editable when Page Layout is "Custom"
* Affects pagination and content flow
* Must accommodate margin settings

***

#### Top Margin

**Purpose:** Set space between top of page and content

**Syntax:** Numeric value

**Units:** Inches, Centimeters, or Pixels (based on Unit setting)

**Default:** 1 inch

**Typical Range:** 0.25 to 3 inches

**Examples:**

```
Standard: 1 inch
Letterhead: 2 inches
Minimal: 0.5 inches
Legal: 1.25 inches
```

**Notes:**

* Increased for pre-printed letterhead
* Minimum often limited by printer (typically 0.25")
* Affects header placement
* Consider header height when setting

***

#### Bottom Margin

**Purpose:** Set space between bottom of page and content

**Syntax:** Numeric value

**Units:** Inches, Centimeters, or Pixels (based on Unit setting)

**Default:** 1 inch

**Typical Range:** 0.25 to 2 inches

**Examples:**

```
Standard: 1 inch
Minimal: 0.5 inches
Footer space: 1.5 inches
```

**Notes:**

* Consider footer content when setting
* Affects pagination
* Minimum often limited by printer

***

#### Left Margin

**Purpose:** Set space between left edge and content

**Syntax:** Numeric value

**Units:** Inches, Centimeters, or Pixels (based on Unit setting)

**Default:** 1 inch

**Typical Range:** 0.25 to 2 inches

**Examples:**

```
Standard: 1 inch
Binding edge: 1.5 inches
Minimal: 0.75 inches
```

**Notes:**

* Increase for binding/hole punches
* Affects text alignment and readability

***

#### Right Margin

**Purpose:** Set space between right edge and content

**Syntax:** Numeric value

**Units:** Inches, Centimeters, or Pixels (based on Unit setting)

**Default:** 1 inch

**Typical Range:** 0.25 to 1.5 inches

**Examples:**

```
Standard: 1 inch
Minimal: 0.75 inches
Symmetric: 1 inch (same as left)
```

**Notes:**

* Often matches left margin for balance
* Affects line length and readability

***

#### Unit

**Purpose:** Set measurement unit for all dimension fields

**Options:**

| Value       | Description          | Use Case                |
| ----------- | -------------------- | ----------------------- |
| inches      | Imperial measurement | US documents            |
| centimeters | Metric measurement   | International documents |
| pixels      | Screen measurement   | Digital-only documents  |

**Conversion:**

* 1 inch = 2.54 centimeters
* 1 inch = 96 pixels (at 96 DPI)

**Notes:**

* Changing units converts all existing values
* Pixels less common for print documents
* Use inches for US, cm for international


# How to Configure Custom Page Sizes

Configure custom page dimensions, units, and margins for labels, cards, letterhead, and international paper sizes.

Use custom page sizes when standard page layouts do not match your output.

This is useful for mailing labels, business cards, letterhead, and international paper formats.

### Set a custom page size

{% stepper %}
{% step %}

### Open page settings

Open the **Page Settings** tab in the Template Editor.
{% endstep %}

{% step %}

### Switch to a custom layout

Set **Page Layout** to **Custom**.
{% endstep %}

{% step %}

### Enter the page dimensions

Set **Page Width** and **Page Height**.

Choose the unit that matches your dimensions.
{% endstep %}

{% step %}

### Adjust margins

Set the top, bottom, left, and right margins.

Use smaller margins only when your printer supports them.
{% endstep %}

{% step %}

### Save and test

Save the template.

Generate a test document before rollout.
{% endstep %}
{% endstepper %}

### Common setups

#### A4 paper

Use these values for standard international A4 output:

1. Set **Page Layout** to **Custom**.
2. Set **Page Width** to `21`.
3. Set **Page Height** to `29.7`.
4. Set **Unit** to `centimeters`.
5. Save the template.

#### Mailing labels

Use these values for a three-column US letter label layout:

1. Set **Page Layout** to **Custom**.
2. Set **Page Width** to `8.5`.
3. Set **Page Height** to `11`.
4. Set **Unit** to `inches`.
5. Set **Top Margin** to `0.5`.
6. Set **Left Margin** and **Right Margin** to `0.25`.
7. Build the template body as a three-column table.
8. Save the template.

#### Business cards

Use these values for a standard business card layout:

1. Set **Page Layout** to **Custom**.
2. Set **Page Width** to `3.5`.
3. Set **Page Height** to `2`.
4. Set **Unit** to `inches`.
5. Set all margins to `0`.
6. Save the template.

#### Pre-printed letterhead

Use margin settings to leave room for the printed header area:

1. Keep **Page Layout** set to **Portrait**.
2. Set **Top Margin** to `2`.
3. Set **Bottom Margin** to `1`.
4. Set **Left Margin** and **Right Margin** to `0.75`.
5. Save the template.

### Common page sizes reference

| Format        | Width | Height | Unit   | Use case                |
| ------------- | ----- | ------ | ------ | ----------------------- |
| US Letter     | 8.5   | 11     | inches | Standard US documents   |
| A4            | 21    | 29.7   | cm     | International documents |
| Legal         | 8.5   | 14     | inches | Legal documents         |
| Tabloid       | 11    | 17     | inches | Large reports           |
| Business Card | 3.5   | 2      | inches | Business cards          |
| Envelope #10  | 9.5   | 4.125  | inches | Envelope layouts        |

{% hint style="info" %}
`1 inch = 2.54 cm`.
{% endhint %}

### Tips

* Use **Landscape** for wide output.
* Test print before production.
* Printers often require at least `0.25` inch margins.


# Document Options Tab

Use Document Options to control output names, storage, edit behavior, and general generation settings.

Use **Document Options** to control what happens after a user clicks **Generate**.

This tab controls how documents are named, saved, edited, archived, and handled during generation.

{% hint style="info" %}
Use **Document Options** for file behavior and general generation settings.

Use **Email Settings** for email recipients and sender controls.

Use **Create Salesforce Task** for follow-up task automation.
{% endhint %}

### What you can configure in Document Options

The **Document Options** tab includes three main areas:

* **Attachment & File Name Options** — control the generated file name.
* **Attachment & File Options** — control where the generated document is saved and whether users can edit it.
* **Other Options** — control Unicode, warnings, redirects, archive limits, and validation behavior.

### Attachment and file name options

Use this section when you need predictable output names.

| Label                               | Description                                                                                                                                                         |
| ----------------------------------- | ------------------------------------------------------------------------------------------------------------------------------------------------------------------- |
| **Attachment and File Name Format** | Set a custom generated file name, replace generic numbered file names with record-based names, and keep naming consistent across downloads, attachments, and files. |

Use single-brace syntax in file name formulas: `{!Object.Field}`.

Related guide:

* [How to Create Dynamic File Names](/sdocs/template-architecture/template-settings/document-options-tab/how-to-create-dynamic-file-names)

### Attachment and file options

Use this section to decide what S-Docs saves after generation.

| Label                                                             | Description                                                           |
| ----------------------------------------------------------------- | --------------------------------------------------------------------- |
| **Create Salesforce Attachment and link to record**               | Create a legacy **Salesforce Attachment** and link it to the record.  |
| **Create Salesforce File and link to record**                     | Create a **Salesforce File** and link it to the record.               |
| **Create Salesforce Attachment only when emailed**                | Create an attachment only when the document is emailed.               |
| **Delete related Salesforce Attachment/File upon S-Doc deletion** | Delete related files or attachments when the S-Doc record is deleted. |
| **Allow Edit**                                                    | Enable **Live Edit** for generated documents.                         |
| **Allow naming of new Salesforce Attachment with each edit**      | Let users rename attachments created during edits.                    |
| **Create new Salesforce Attachment with each edit**               | Create a new attachment on each edit.                                 |
| **Show Content Version JSON field**                               | Show the file metadata mapping field.                                 |
| **Content Version Field Assignment JSON**                         | Map custom metadata to the generated Salesforce File.                 |

Use **Salesforce Files** for most new implementations.

Use legacy attachments only when another process still depends on them.

Related guides:

* [How to Auto-Attach Documents to Records](/sdocs/template-architecture/template-settings/document-options-tab/how-to-auto-attach-documents-to-records)
* [How to Map Custom Metadata to Salesforce Files (ContentVersion)](broken://spaces/WKNnJmhJBQwhdk5WBFsi/pages/iZVtSM5qJQBpRTPtUd7e)
* [How To: Editing Generated Documents](/sdocs/automation-and-document-lifecycle/workflows/editing-generated-documents-live-edit)

### Other options

Use this section for general generation behavior and guardrails.

| Label                                                          | Description                                                       |
| -------------------------------------------------------------- | ----------------------------------------------------------------- |
| **Template contains international characters (Unicode fonts)** | Enable Unicode support for international characters.              |
| **Unicode enforcement level**                                  | Set the Unicode enforcement level.                                |
| **Show warning messages during document generation**           | Show or suppress non-critical warning messages during generation. |
| **Redirect back to record**                                    | Redirect users back to the record after generation.               |
| **Attach related case articles to outbound email**             | Attach related case articles to outbound email.                   |
| **Maximum versions retained in archive**                       | Set the maximum number of archived template versions to retain.   |
| **List of merge fields that cannot be null**                   | Require specific merge fields to be non-null before generation.   |
| **Enable Rich Text in Runtime Prompts Tab**                    | Enable rich text support in runtime prompts.                      |

Related guide:

* [How to Handle International Characters](/sdocs/template-architecture/template-settings/document-options-tab/how-to-handle-international-characters)


# Document Options Quick Reference

Scan Document Options settings in table format, including file naming, storage, edit behavior, and general generation options.

Use this version when you want the same quick reference in table format.

### Attachment and File Name Format

<table data-full-width="true"><thead><tr><th width="117.6666259765625">Setting</th><th width="113.6666259765625">Purpose</th><th>Syntax</th><th width="123">Default</th><th width="127.6666259765625">Supports</th><th width="129.3333740234375">Best fit</th><th>Notes</th></tr></thead><tbody><tr><td><strong>Attachment and File Name Format</strong></td><td>Define the naming pattern for generated documents.</td><td>Text string with optional merge fields. Use single braces: <code>{!Object.Field}</code>.</td><td><code>SD-####.pdf</code></td><td>Standard fields, custom fields, lookup fields up to 5 levels, and user fields like <code>{!User.FirstName}</code></td><td>Use it when generated files need to be searchable and easy to identify outside Salesforce.</td><td>Keep names under 80 characters when possible. The maximum length is 255 characters. Include the <code>.pdf</code> extension. Null merge fields resolve to blanks. Very long names may be truncated by the file system.</td></tr></tbody></table>

**Examples:**

```
Proposal for {!Opportunity.Account.Name}
Legal Contract - {!DocumentID}
{!DocumentName} for {!Opportunity.Account.Name}
```

**Restricted Characters:**

<pre><code><strong>/ \ : * ? " &#x3C; > |
</strong></code></pre>

**Supported Merge Fields:**

* Standard fields from base object
* Custom fields
* Lookup fields (up to 5 levels)
* User fields: `{!User.FirstName}`

***

### Attachment & File Options

<table data-full-width="true"><thead><tr><th>Setting</th><th width="156.666748046875">Purpose</th><th>What happens when enabled</th><th>Use when</th><th>Watch for</th></tr></thead><tbody><tr><td><strong>Create Salesforce Attachment and link to record</strong></td><td>Automatically create an attachment in <strong>Notes &#x26; Attachments</strong>.</td><td>Creates an attachment on each generation. Uses the output file name. Links it to the base record.</td><td>Use it only when another process still depends on legacy attachments (uncommon).</td><td>Counts toward Attachment storage. Not recommended for most new implementations.</td></tr><tr><td><strong>Create Salesforce File and link to record</strong></td><td>Automatically create a file in <strong>Salesforce Files</strong>.</td><td>Creates a file on each generation. Uses the output file name. Links it to the base record. Supports sharing and collaboration.</td><td>Use it for most Lightning-first and modern Salesforce implementations.</td><td>Counts toward Files storage. Review file sharing rules if access matters.</td></tr><tr><td><strong>Create Salesforce Attachment only when emailed</strong></td><td>Create an attachment only if the document is emailed.</td><td>Skips attachment creation for download-only or preview-only actions. Creates the attachment only during email send flows.</td><td>Use it to reduce storage when many generated documents are never emailed.</td><td>Applies only to Attachments. It does not control Files.</td></tr><tr><td><strong>Delete related Salesforce Attachment/File upon S-Doc deletion</strong></td><td>Control whether generated files are deleted with the S-Doc record.</td><td>Deleting the S-Doc record also deletes related files or attachments. If disabled, the related files remain.</td><td>Keep it enabled for cleaner storage and fewer orphaned records.</td><td>Disable it only when retention rules require files to remain after the S-Doc is removed.</td></tr><tr><td><strong>Allow Edit</strong></td><td>Enable <strong>Live Edit</strong> for generated documents.</td><td>Adds an <strong>Edit</strong> option on generated documents. Users can open the file in a browser-based editor and save changes.</td><td>Use it for working drafts and minor post-generation edits.</td><td>Avoid it for legal, compliance, or highly formatted documents. Requires the <strong>S-Docs Edit Document</strong> permission.</td></tr><tr><td><strong>Allow naming of new Salesforce Attachment with each edit</strong></td><td>Let users rename attachments created during edits.</td><td>Prompts the user to enter a new attachment name after editing.</td><td>Use it when users need more descriptive version names.</td><td>Requires <strong>Allow Edit</strong> and works only when <strong>Create new Salesforce Attachment with each edit</strong> is also enabled.</td></tr><tr><td><strong>Create new Salesforce Attachment with each edit</strong></td><td>Create a new attachment on every edit instead of overwriting the old file.</td><td>Preserves prior versions by creating a fresh attachment after each edit.</td><td>Use it when version tracking matters more than storage efficiency.</td><td>Requires <strong>Allow Edit</strong>. Increases Attachment storage over time.</td></tr><tr><td><strong>Show Content Version JSON field</strong></td><td>Reveal a field for setting custom values on the generated <strong>ContentVersion</strong> record.</td><td>Shows the <strong>Content Version Field Assignment JSON</strong> input and lets you map custom values to file metadata fields.</td><td>Use it when downstream reporting, automation, or integrations depend on custom file metadata.</td><td>Works only with Salesforce Files. Fields must exist on <strong>ContentVersion</strong>. Invalid JSON causes errors. Merge fields inside the JSON use double braces: <code>{{!Field}}</code>.</td></tr></tbody></table>

**Show Content Version JSON field Example:**

```
{
  "Checkbox__c": "true",
  "Date_Created__c": "{{!Opportunity.CloseDate}}",
  "Type_Picklist__c": "Quote",
  "Type_Text__c": "{{!Opportunity.Name}}",
  "Decimal_Value__c": "12.34",
  "Integer_Value__c": "1234"
}
```

***

### Document Options - Other Options

<table data-full-width="true"><thead><tr><th>Setting</th><th>Purpose</th><th width="110.666748046875">Type</th><th>What happens when enabled or set</th><th>Use when</th><th>Watch for</th></tr></thead><tbody><tr><td><strong>Template contains international characters (Unicode fonts)</strong></td><td>Enable Unicode character support.</td><td>Checkbox</td><td>Allows non-English and non-Latin characters to render correctly. Works with the Unicode enforcement setting.</td><td>Use it for accented characters, non-Latin scripts, or special symbols.</td><td>Enable it before testing translated or multilingual output.<br><br><a data-mention href="#unicode-enforcement-options">#unicode-enforcement-options</a></td></tr><tr><td><strong>Show warning messages during document generation (Legacy)</strong></td><td>Control whether non-critical warnings appear during generation.</td><td>Checkbox</td><td>Shows warning messages such as null merge fields, missing lookup data, field access issues, and non-critical formatting warnings.</td><td>Keep it enabled during testing and rollout.</td><td>Disable it only when known warnings create noise for users. Critical errors still appear.</td></tr><tr><td><strong>Redirect back to record</strong></td><td>Return users to the source record after generation.</td><td>Checkbox</td><td>Sends the user back to the base record after the document is generated.</td><td>Use it when document generation is part of a record-based workflow.</td><td>Leave it disabled when users usually review, edit, or email the document next.</td></tr><tr><td><strong>Attach related case articles to outbound email</strong></td><td>Include related case articles in the outbound email.</td><td>Checkbox</td><td>Adds related case articles to the email along with the generated document.</td><td>Use it for case response templates and support workflows.</td><td>Works only when the base object is <strong>Case</strong> and only during email send flows.</td></tr><tr><td><strong>Unicode enforcement level</strong></td><td>Set how aggressively Unicode handling is applied.</td><td>Picklist</td><td>Controls how strongly S-Docs enforces Unicode rendering. Options are blank or none, <strong>Data</strong>, and <strong>Strict</strong>.</td><td>Increase it only when Unicode output needs more support.</td><td>Higher levels add processing overhead. Also enable <strong>Template contains international characters</strong>.</td></tr><tr><td><strong>Maximum versions retained in archive</strong></td><td>Limit how many saved template versions are kept.</td><td>Text field (numeric)</td><td>Creates a new template version on each save and deletes the oldest versions when the limit is reached.</td><td>Use lower values for stable templates and higher values for heavily revised templates.</td><td><code>0</code> or blank keeps all versions and can increase storage over time.<br><br><a data-mention href="#maximum-versions-retained-in-archive-options">#maximum-versions-retained-in-archive-options</a></td></tr><tr><td><strong>List of merge fields that cannot be null</strong></td><td>Block generation if required merge fields are empty.</td><td>Text area</td><td>Runs validation before generation. If any listed field is null, generation stops and the user sees an error.</td><td>Use it to enforce required business data before users generate a document.</td><td>Enter one field per line. Use double braces: <code>{{!Object.Field}}</code>. Do not use commas or semicolons.<br><br></td></tr></tbody></table>

#### Unicode Enforcement Options

<table data-full-width="true"><thead><tr><th>Unicode enforcement level</th><th>Description</th><th>Performance impact</th><th>Best fit</th><th>Notes</th></tr></thead><tbody><tr><td><code>(blank/None)</code></td><td>Standard handling</td><td>Fast</td><td>English-only documents</td><td>Use the default when Unicode support is not needed.</td></tr><tr><td><code>Data</code></td><td>Enforces Unicode in merge fields</td><td>Minimal</td><td>Western European languages</td><td>Good for accented Latin characters and lighter multilingual needs.</td></tr><tr><td><code>Strict</code></td><td>Full Unicode enforcement</td><td>Moderate</td><td>Asian, Arabic, Hebrew, and other complex scripts</td><td>Use it only when lower levels do not render characters correctly.</td></tr></tbody></table>

#### **Maximum versions retained in archive Options**

<table data-full-width="true"><thead><tr><th width="116">Archive value</th><th>Result</th><th>Best fit</th><th>Notes</th></tr></thead><tbody><tr><td><code>10</code></td><td>Keep the last 10 versions</td><td>Stable templates with occasional edits</td><td>Reduces stored version history.</td></tr><tr><td><code>25</code></td><td>Keep the last 25 versions</td><td>Templates under active revision</td><td>A balanced default for many teams.</td></tr><tr><td><code>50</code></td><td>Keep the last 50 versions</td><td>Complex templates with frequent changes</td><td>Keeps more rollback points.</td></tr><tr><td><code>0</code> or blank</td><td>Keep all versions</td><td>Rarely recommended</td><td>Use only when full retention is required and storage is monitored.</td></tr></tbody></table>


# How to Handle International Characters

Enable Unicode support and choose the right enforcement level and fonts for international characters.

Use these settings when non-English characters render as boxes, question marks, or missing glyphs.

International character support depends on both template settings and font coverage.

### Enable Unicode support

1. Open the **Document Options** tab.
2. Under **Other Options**, check **Template contains international characters (Unicode fonts)**.
3. Save the template.

If characters still do not render correctly, change the Unicode enforcement level.

### Choose a Unicode enforcement level

| Level  | What it does                           | Use it for                              | Performance impact |
| ------ | -------------------------------------- | --------------------------------------- | ------------------ |
| None   | Uses standard character handling       | English-only documents                  | None               |
| Data   | Enforces Unicode in merge field output | Western European languages              | Minimal            |
| Strict | Applies full Unicode enforcement       | Asian, Arabic, Hebrew, or mixed scripts | Moderate           |

### When to use each level

* Use **Data** for accented Latin characters or Cyrillic text.
* Use **Strict** for Chinese, Japanese, Korean, Arabic, or Hebrew.
* Start with the lowest level that fixes the issue.

### Font guidance

Font choice matters as much as the Unicode setting.

Use fonts with broad international coverage:

* `Arial`
* `Arial Unicode MS`
* `Calibri`
* `Tahoma`
* `Verdana`
* `Times New Roman`

Avoid decorative, script, or specialty fonts when you need reliable multilingual output.

{% hint style="warning" %}
If the setting is correct but characters still fail, switch to a font with wider Unicode coverage first.
{% endhint %}

### Language-specific troubleshooting

#### Accented characters or Cyrillic

Try basic Unicode support first.

If needed, change the enforcement level to **Data**.

#### Chinese, Japanese, or Korean

Set the enforcement level to **Strict**.

Use a font that supports the required character set.

#### Arabic or Hebrew

Set the enforcement level to **Strict**.

Use right-to-left formatting when the document layout requires it.

For right-to-left layout guidance, read [How to Work with Right-to-Left Languages](/sdocs/advanced-template-logic/template-attributes/template-attributes-how-to-guides/how-to-work-with-right-to-left-languages).

### Quick test content

Use a test block with representative characters before rollout:

```plaintext
Spanish: ñ é í ó ú ü ¿ ¡
French: à è é ê ë ï ô ù û ç
German: ä ö ü ß
Polish: ą ć ę ł ń ó ś ź ż
Chinese: 你好世界
Japanese: こんにちは
Arabic: مرحبا
Russian: Привет
```

Test with the same font you plan to ship.


# How to Create Dynamic File Names

Use merge fields in Output File Format to generate clear, searchable file names automatically.

Use dynamic file names to replace generic outputs like `SD-0001.pdf`.

This makes files easier to sort, search, and identify in Salesforce.

### Set the output file name

{% stepper %}
{% step %}

### Open document options

Open the **Document Options** tab in the Template Editor.
{% endstep %}

{% step %}

### Find the file name setting

Locate **Attachment & File Name Options**.
{% endstep %}

{% step %}

### Enter the naming formula

Add your formula in **Output File Format**.
{% endstep %}

{% step %}

### Save and test

Save the template.

Generate a test document.
{% endstep %}
{% endstepper %}

{% hint style="warning" %}
Use single braces in file name formulas: `{!Object.Field}`.

Do not use standard body merge field syntax like `{{!Object.Field}}`.
{% endhint %}

### Common naming patterns

| Use case     | Formula                                    | Example output                     |
| ------------ | ------------------------------------------ | ---------------------------------- |
| Sales quotes | `Quote-{!Opportunity.Name}-{!TODAY()}.pdf` | `Quote-Q1 Services-2024-02-04.pdf` |
| Invoices     | `INV-{!Opportunity.InvoiceNumber__c}.pdf`  | `INV-12345.pdf`                    |
| Contracts    | `Contract-{!Opportunity.Account.Name}.pdf` | `Contract-Acme Corp.pdf`           |
| Reports      | `{!Account.Name}-Report-{!TODAY()}.pdf`    | `Acme-Report-2024-02-04.pdf`       |

### Best practices

* Avoid `/`, `\`, `:`, `*`, `?`, `"`, `<`, `>`, and `|`.
* Use hyphens or underscores instead of spaces.
* Keep names under `80` characters when possible.
* Put the most important value first.

### Tips

#### Include record context

Start with the document type, record name, or ID.

This improves sorting in related lists and external storage systems.

#### Add a date when needed

Use `{!TODAY()}` for time-based versioning.

This helps when users generate multiple copies over time.

#### Keep names stable

Avoid long formulas with optional fields unless you need them.

Shorter names are easier to scan.


# How to Auto-Attach Documents to Records

Save generated documents to Salesforce Files or Attachments automatically.

Use auto-attach settings to save documents without manual user steps.

This keeps record files consistent and reduces missed saves.

### Choose how S-Docs saves the generated file

{% stepper %}
{% step %}

### Open document options

Open the **Document Options** tab.
{% endstep %}

{% step %}

### Go to attachment and file options

Find **Attachment & File Options**.
{% endstep %}

{% step %}

### Select a save method

Choose one of the available save options.
{% endstep %}

{% step %}

### Save the template

Save your changes.

Generate a test document.
{% endstep %}
{% endstepper %}

### Available save options

* **Create Salesforce File and link to record** — recommended for most orgs.
* **Create Salesforce Attachment and link to record** — useful for legacy setups.
* **Create Salesforce Attachment only when emailed** — saves storage for draft-heavy workflows.

### Control deletion behavior

By default, related files or attachments can be removed when the S-Doc record is deleted.

Clear **Delete related Salesforce Attachment/File upon S-Doc deletion** if you need to preserve generated files for audit or retention purposes.

### Files vs. Attachments

| Feature    | Salesforce Files        | Salesforce Attachments |
| ---------- | ----------------------- | ---------------------- |
| Interface  | Lightning-ready         | Legacy                 |
| Versioning | Supported               | Not supported          |
| Sharing    | Better sharing controls | Basic                  |
| Best fit   | New implementations     | Legacy integrations    |

{% hint style="info" %}
Use **Salesforce Files** for most new implementations.
{% endhint %}

{% hint style="warning" %}
Both Files and Attachments count toward Salesforce storage limits.

Review storage usage if you generate documents at high volume.
{% endhint %}

### When to use each option

#### Use Salesforce Files

Use this when your org works primarily in Lightning.

This is the best default for modern document management.

#### Use Salesforce Attachments

Use this only when another process still depends on legacy attachments.

#### Use attachment on email only

Use this when many generated documents are drafts and only emailed copies need to persist.


# Email Settings Tab

Use Email Settings to control email subject, recipients, sender behavior, and outbound email restrictions.

Use **Email Settings** to control what happens when users email generated documents.

This tab sets default email values, controls which fields users can edit, and helps enforce sender and recipient rules.

{% hint style="info" %}
Use **Email Settings** for email recipients, sender controls, and delivery guardrails.

Use **Document Options** for file behavior and general generation settings.

Use **Create Salesforce Task** for follow-up task automation.
{% endhint %}

### What you can configure in Email Settings

The **Email Settings** tab includes four main areas:

* **Email Subject Settings** — control the default subject and whether users must keep or enter one.
* **Email Recipient Settings** — control default recipients and whether users can change them.
* **Email Sender Settings** — control the sender address and available sender choices.
* **Other Email Settings** — control body locking, domain restrictions, and translation behavior.

Use single-brace syntax in email setting formulas: `{!Object.Field}`.

### Email subject settings

Use this section when you want consistent email subject lines.

| Label                    | Description                                     |
| ------------------------ | ----------------------------------------------- |
| **Subject**              | Set the default subject line for the email.     |
| **Lock Subject**         | Prevent users from changing the subject line.   |
| **Require subject line** | Require a subject before the email can be sent. |

Use merge fields in the subject when you want record-aware email titles.

Examples:

* `Quote for {!Opportunity.Name}`
* `Invoice {!Invoice__c.Name} from Your Company`

### Email recipient settings

Use this section to prefill or restrict who receives the email.

| Label             | Description                                         |
| ----------------- | --------------------------------------------------- |
| **To**            | Set the default primary recipient list.             |
| **Lock To**       | Prevent users from changing the **To** field.       |
| **CC**            | Set default carbon copy recipients.                 |
| **Lock CC**       | Prevent users from changing the **CC** field.       |
| **BCC**           | Set default blind carbon copy recipients.           |
| **Lock BCC**      | Prevent users from changing the **BCC** field.      |
| **Reply To**      | Set the address that receives replies.              |
| **Lock Reply To** | Prevent users from changing the **Reply To** field. |

Separate multiple email addresses with commas.

You can combine static addresses and merge fields in the same field.

{% hint style="warning" %}
If a locked email field is blank, S-Docs hides it on the email screen.

If **To** is locked and blank, the user will not be presented with the option to email through the legacy visualforce page method.
{% endhint %}

### Email sender settings

Use this section to control who the email appears to come from.

| Label                                            | Description                                                                  |
| ------------------------------------------------ | ---------------------------------------------------------------------------- |
| **From**                                         | Set the default sender as the logged-in user or a verified org-wide address. |
| **Restrict to Org-Wide Addresses**               | Force emails to send from org-wide addresses only.                           |
| **Enable user to choose/select from a picklist** | Let users choose from allowed sender addresses at send time.                 |
| **Use Salesforce Email Signature**               | Enable the Salesforce email signature merge field in the email body.         |

By default, S-Docs can send from the user who generated the document.

{% hint style="info" %}
Use a verified org-wide address when you need a shared sender such as `billing@company.com`.

Use `{{{!UserSignature}}}` in the email body when you want to insert the generating user's Salesforce email signature.
{% endhint %}

### Other email settings

Use this section for email delivery guardrails and body controls.

| Label                             | Description                                                          |
| --------------------------------- | -------------------------------------------------------------------- |
| **Email domain restriction**      | Limit sending to approved recipient domains only.                    |
| **Translate Email Settings Data** | Apply Data Map translations to merge field values in email settings. |
| **Lock Body**                     | Prevent users from editing the email body before sending.            |

Enter restricted domains as a comma-separated list such as `company.com,partner.org`.

Do not include spaces, `@`, or `www`.

S-Docs validates **To**, **CC**, and **BCC** against the allowed domains when the user clicks **Send**.

### Related guides

* [Email Delivery and Security](/sdocs/template-architecture/template-settings/email-settings-tab/email-delivery-and-security)
* [How To: Sending Generated Documents via Email](/sdocs/automation-and-document-lifecycle/workflows/sending-generated-documents-via-email-s-docs-lwc)
* [How To: Email Editor In Flow](broken://spaces/WKNnJmhJBQwhdk5WBFsi/pages/qXbzsyU8aK2CyCfvT0M6)


# Email Settings Quick Reference

Scan Email Settings in table format, including subject, recipients, sender controls, and other email delivery options.

Use this version when you want the same quick reference in table format.

{% hint style="warning" %}
If a locked email field is blank, S-Docs hides it on the email screen.

If **To** is locked and blank, the template cannot be emailed.
{% endhint %}

### Email Settings - Email Subject Settings

<table data-full-width="true"><thead><tr><th>Setting</th><th>Purpose</th><th>Type</th><th>Format</th><th>Behavior</th><th>Watch for</th></tr></thead><tbody><tr><td><strong>Subject</strong></td><td>Set the default email subject line.</td><td>Text field</td><td>Static text, merge fields, or both. Use single braces: <code>{!Object.Field}</code>.</td><td>Prefills the subject line. Null merge fields resolve to blanks.</td><td>Keep it short for mobile inboxes. Maximum length is 255 characters.</td></tr><tr><td><strong>Lock Subject</strong></td><td>Prevent users from changing the subject line.</td><td>Checkbox</td><td>On or off</td><td>When enabled, the subject field is read-only.</td><td>If enabled and blank, S-Docs hides the field.</td></tr><tr><td><strong>Require subject line</strong></td><td>Require a subject before send.</td><td>Checkbox</td><td>On or off</td><td>Validates the subject when the user clicks <strong>Send</strong>.</td><td>If the subject is already locked with a value, this setting has no practical effect.</td></tr></tbody></table>

**Examples:**

```
Quote for {!Opportunity.Name}
Invoice {!Opportunity.InvoiceNumber__c} from Your Company
Proposal for {!Opportunity.Account.Name}
Contract: {!Opportunity.Name} - Action Required
```

***

### Email Recipient Settings

<table data-full-width="true"><thead><tr><th>Setting</th><th>Purpose</th><th>Type</th><th>Format</th><th>Behavior</th><th>Watch for</th></tr></thead><tbody><tr><td><strong>To</strong></td><td>Set the default primary recipient list.</td><td>Text area</td><td>Single address, comma-separated addresses, merge fields, or a mix.</td><td>Prefills the <strong>To</strong> field. Users can edit it unless you lock it.</td><td>Separate multiple addresses with commas. This field must contain at least one valid recipient to send email.<br><br><a data-mention href="#recipient-field-examples">#recipient-field-examples</a></td></tr><tr><td><strong>Lock To</strong></td><td>Prevent users from changing <strong>To</strong> recipients.</td><td>Checkbox</td><td>On or off</td><td>Makes the <strong>To</strong> field read-only.</td><td>If enabled and blank, the template cannot be emailed.</td></tr><tr><td><strong>CC</strong></td><td>Set default carbon copy recipients.</td><td>Text area</td><td>Same format as <strong>To</strong>.</td><td>Prefills the <strong>CC</strong> field. Users can edit it unless you lock it.</td><td>Optional. If locked and blank, S-Docs hides the field.</td></tr><tr><td><strong>Lock CC</strong></td><td>Prevent users from changing <strong>CC</strong> recipients.</td><td>Checkbox</td><td>On or off</td><td>Makes the <strong>CC</strong> field read-only.</td><td>If enabled and blank, S-Docs hides the field.</td></tr><tr><td><strong>BCC</strong></td><td>Set default blind carbon copy recipients.</td><td>Text area</td><td>Same format as <strong>To</strong>.</td><td>Prefills the <strong>BCC</strong> field. BCC recipients stay hidden from other recipients.</td><td>If locked and blank, S-Docs hides the field.</td></tr><tr><td><strong>Lock BCC</strong></td><td>Prevent users from changing <strong>BCC</strong> recipients.</td><td>Checkbox</td><td>On or off</td><td>Makes the <strong>BCC</strong> field read-only.</td><td>If enabled and blank, S-Docs hides the field.</td></tr><tr><td><strong>Reply To</strong></td><td>Set the address that receives replies.</td><td>Text field</td><td>One email address or one merge field.</td><td>Sets the email Reply-To header. It can differ from the <strong>From</strong> address.</td><td>Only one reply-to value is supported. If locked and blank, S-Docs hides the field.</td></tr><tr><td><strong>Lock Reply To</strong></td><td>Prevent users from changing the reply-to address.</td><td>Checkbox</td><td>On or off</td><td>Makes the <strong>Reply To</strong> field read-only.</td><td>If enabled and blank, S-Docs hides the field.</td></tr></tbody></table>

#### **Recipient Field Examples**

```
{!Opportunity.Account.BillingEmail}
{!Contact.Email}
sales@company.com
{!Opportunity.Owner.Email}, manager@company.com
```

***

### Email Sender Settings

<table data-full-width="true"><thead><tr><th>Setting</th><th>Purpose</th><th>Type</th><th>Options</th><th>Behavior</th><th>Watch for</th></tr></thead><tbody><tr><td><strong>From</strong></td><td>Set the email sender address.</td><td>Picklist</td><td><strong>Logged in user</strong> or a verified org-wide email address.</td><td>Controls who the email appears to come from.</td><td>Org-wide addresses must already exist, be verified, and be available to the user.</td></tr><tr><td><strong>Restrict to Org-Wide Addresses</strong></td><td>Force senders to use org-wide addresses only.</td><td>Checkbox</td><td>On or off</td><td>Removes the ability to send from a personal user address.</td><td>Requires at least one allowed org-wide address.</td></tr><tr><td><strong>Enable user to choose/select from a picklist</strong></td><td>Let users choose the sender at send time.</td><td>Checkbox</td><td>On or off</td><td>Shows a sender dropdown with the user address and allowed org-wide addresses.</td><td>Most useful when multiple sender addresses are available.</td></tr><tr><td><strong>Use Salesforce Email Signature</strong></td><td>Enable the Salesforce signature merge field.</td><td>Checkbox</td><td>On or off</td><td>Makes <code>{{{!UserSignature}}}</code> available for the email body.</td><td>The user must have a Salesforce email signature configured. Use triple braces to preserve formatting.</td></tr></tbody></table>

***

### Other Email Settings

<table data-full-width="true"><thead><tr><th>Setting</th><th>Purpose</th><th>Type</th><th>Format</th><th>Behavior</th><th>Watch for</th></tr></thead><tbody><tr><td><strong>Email domain restriction</strong></td><td>Limit sending to approved recipient domains.</td><td>Text field</td><td>Comma-separated domains such as <code>company.com,partner.org</code>.</td><td>Validates <strong>To</strong>, <strong>CC</strong>, and <strong>BCC</strong> when the user clicks <strong>Send</strong>.</td><td>Do not include spaces, <code>@</code>, or <code>www</code>.<br><br><a data-mention href="#email-domain-restriction-examples">#email-domain-restriction-examples</a></td></tr><tr><td><strong>Translate Email Settings Data</strong></td><td>Apply Data Map translations to merge field values in email settings.</td><td>Checkbox</td><td>On or off</td><td>Translates merge field values in subject and recipient fields when Data Map translations exist.</td><td>It affects merge field output only. It does not translate static text.</td></tr><tr><td><strong>Lock Body</strong></td><td>Prevent users from editing the email body before sending.</td><td>Checkbox</td><td>On or off</td><td>Makes the email body read-only on the email screen.</td><td>Use it when the message must stay unchanged. Add <code>{{{!UserSignature}}}</code> if users still need signature personalization.</td></tr></tbody></table>

#### **Email domain restriction examples**

```
company.com
company.com,partner.com,client.org
company.com,company.co.uk,company.de
```

### Related guides

* [Email Settings Tab](/sdocs/template-architecture/template-settings/email-settings-tab)
* [Email Delivery and Security](/sdocs/template-architecture/template-settings/email-settings-tab/email-delivery-and-security)
* [How To: Sending Generated Documents via Email](/sdocs/automation-and-document-lifecycle/workflows/sending-generated-documents-via-email-s-docs-lwc)


# Email Delivery and Security

Configure sender behavior, locked email fields, and domain restrictions for secure document delivery.

When generating and sending documents directly from Salesforce, maintaining control over your outbound communications is critical. This guide covers how to configure professional sender addresses, lock down specific email fields to prevent user error, and restrict outbound emails to approved domains.

***

### How to Configure Sender Addresses

By default, S-Docs sends emails from the address of the user who clicked "Generate." However, for official documents like invoices or contracts, you likely want these emails coming from an official company address (e.g., `sales@yourcompany.com`).

### Step 1: Create an Org-Wide Email Address (Admins Only)

Before you can use a generic company address in S-Docs, it must be verified in Salesforce.

1. In Salesforce Setup, search for and select Organization-Wide Addresses.
2. Click Add and fill in your Display Name and Email Address.
3. Select which profiles are allowed to use this address, then click Save.
4. *Important:* Check the inbox of that email address and click the Salesforce verification link.

### Step 2: Configure the Template Sender Settings

Once verified, you can assign the address to your template.

1. Open your Template Editor and navigate to the Email Settings tab.
2. Under "Email Sender Settings," click the From dropdown and select your Org-Wide Address.
3. Choose your enforcement level:
   * Restrict to Org-Wide Addresses: Check this to force users to send from the selected company address. They will not be able to use their personal email.
   * Enable user to choose/select from a picklist: Check this to give users a dropdown menu on the email page, allowing them to choose between their personal address or any Org-Wide Addresses they have permission to use.
4. Click Save.

> Pro-Tip: Adding User Signatures
>
> Even if an email comes from a generic address like `sales@yourcompany.com`, you can still include the individual user's signature for a personal touch. Check Use Salesforce Email Signature in the sender settings, and add `{{{!UserSignature}}}` to your email body. *(Note: You must use triple braces to preserve HTML formatting!)*

***

### How to Lock Email Fields

To prevent users from accidentally changing critical email settings—like altering a compliance statement or sending a quote to the wrong person—you can lock specific fields on the email dispatch page.

### Configuration Steps

1. Navigate to the Email Settings tab in the Template Editor.
2. Locate the "Email Subject Settings," "Email Recipient Settings," or "Other Email Settings" sections.
3. Enter your default text or merge fields (e.g., `{!Opportunity.Account.BillingEmail}` in the To field).
4. Check the Lock box next to the corresponding field.
5. Click Save.

When a user attempts to email this document, the locked fields will appear grayed out and cannot be edited.

### The "Locked + Blank = Hidden" Rule

Understanding this rule is key to customizing your user interface:

* Hiding Fields: If you lock a field (like CC or BCC) but leave the text value blank, that field will completely disappear from the end-user's email page.
* The "To" Field Exception: If you lock the To field and leave it blank, *the template cannot be emailed at all.* You must always provide a default address or merge field if you lock the To line.

### Common Locking Strategies

| **Scenario**        | **Fields to Lock** | **Why**                                                                              |
| ------------------- | ------------------ | ------------------------------------------------------------------------------------ |
| Customer Quotes     | Subject only       | Maintains brand standards but allows sales reps to adjust recipients.                |
| Invoices/Statements | Subject, To, Body  | Ensures automated consistency and prevents modification of financial communications. |
| Contracts           | To, CC, Body       | Ensures proper legal routing and prevents tampering with the email body.             |

***

### How to Restrict Email Domains

For highly sensitive documents, you can restrict the template so it can only be emailed to specific, approved domains (like internal company addresses or specific partner networks).

### Configuration Steps

1. Navigate to the Email Settings tab.
2. Under "Other Email Settings," locate the Email domain restriction field.
3. Enter a comma-separated list of approved domains.
   * Correct Syntax: `yourcompany.com,partnerdomain.com,approved.org`
   * Incorrect Syntax: Do not use spaces, `@` symbols, or `www`. (e.g., `✗ @company.com, partner.com`)
4. Click Save.

### How Restrictions Work

When a user clicks "Send," S-Docs checks the To, CC, and BCC fields against your restricted list. If a user tries to send a document to an unapproved domain (e.g., `competitor@example.com`), the email will fail to send, and they will receive an immediate error message listing the permitted domains.


# Advanced Options Tab

Use Advanced Options for template preview, export, and feature-specific integrations.

Use **Advanced Options** when you need preview, migration support, or feature-specific controls that do not fit the main page, document, or email settings tabs.

This tab groups together settings for testing, template portability, and e-signature features.

{% hint style="info" %}
Use **Advanced Options** for preview, export, and feature-specific integrations.

Use **Document Options** for file behavior, validation, and general generation settings.
{% endhint %}

### What you can configure in Advanced Options

The **Advanced Options** tab includes these settings:

* **Preview ID** — preview the template with data from a real Salesforce record.
* **Export Template** — generate a portable export string for migration or backup.
* **Enable S-Sign** — enable S-Sign features when the package is installed.

Some settings appear only when the related feature is installed, enabled, or supported by the template's base object.

### Preview and testing

Use preview settings while building or validating a template.

| Label          | Description                                                                              |
| -------------- | ---------------------------------------------------------------------------------------- |
| **Preview ID** | Enter a valid `15`- or `18`-character Salesforce record ID to enable **Save & Preview**. |

Preview uses real record data. It helps you verify merge fields, layout, page breaks, and conditional content before rollout.

Preview does not test downstream actions such as email delivery, task creation, or file creation.

Related guide:

* [How to Set Up Template Preview](/sdocs/template-architecture/template-settings/advanced-options-tab/how-to-set-up-template-preview)

### Template export and migration

Use export settings when you need to move a template between orgs or keep a backup outside Salesforce.

| Label               | Description                                                                                              |
| ------------------- | -------------------------------------------------------------------------------------------------------- |
| **Export Template** | Generate a text export of the template body, settings, prompts, and formatting for reuse in another org. |

The export string is designed for template migration and backup.

After import, you still need to review org-specific values such as preview records, sender addresses, and any referenced custom metadata or fields.

Related guide:

* [Template Lifecycle Management](/sdocs/template-architecture/template-settings/advanced-options-tab/template-lifecycle-management)

### Feature-specific integrations

Use these settings when your template depends on extra S-Docs or Salesforce capabilities.

| Label             | Description                                                           |
| ----------------- | --------------------------------------------------------------------- |
| **Enable S-Sign** | Turn on S-Sign support for templates that need e-signature workflows. |

#### Enable S-Sign

This setting is available when **S-Sign** is installed.

Enable it when the template will be sent for signature.

If S-Sign is not installed, this option is unavailable.

### When to use this tab

Use **Advanced Options** when you need to:

* preview a template against a real record before release
* export a template for sandbox-to-production migration
* enable S-Sign for signature workflows

### Related guides

* [How to Set Up Template Preview](/sdocs/template-architecture/template-settings/advanced-options-tab/how-to-set-up-template-preview)
* [Template Lifecycle Management](/sdocs/template-architecture/template-settings/advanced-options-tab/template-lifecycle-management)
* [Document Options Tab](/sdocs/template-architecture/template-settings/document-options-tab)


# Advanced Options Quick Reference

Use this version when you want the same quick reference in table format.

Some settings appear only when the related feature is installed, enabled, or supported by the template's base object.

### Preview and testing

<table data-full-width="true"><thead><tr><th>Setting</th><th>Purpose</th><th>Type</th><th>Format</th><th>Behavior</th><th>Watch for</th></tr></thead><tbody><tr><td><strong>Preview ID</strong></td><td>Preview the template with real Salesforce data.</td><td>Text field</td><td>A valid <code>15</code>- or <code>18</code>-character Salesforce record ID.</td><td>Enables <strong>Save &#x26; Preview</strong>. Uses the selected record to generate a preview in a new tab.</td><td>The record must exist and match the template's base object. Preview checks layout and merge output only. It does not test email, task, or file creation.</td></tr></tbody></table>

**Examples:**

```plaintext
006Q000001AbCDE
006Q000001AbCDEFGH
001Q000001XyZAB
```

***

### Template export and migration

<table data-full-width="true"><thead><tr><th>Setting</th><th>Purpose</th><th>Type</th><th>Format</th><th>Behavior</th><th>Watch for</th></tr></thead><tbody><tr><td><strong>Export Template</strong></td><td>Generate a portable export of the template.</td><td>Button and text area</td><td>Click <strong>Generate</strong> to produce a text export string.</td><td>Packages the template body, settings, prompts, and formatting for backup or import into another org.</td><td>After import, review org-specific values such as preview IDs, org-wide email addresses, and referenced custom fields or metadata.</td></tr></tbody></table>

***

### Feature-specific integrations

<table data-full-width="true"><thead><tr><th>Setting</th><th>Purpose</th><th>Type</th><th>Availability</th><th>Behavior</th><th>Watch for</th></tr></thead><tbody><tr><td><strong>Enable S-Sign</strong></td><td>Turn on e-signature support for the template.</td><td>Checkbox</td><td>Available when <strong>S-Sign</strong> is installed.</td><td>Opens the S-Sign panel in the template editor, allows signature tag placement, and enables signature workflows.</td><td>Requires an S-Sign trial or full license. Additional setup may be required. Contact <a href="mailto:sales@sdocs.com">sales@sdocs.com</a> for licensing details.</td></tr></tbody></table>

### Related guides

* [Advanced Options Tab](/sdocs/template-architecture/template-settings/advanced-options-tab)
* [How to Set Up Template Preview](/sdocs/template-architecture/template-settings/advanced-options-tab/how-to-set-up-template-preview)
* [Template Lifecycle Management](/sdocs/template-architecture/template-settings/advanced-options-tab/template-lifecycle-management)


# How to Set Up Template Preview

Use a Salesforce record ID to preview a template with real data before rollout.

Template Preview lets you test document output with a real Salesforce record before users generate it.

This helps you catch layout issues, missing data, and overflow early.

### Set up template preview

{% stepper %}
{% step %}

### Open advanced settings

Open the **Advanced Options** tab in the Template Editor.
{% endstep %}

{% step %}

### Enter a preview record

Under **Advanced Template Settings**, find **Preview ID**.

Paste a valid `15`- or `18`-character Salesforce record ID.
{% endstep %}

{% step %}

### Trigger preview mode

Click outside the field.

The **Save & Preview** button appears at the top of the editor.
{% endstep %}

{% step %}

### Generate the preview

Click **Save & Preview**.

A new tab opens with the generated document for that record.
{% endstep %}
{% endstepper %}

### Find a record ID

Open a representative Salesforce record.

Copy the alphanumeric ID from the end of the browser URL.

Example:

```plaintext
https://yourinstance.salesforce.com/006Q000001AbCDEF
```

In this example, `006Q000001AbCDEF` is the record ID.

### What preview shows

Preview shows the generated document output, including:

* merge field data
* conditional rendering
* page breaks and formatting

### What preview does not show

Preview does not test:

* email settings
* file naming behavior
* task creation or attachment creation

Runtime prompts also use blank or default values during preview.

### Best practices

* Use dedicated test records with realistic data.
* Include long text and multiple related records.
* Label test records clearly so users do not change them.

{% hint style="info" %}
Template Preview respects the current user's Salesforce permissions and sharing rules.
{% endhint %}


# Template Lifecycle Management

Preview, export, import, and maintain templates across development and deployment cycles.

Once you have perfected a template in your Salesforce Sandbox, you need a safe and reliable way to move it into your Production environment (or share it with another org entirely). S-Docs makes this easy by allowing you to export your entire template configuration as a portable text string.

***

### How to Export a Template

Exporting a template packages its entire structure—including the HTML body, page settings, email configurations, and runtime prompts—into a single JSON text string.

1. Open the template you want to export and click into the Template Editor.
2. Navigate to the Advanced Options tab.
3. Under the "Export Template" section, click the Generate button.
4. A large text box will appear containing a long string of JSON code.
5. Click Copy (or manually select all the text and copy it).
6. Paste this text into a plain text file on your computer (e.g., Notepad or TextEdit) and save it.

> Best Practice for Version Control: Save your export files with a strict, descriptive naming convention so you can track your changes over time. For example: `QuoteTemplate_v1.0_2024-02-04_Initial.txt` or `QuoteTemplate_v1.1_2024-02-15_AddedPrompts.txt`.

***

### How to Import a Template

To bring your exported template into a new environment, you simply need to paste that JSON code into the target org.

1. Log into your Target Org (e.g., your Production environment).
2. Navigate to the S-Docs Templates tab and click the New Template button.
3. Look for the Import option. *(Note: Depending on your specific S-Docs version, this may be located on the template list view, the template detail page, or the initial creation screen).*
4. Paste the entire JSON string you copied during the export process.
5. Click Import or Create Template.

Your template will instantly generate with all of your settings and content intact!

***

### The Migration Checklist

Because no two Salesforce orgs are exactly identical, you must ensure your Target Org is prepared to receive the template.

### What Migrates vs. What Doesn't

| **Automatically Included in Export**  | **NOT Included (Must be manually recreated)** |
| ------------------------------------- | --------------------------------------------- |
| Template body (HTML/CSS)              | Actual Salesforce record data                 |
| Page, Document, and Task Settings     | Template permissions and sharing settings     |
| Email Settings & Runtime Prompts      | S-Docs button configurations                  |
| Formatting, styling, and merge fields | Org-specific IDs (like a Preview ID)          |

### Pre-Import Prerequisites

Before you hit "Import" in your new org, verify the following elements exist:

* Custom Fields & Objects: All custom fields and objects referenced in your template *must* exist in the target org. The API names and field types must match exactly.
* Record Types: If your template relies on specific record types, their Developer Names must match.
* S-Docs Version: Ensure the target org has the same (or a compatible) version of S-Docs installed.

### Post-Import Configuration

Immediately after importing, you need to reconfigure any settings that rely on org-specific data:

1. Update Org-Wide Emails: If your template sends from a generic company address, you must reselect that verified address in the target org's Email Settings tab.
2. Update the Preview ID: Your old test record ID from the Sandbox does not exist in Production! Find a valid record ID in your new org and paste it into the Advanced Options tab to restore your preview functionality.
3. Test End-to-End: Always generate a test document, verify the merge fields populated correctly, and send a test email to ensure your routing is working.

***

### Troubleshooting Common Import Errors

| **Error Message**          | **Why it Happened**                                                        | **How to Fix It**                                                                                                        |
| -------------------------- | -------------------------------------------------------------------------- | ------------------------------------------------------------------------------------------------------------------------ |
| "Field does not exist"     | The target org is missing a custom field referenced in the template.       | Create the missing custom field in Salesforce with the exact same API name, or delete the merge field from the template. |
| "Invalid org-wide address" | The sender address verified in your Sandbox is not verified in Production. | Recreate and verify the Org-Wide Address in Salesforce Setup, then reselect it in the Template Editor.                   |
| "Record type not found"    | The target org is missing a record type used by your template.             | Recreate the record type in the new org, ensuring the Developer Name matches the original.                               |


# Insert Images

## What Are Images in S-Docs?

Images in S-Docs allow you to include visual elements in your generated documents, from company logos and product photos to signatures and watermarks. S-Docs supports both static images (that remain the same across all documents) and dynamic images (that change based on record data).

## How Are Images Used in S-Docs?

Images enhance document professionalism and provide visual context that text alone cannot convey. Common use cases include:

* **Company logos and branding**: Headers, footers, and letterheads
* **Product images**: Catalogs, specifications, and proposals
* **Signatures**: Contracts and approvals
* **Charts and diagrams**: Reports and presentations
* **Watermarks**: Draft stamps, confidential labels, and background branding

***

## Static Images vs. Dynamic Images

Understanding the difference between static and dynamic images helps you choose the right approach for your needs.

### Static Images

Static images are the same across all generated documents. Examples include company logos, standard headers, or consistent branding elements.

**Use static images when:**

* The image never changes regardless of the record
* You need consistent branding across all documents
* The image is part of your document template design

### Dynamic Images

Dynamic images change based on the record being used to generate the document. Examples include product photos, employee headshots, or custom signatures.

**Use dynamic images when:**

* Different records need different images
* Images are uploaded or selected by users
* You want one template to handle multiple scenarios

***

## Adding Static Images

There are several methods for embedding static images into your S-Docs templates.

### Method 1: Using an Image URL

The simplest approach is to reference an image URL directly in your template source:

{% code title="Example" %}

```html
<img src="https://publicsite.com/imagename.png" />
```

{% endcode %}

This method works well for:

* Images hosted on public websites
* Email templates (where the recipient needs to access the image at view-time)
* Quick testing and prototyping

**Important:** If images are stored outside of Salesforce, you must create a Remote Site Setting for the image's URL domain (see "Troubleshooting" section below).

### Method 2: Using the Template Editor Add Image Button

The template editor provides a visual interface for adding images with two tabs: **Image Info** and **Upload**.

{% stepper %}
{% step %}

#### Open the Template Editor

1. Open your template in the Template Editor
2. Click the **Add Image** button on the toolbar

<figure><img src="https://1548664070-files.gitbook.io/~/files/v0/b/gitbook-x-prod.appspot.com/o/spaces%2FWKNnJmhJBQwhdk5WBFsi%2Fuploads%2FnKcBehuTnKwNTWMNo1lX%2Fimage.png?alt=media&amp;token=7f0421c9-e3e6-4bb4-850d-711dd818a38c" alt=""><figcaption></figcaption></figure>
{% endstep %}

{% step %}

#### Choose one of the following options

Select either the Image Info tab or the Upload tab (detailed below).
{% endstep %}
{% endstepper %}

#### Image Info Tab

The Image Info tab offers two ways to add images:

**Option A: Browse Server**

{% stepper %}
{% step %}
Click **Browse Server** to search for existing images in your Salesforce documents folder
{% endstep %}

{% step %}
Select your desired image
{% endstep %}

{% step %}
Click to insert the image
{% endstep %}
{% endstepper %}

**Note:** If you're sending documents externally (like email templates) and you selected an image using Browse Server, you need to ensure the Salesforce document record is set to externally available:

{% stepper %}
{% step %}
Navigate to the Documents object in Salesforce Classic
{% endstep %}

{% step %}
Find your image's Document record
{% endstep %}

{% step %}
Check the **Externally Available Image** checkbox
{% endstep %}

{% step %}
Save the record
{% endstep %}
{% endstepper %}

**Option B: Paste Image URL**

{% stepper %}
{% step %}
Copy the full URL of your image (right-click the image → "Copy image address")
{% endstep %}

{% step %}
Paste the URL into the **URL** field in the Image Info tab
{% endstep %}

{% step %}
Click to insert the image
{% endstep %}
{% endstepper %}

This works the same way as adding an image URL directly in the template source code.

#### Upload Tab

The Upload tab allows you to upload new images directly from your computer:

{% stepper %}
{% step %}
Click the **Upload** tab
{% endstep %}

{% step %}
Click **Browse** to select a file from your computer
{% endstep %}

{% step %}
Select your image file
{% endstep %}

{% step %}
Click to upload and insert the image
{% endstep %}
{% endstepper %}

**Important advantage:** Images uploaded through the Upload tab are **automatically set as externally available**, so you don't need to manually configure the Externally Available Image checkbox.

**Note:** S-Docs also supports embedding images as Content Distribution URLs, which render consistently and securely across all generated documents, aligning with Salesforce best practices.

### Method 3: Using Static Resources

You can embed static resources as images using the following code:

{% code title="Example" %}

```html
<img src="/resource/STATIC_RESOURCE_API_NAME/PATH_TO_IMAGE" />
```

{% endcode %}

**Example:**

{% code title="Example" %}

```html
<img src="/resource/Pckg__Images/FolderInZipFile/image.png" />
```

{% endcode %}

This method is ideal for:

* Package development
* Images that are part of your deployment
* Version-controlled branding assets

### Method 4: Adding Background Images or Watermarks

To add a background image or watermark that appears on every page:

{% code title="Example" %}

```html
<style type="text/css">
body {
    background-image: url("https://background.image.url");
    background-attachment: fixed;
    background-position: center;
    background-repeat: no-repeat;
}
</style>
```

{% endcode %}

**Note:** The background image/watermark will be the same for every page of the document. For different images on different pages, use the DOCX document format.

***

## Adding Dynamic Images

Dynamic images allow a single template to display different images based on record data.

### Method 1: Use a Rich Text Field

This is the easiest method for dynamic images:

{% stepper %}
{% step %}
Upload your image into a standard Salesforce rich text field on your record detail page
{% endstep %}

{% step %}
Open your template in the Template Editor
{% endstep %}

{% step %}
Click **Insert Field**
{% endstep %}

{% step %}
Select the rich text field
{% endstep %}

{% step %}
Check the **Contains Rich Text** checkbox
{% endstep %}

{% step %}
Click **Insert**
{% endstep %}
{% endstepper %}

The document will now render the rich text content (including images) wherever you placed this field.

**Note:** This option is only available for PDF and DOCX documents. Rich text fields with many items or complex formatting may not render precisely. It's better practice to use the S-Docs editor to control document layout rather than inserting complex rich-text fields.

### Method 2: Use a Text Field Containing Image Markup

You can use a standard Salesforce text field whose value contains the complete image element tag:

**Example field value:**

{% code title="Example" %}

```html
PRODUCT IMAGE:<br><img src="/host/Product123Image.png" />
```

{% endcode %}

Then insert the field using the Template Editor:

{% stepper %}
{% step %}
Click **Insert Field**
{% endstep %}

{% step %}
Select the field
{% endstep %}

{% step %}
Check the **Contains Rich Text** checkbox
{% endstep %}

{% step %}
Click **Insert**
{% endstep %}
{% endstepper %}

**Use this method for:**

* Images controlled by administrators
* Images that don't change frequently
* Representative signatures or stamps

**Limitations:** Since this is a text field, users will see the markup text (not the image) when viewing the record in Salesforce, making it less user-friendly for frequently updated images.

### Method 3: Use a Formula Field to Display an Image

Building on Method 2, you can use a Salesforce formula field to create the image path programmatically:

{% code title="Example" %}

```
IMAGE("/CompanyIntranet/Products/" + myObject__c.ProductID__c + ".png")
```

{% endcode %}

Then insert the formula field into your template with **Contains Rich Text** checked.

**Benefits:**

* Image displays properly in Salesforce record detail pages
* Programmatically builds the correct path
* More user-friendly than text fields

**Requirements:** Image file names must follow a consistent, predictable pattern.

### Method 4: Build an Image URL Within the S-Docs Template

This method creates the full image path within the S-Docs template itself, without requiring a formula field.

**For S-Docs versions below 7.0:**

{% code title="Example" %}

```
lt#img src=quot#https://intranet/{{!Product2.ProductPath__c}}.pngquot# /gt#
lt#img src=quot#{{!Opportunity.Owner.SignatureURL__c}}quot# /gt#
```

{% endcode %}

The special notation (`lt#`, `gt#`, `quot#`) instructs S-Docs to evaluate the markup rather than render it literally.

**For S-Docs version 7.0 and later:**

{% code title="Example" %}

```html
<img src="https://intranet/{{!Product2.ProductPath__c}}.png" />
<img src="{{!Opportunity.Owner.SignatureURL__c}}" />
```

{% endcode %}

**Important:** The field value should be a URL pointing to either:

* An image in your Salesforce documents folder
* An external image hosted on the public internet

The field should contain the entire path including the `https://` prefix.

**Best Practice:** Build a full image URL in a custom field so the base URL can be changed in one place if needed, rather than updating every template. This is especially important when migrating templates between orgs.

***

## Understanding Triple Curly Braces

When you insert a field marked as "Contains Rich Text," you'll see three sets of braces:

{% code title="Example" %}

```
{{{!Product2.ProductImage__c}}}
```

{% endcode %}

The extra pair of curly braces instructs S-Docs to **interpret** the field value as markup rather than display it as text.

**Without triple braces:**

```
```

Displays: `<img src="//host/Product123Image.png" />`

**With triple braces:**

```
```

Displays: The actual image

***

## Working With Images in DOC Templates

For DOC templates, additional configuration is required to ensure images scale correctly.

### Template Settings

{% stepper %}
{% step %}
Navigate to the **Page Settings** tab in the Template Editor
{% endstep %}

{% step %}
Check **Embed Images**
{% endstep %}
{% endstepper %}

### Image Format Requirements

Use the **style attribute** format:

{% code title="Correct" %}

```html
<img src="..." style="height: 100px; width: 200px;" />
```

{% endcode %}

**Do NOT use:**

{% code title="Incorrect" %}

```html
<img src="..." height="100" width="200" />
```

{% endcode %}

Without the style attribute, images will appear as tiny squares in generated documents.

### User Action Required

Users must click **Enable Editing** in Microsoft Word for images to download in the generated document.

***

## Best Practices

* **Use the Upload tab for new images**: When adding new images from your computer, use the Upload tab to automatically handle external availability
* **Point sandbox templates to production images**: When working in sandbox, reference image URLs from your production org to avoid updating images when migrating templates
* **Use full URLs, not relative paths**: Build complete URLs (e.g., `https://na30.salesforce.com/servlet/...`) instead of relative paths (e.g., `/servlet/...`) for better portability between orgs
* **Organize images logically**: Use descriptive file names and folder structures for easy maintenance
* **Test across formats**: Verify images render correctly in PDF, DOCX, and HTML formats
* **Consider file size**: Large images can slow document generation; optimize images before uploading
* **Use static resources for packages**: If developing managed packages, use static resources for version control and deployment

***

## Troubleshooting

If images show up in the template editor but do not load in generated documents, there are four common causes and resolutions.

### Issue 1: Image URL is From External Source

If your image URL is from outside Salesforce, you must allowlist the domain through Remote Site Settings.

**Resolution:**

{% stepper %}
{% step %}
Navigate to Setup → type "Remote Site Settings" in Quick Find → click **Remote Site Settings**
{% endstep %}

{% step %}
Click **New Remote Site**
{% endstep %}

{% step %}
Enter the following:

* **Remote Site Name**: externalImageSDocs (or any descriptive name)
* **Remote Site URL**: The image URL domain only

**Example:** If your full image URL is `https://www.google.com/images/logo.png`, enter `https://www.google.com` as the Remote Site URL.
{% endstep %}

{% step %}
Click **Save**
{% endstep %}
{% endstepper %}

Your external image should now load correctly.

### Issue 2: Image From Salesforce Documents is Not Externally Available

If your image was added from Salesforce documents using Browse Server (not uploaded through the Upload tab), it must be manually set to Externally Available.

**Resolution:**

{% stepper %}
{% step %}
Navigate to the **Documents** object in Salesforce Classic (Click the **+** (All Tabs) symbol to find Documents)
{% endstep %}

{% step %}
Find the Document record for your image and click its name
{% endstep %}

{% step %}
Check the **Externally Available Image** checkbox
{% endstep %}

{% step %}
Click **Save**
{% endstep %}
{% endstepper %}

The image should now load correctly.

**Note:** Images uploaded through the **Upload tab** in the Add Image window are automatically set as externally available and do not require this manual step.

### Issue 3: Images Not Appearing After Org Migration

**Symptoms:** Images worked in your original org but don't appear after migrating templates to a new org.

**Causes:**

* Image URLs contain the old org's instance (e.g., `na30.salesforce.com` instead of the new instance)
* Relative URLs aren't resolving correctly in the new org

**Resolution:**

* Use full URLs with the correct instance
* Consider using formula fields to build URLs dynamically
* Update static image references to point to the new org's resources

### Issue 4: Broken Image Icons Appear

**Symptoms:** Broken image icons appear instead of images in generated PDFs.

**Common causes:**

* Missing Remote Site Settings for external URLs
* Image not set as Externally Available
* Incorrect or expired image URL

**Resolution:** Follow the troubleshooting steps for Issues 1 and 2 above.

***

Working with images in S-Docs allows you to create professional, visually engaging documents that enhance your brand and improve communication with customers and stakeholders. Whether using static images for consistent branding or dynamic images for personalized content, S-Docs provides flexible options to meet your needs.


# Static Image Solutions


# How to: Remote Site Settings

This page will outline how to create a new Remote Site so that images within a Salesforce Organization can be used externally.

## Phase 1: Adding the Remote Site

It is a common occurrence to have images that are stored outside of Salesforce. In order to leverage those within S-Docs Templates and correctly display them post document generation, the user must whitelist the image's domain.

1. Navigate to Setup > Search for Remote Site Settings from the QuickFind Search
2. Select **New Remote Site**
3. **Enter the Following Information:**
   1. Remote Site Name (Descriptive name indicating we are saving images)
   2. Remote Site URL
4. **Save**

{% hint style="info" %}
The Remote Site URL should indicate only the domain of the site. **Example:** If your full image URL is `https://www.google.com/images/logo.png`, enter `https://www.google.com` as the Remote Site URL.
{% endhint %}


# How to: Add Images as Static Resources

This is a guide to show how to add images as a static resource within Salesforce to then leverage within S-Docs Templates.

## Instructions

### Phase 1: adding images to Salesforce as a static resource.

{% stepper %}
{% step %}

#### Add a new static resource in Salesforce

Click the gear (1) and then Setup, then search for Static Resources (2), then click Static Resources (3) and create a new one (4).
{% endstep %}

{% step %}

#### Choose the file and save the resource

Choose the name, select your image file, set to public, and click Save.

<figure><img src="https://1548664070-files.gitbook.io/~/files/v0/b/gitbook-x-prod.appspot.com/o/spaces%2FWKNnJmhJBQwhdk5WBFsi%2Fuploads%2FIQvlQAN25QS6TsvtZm3b%2Fimage.png?alt=media&amp;token=d1891fde-2f2f-49a3-95a3-ff04da02480b" alt=""><figcaption></figcaption></figure>
{% endstep %}
{% endstepper %}

### Phase 2: adding the image to a S-Docs template.

{% stepper %}
{% step %}

#### View the static resource

Now your image will populate in Static Resources and you can click on it. Now click View.

<figure><img src="https://1548664070-files.gitbook.io/~/files/v0/b/gitbook-x-prod.appspot.com/o/spaces%2FWKNnJmhJBQwhdk5WBFsi%2Fuploads%2Fj74EmlYCwPlcMjuUbqJI%2Fimage.png?alt=media&amp;token=7fb2b2fc-24c0-4666-b6e1-8d4e36cf8931" alt=""><figcaption></figcaption></figure>
{% endstep %}

{% step %}

#### Use the URL or resource tag

You can now use this URL or the resource tag in your template, and configure it however you would like.

<figure><img src="https://1548664070-files.gitbook.io/~/files/v0/b/gitbook-x-prod.appspot.com/o/spaces%2FWKNnJmhJBQwhdk5WBFsi%2Fuploads%2F6h0syXcof5BQA3LYEz6j%2Fimage.png?alt=media&amp;token=05e859b3-2160-4560-a621-8f347f6c91d3" alt=""><figcaption></figcaption></figure>

{% hint style="info" %}
**Note:** If you're sending documents externally (like email templates) and you selected an image using Browse Server, you need to ensure the Salesforce document record is set to externally available
{% endhint %}
{% endstep %}

{% step %}

#### Add the image to your template with

Navigate to your template and add it to your template with the tag, and configure it however you would like.

<figure><img src="https://1548664070-files.gitbook.io/~/files/v0/b/gitbook-x-prod.appspot.com/o/spaces%2FWKNnJmhJBQwhdk5WBFsi%2Fuploads%2F9RbfQyMqtBmAhBDNfAE2%2Fimage.png?alt=media&amp;token=27726f7d-897f-4d28-8065-ca5f55512af9" alt=""><figcaption></figcaption></figure>
{% endstep %}
{% endstepper %}

{% hint style="info" %}
You can only make hyperlinks for images if the images are saved in Salesforce as a static resource
{% endhint %}


# How to: Add Images as Salesforce Documents

This page will walk a user through adding a static image as a document to be used throughout an Org.

## Phase 1: Switch to Salesforce Classic

The Documents Tab has been depreciated by Salesforce, and thus not available on the lightning experience.

1. Select the **User's Avatar** in the top right of the screen
2. Select **Switch to Salesforce Classic** from the dropdown

   <figure><img src="https://1548664070-files.gitbook.io/~/files/v0/b/gitbook-x-prod.appspot.com/o/spaces%2FWKNnJmhJBQwhdk5WBFsi%2Fuploads%2F9cUxx6ukhMbqkvqHfJZm%2Fimage.png?alt=media&amp;token=9342e36b-d66c-4ce5-9bf0-530f7d327545" alt=""><figcaption></figcaption></figure>

## Phase 2: The Documents Object

1. Navigate to **All Tabs**
2. **Select** the **Documents** Tab

   <figure><img src="https://1548664070-files.gitbook.io/~/files/v0/b/gitbook-x-prod.appspot.com/o/spaces%2FWKNnJmhJBQwhdk5WBFsi%2Fuploads%2FCBYBx3taCcfXtw6MS6F5%2Fimage.png?alt=media&amp;token=37a55440-5578-4dc3-a996-b0f281ab322a" alt=""><figcaption></figcaption></figure>
3. **Select the desired folder** and **select New** to create a new document

   <figure><img src="https://1548664070-files.gitbook.io/~/files/v0/b/gitbook-x-prod.appspot.com/o/spaces%2FWKNnJmhJBQwhdk5WBFsi%2Fuploads%2F4LHJg2La8BOHKbfjbOtD%2Fimage.png?alt=media&amp;token=27035719-8e07-4f35-9758-af2321e4b0e7" alt=""><figcaption></figcaption></figure>
4. Fill in the following information:

   <figure><img src="https://1548664070-files.gitbook.io/~/files/v0/b/gitbook-x-prod.appspot.com/o/spaces%2FWKNnJmhJBQwhdk5WBFsi%2Fuploads%2FYQ49sfSc7KFEqDXSldz7%2Fimage.png?alt=media&amp;token=7b7e4aef-50fd-4aa2-a5e5-6ce67c06cbf7" alt=""><figcaption></figcaption></figure>

{% hint style="info" %}
**Be sure to Set Externally Available Image to True.** If the setting is disabled, the document will be received as a broken image when delivered outside of the organization (such as email templates).
{% endhint %}


# How to: Use Bar Codes & QR Codes

This page will walk a user through adding Bar Codes or QR Codes to be leveraged within S-Docs Templates.

{% hint style="warning" %}
S-Docs does not offer the capability to generate QR Codes or Bar Codes. S-Docs is capable of including Bar Codes and QR Codes within S-Docs Templates, and therefore within a Generated Document.
{% endhint %}

## Prerequisites:

Before proceeding through this article, the user should have a working knowledge of:

* How to store an Image in a Rich Text Field
* How to format an HTML image tag

## Option 1: Store the Image in a Rich Text Field

1. Store the image in a Rich Text Field within a Salesforce Record
2. In the Template Editor, **Select Insert Field, Select the Rich Text Field, Select Insert**

   <figure><img src="https://1548664070-files.gitbook.io/~/files/v0/b/gitbook-x-prod.appspot.com/o/spaces%2FWKNnJmhJBQwhdk5WBFsi%2Fuploads%2FaMV6A310a2sqiwS5DZpe%2Fimage.png?alt=media&amp;token=a42f1fb3-4f39-4e1f-89f8-bcfdfcae463f" alt="" width="563"><figcaption></figcaption></figure>

{% hint style="info" %}
Ensure 3 Curly Braces {{{!Object.fieldName}}} to correctly pull in Rich Text Data such as images or HTML Elements. The Insert Field Option will do this automatically if you enable **This field value contains HTML, Rich Text, or Images**
{% endhint %}

<figure><img src="https://1548664070-files.gitbook.io/~/files/v0/b/gitbook-x-prod.appspot.com/o/spaces%2FWKNnJmhJBQwhdk5WBFsi%2Fuploads%2FJAz40cKHVPDw7pT14XP9%2Fimage.png?alt=media&amp;token=ac99102a-76f1-4e84-8fb8-548e9b79acc5" alt=""><figcaption></figcaption></figure>

## Option 2: Inserting Markup into Plain Text Field

1. Insert the image using HTML Entities directly into a TextArea field

   <figure><img src="https://1548664070-files.gitbook.io/~/files/v0/b/gitbook-x-prod.appspot.com/o/spaces%2FWKNnJmhJBQwhdk5WBFsi%2Fuploads%2Fw8RmiDjaX1iPxTsXOp4m%2Fimage.png?alt=media&amp;token=facdd3e3-9dc6-4911-acf6-06cbeb45584a" alt=""><figcaption></figcaption></figure>
2. Insert the field in the template as we did in Option 1

<figure><img src="https://1548664070-files.gitbook.io/~/files/v0/b/gitbook-x-prod.appspot.com/o/spaces%2FWKNnJmhJBQwhdk5WBFsi%2Fuploads%2FQUWpEuMUIwfoDBrRX02z%2Fimage.png?alt=media&amp;token=fa22e3d7-48f9-4286-a140-b7a4ce0d3edd" alt="" width="563"><figcaption></figcaption></figure>


# Dynamic Image Solutions


# How to: Images & Related Lists

This page will guide the user through how to pull images from Salesforce Object Records that are stored in the Files or Attachments related lists.

## Images from Files Related List

```
<!--{{!
<lineitemsSOQL><class>table999</class>
<soql>select ContentDocument.latestpublishedversionid, ContentDocument.LatestPublishedVersion.pathonclient from contentdocumentlink where LinkedEntityId='{!ObjectID15}' AND (ContentDocument.LatestPublishedVersion.pathonclient LIKE'%.jpg%')
</soql>
<column prefix="<img src='/sfc/servlet.shepherd/version/download/" postfix="' width='150px' />">ContentDocument.latestpublishedversionid</column>
</lineitemsSOQL>
}}-->
```

Insert the above code snippet directly into the Template Editor's Source.

{% hint style="info" %}
The above code snippet is searching for image's stored on the Object Record of type JPG. To generate properly, change **.jpg** in **LIKE'%.jpg%'** to the image format that was uploaded.
{% endhint %}

<figure><img src="https://1548664070-files.gitbook.io/~/files/v0/b/gitbook-x-prod.appspot.com/o/spaces%2FWKNnJmhJBQwhdk5WBFsi%2Fuploads%2F0xJVFWQ1hzVexOLv4liR%2Fimage.png?alt=media&amp;token=f0c459f3-3fbb-4ae2-a09e-c60ef365c489" alt=""><figcaption></figcaption></figure>

## Images from Attachments

{% hint style="info" %}
Images stored in attachments is considered legacy in comparison to storing images as Files/ContentDocuments. The Salesforce Lightning Experience will **automatically convert uploads to Notes & Attachments to Salesforce Files**. In order to upload Attachments, use **Salesforce Classic**.
{% endhint %}

In Salesforce Classic, Navigate to the Object Record, Select Attach File, upload the selected image. The following code block will now operate as expected.

<figure><img src="https://1548664070-files.gitbook.io/~/files/v0/b/gitbook-x-prod.appspot.com/o/spaces%2FWKNnJmhJBQwhdk5WBFsi%2Fuploads%2FQZEkkAePg8fYXbBSWHYE%2Fimage.png?alt=media&amp;token=1bf3404f-ee2e-44d8-bf6e-08b5849f89cf" alt=""><figcaption></figcaption></figure>

```
<!--{{!
<lineitemsSOQL>
<class>table999</class>
<soql>Select id, name from attachment where parentId='{!ObjectID15}' AND (name LIKE'%.jpg%')</soql>
<column prefix="<img src='/servlet/servlet.FileDownload?file=" postfix="' width='150px' />">id</column>
</lineitemsSOQL>}}-->
```


# How to: Place Images in Columns

This page will guide the user through generating a related list and generating images from that related list.

## Prerequisites:

Before proceeding, the user should have:

* The permissions to create and edit S-Docs Templates
* An Object Record with Images store in a related list

## Instructions:

We will showcase this by pulling images from the Files related list on an object record

```html
<table>
	<tbody>
		<tr><!--{{!
<lineitemsSOQL>
<class>none</class>
<soql>select ContentDocument.latestpublishedversionid, ContentDocument.LatestPublishedVersion.pathonclient from contentdocumentlink where  LinkedEntityId='{!ObjectID15}' AND (ContentDocument.LatestPublishedVersion.pathonclient LIKE'%.png%')
</soql>
<column newrow="X" type="rtf" prefix="<td><img src='" postfix="' width='150px'
style='border:2px solid black;' /></td>">ContentDocument.latestpublishedversionid</column>
</lineitemsSOQL>
}}-->
		</tr>
	</tbody>
</table>
```

{% hint style="info" %}
Replace “X” in `newrow="X"` with the number of columns to be displayed.\
`!ObjectId15` can be replaced with the object ID of the related list where the images are being pulled from.
{% endhint %}


# How to: Resize Images from Fields

This page will instruct how to resize images in a rich text field.

## Merge Field Syntax:

```
{{{!Object.fieldname__c replaceAll='#LT#img ,#LT#img height="Valuepx" width="Valuepx" '}}}
```

Take for example we generate an image stored in a rich text field:

<figure><img src="https://1548664070-files.gitbook.io/~/files/v0/b/gitbook-x-prod.appspot.com/o/spaces%2FWKNnJmhJBQwhdk5WBFsi%2Fuploads%2F7ry8zCtarAd5hGxCJwjW%2Fimage.png?alt=media&amp;token=38673bcb-ce5a-4684-bd7a-38685abe9104" alt="" width="188"><figcaption></figcaption></figure>

The generated image is much too large. If we then generate setting the height and width to 100px and 50px:

```
{{{!Opportunity.Rich_text__c replaceAll='#LT#img ,#LT#img height="50px" width="100px" '}}}
```

<figure><img src="https://1548664070-files.gitbook.io/~/files/v0/b/gitbook-x-prod.appspot.com/o/spaces%2FWKNnJmhJBQwhdk5WBFsi%2Fuploads%2F9dp20azaxDrfAAV30t4X%2Fimage.png?alt=media&amp;token=fd81f498-c8a8-4c4e-ad43-8a193e3bd926" alt=""><figcaption></figcaption></figure>

***

## Related List Syntax:

Using the same example, we can alter the image within a related list using:

```
replaceall="<img ,<img style='width:100px'">
```

```html
<table>
<tbody>
<tr>
<th class="table498header">image test</th>
</tr>
</tbody>
<tbody style="page-break-inside: avoid !important; page-break-before: auto !important;"><!--{{!
<lineitemsSOQL>
<class>none</class>
<listname>opportunity</listname>
<soql>select rtfimage__c from opportunity where accountid = '{{!account.id}}'</soql>
<column type="rtf" replaceall="<img ,<img style='width:100px'">rtfimage__c</column>
</lineitemsSOQL>
}}-->
</tbody>
</table>
```

<figure><img src="https://1548664070-files.gitbook.io/~/files/v0/b/gitbook-x-prod.appspot.com/o/spaces%2FWKNnJmhJBQwhdk5WBFsi%2Fuploads%2FUWH2snZSj3WanQa4NeCS%2Fimage.png?alt=media&amp;token=14732d24-509d-4fba-85ce-88037ce68d75" alt=""><figcaption></figcaption></figure>

{% hint style="info" %}
NOTE: This will resize all images. max-width does not currently work at the time of this writing.
{% endhint %}


# How to: Use a CSS Selector

This guide will walk users through how to use CSS and more specifically a CSS Selector to resize an image.

CSS Styling for an image within a custom field. Useful for dynamic images that are various sizes.

Use a selector to set dimensions for specific HTML entities such as `div.class1 img`

{% code title="template.html" %}

```html
<style type="text/css">div.class1{
  max-width: 400px;
  max-height: 400px
}

div.class1 img {
  width: 100%;
  height: 100%;
}
</style>
<div class="class1">{{{!Objectname.fieldname}}}</div>
```

{% endcode %}

### Understanding the Source

In the above code block we provide our \<div> with a class **class1.**

```
<div class="class1">{{{!Objectname.fieldname}}}</div>
```

The template is being populated with an image stored in a field, meaning we have a rich text field that will require 3 curly braces. The Selector will set the width and height of any image \<img> to its full value that is found within a \<div> with class **class1.**

<figure><img src="https://1548664070-files.gitbook.io/~/files/v0/b/gitbook-x-prod.appspot.com/o/spaces%2FWKNnJmhJBQwhdk5WBFsi%2Fuploads%2FK7qrfmc6cH4hJoeKTN6l%2Fimage.png?alt=media&amp;token=ccc1e1dd-7e42-499f-a06b-c63505289ff6" alt=""><figcaption></figcaption></figure>


# Images from Files

In order to add images from a Salesforce File, a Public URL must be created in order to download/use the File as an image in a generated document.

This can be accomplished manually, by pulling up the File record and [clicking “Public Link”](https://help.salesforce.com/s/articleView?id=sf.collab_files_sharing_via_link.htm\&type=5). Once this is done, right-clicking on the opened image and copying the link should provide a link that can be successfully pulled into a document during generation.

For clients who want to automate creating public links and using them in generated documents on the regular, this can be accomplished with Apex, directly inserting the File (ContentVersion) into the public link table (ContentDistribution) like so:

{% code title="Apex" %}

```apex
/* Getting ContentVersion file using ContentDocument Id */
ContentVersion file = [SELECT Id, Title FROM ContentVersion WHERE ContentDocumentId = '<Content Document ID>'].Id;

/* Creating ContentDistribution record */
insert new ContentDistribution(
   Name = file.Title,
   ContentVersionId = file.Id,
   PreferencesAllowViewInBrowser= true
);
```

{% endcode %}

Or perhaps a triggered Flow is preferable:

{% hint style="info" %}
Be sure to:

* Make sure public link base URLs are included in Remote Site Settings
* Note that a “download URL” will effectively download an image for document generation
  {% endhint %}


# Document Formats

Choose the right S-Docs output format, then jump to setup, examples, and format-specific guidance.

Use this page when you need to choose the right output format for an S-Docs template.

Each format is built for a different document job.

Use this section to choose the format that fits your layout, editing, and delivery needs.

{% hint style="info" %}
Use **PDF Templates** when you build the layout in S-Docs.

Use **Upload Existing PDFs** when you already have a finished PDF form.

Use **Microsoft formats** when the final file needs to stay in Word, PowerPoint, or Excel.
{% endhint %}

### Start with the path that fits your goal

If you need a print-ready document with flexible layout, start with PDF.

If you need exact placement on a fixed form, use PDF upload.

If users need an editable Office file, use a Microsoft format.

<table data-card-size="large" data-column-title-hidden data-view="cards"><thead><tr><th>Title</th><th>Description</th><th data-card-target data-type="content-ref">Target</th></tr></thead><tbody><tr><td><strong>PDF Templates</strong></td><td>Build dynamic PDFs with layout control, related lists, and page settings.</td><td><a href="/sdocs/template-architecture/document-formats/pdf-templates">PDF Templates</a></td></tr><tr><td><strong>HTML Email Templates</strong></td><td>Build merged email content when the output should be sent as email, not downloaded as a file.</td><td><a href="/sdocs/template-architecture/document-formats/html-email-format">HTML Email Templates</a></td></tr><tr><td><strong>Upload Existing PDFs</strong></td><td>Map Salesforce data onto a finished PDF form or background document.</td><td><a href="/sdocs/template-architecture/document-formats/pdf-upload-format">Upload Existing PDFs</a></td></tr><tr><td><strong>Microsoft Word (DOCX)</strong></td><td>Generate Word documents when the result should stay editable after generation.</td><td><a href="/sdocs/template-architecture/document-formats/docx-s-docs">Microsoft Word (DOCX)</a></td></tr></tbody></table>

### Pick the right format

* Use [PDF Templates](/sdocs/template-architecture/document-formats/pdf-templates) for quotes, invoices, reports, and other print-style documents.
* Use [Upload Existing PDFs](/sdocs/template-architecture/document-formats/pdf-upload-format) for fixed forms that need drag-and-drop field placement.
* Use [HTML Email Templates](/sdocs/template-architecture/document-formats/html-email-format) when the output is email content, not a document file.
* Use [Microsoft Word (DOCX)](/sdocs/template-architecture/document-formats/docx-s-docs) for editable word-processing documents.
* Use [PowerPoint (PPTX)](/sdocs/template-architecture/document-formats/pptx-format) for presentation-style output.
* Use [Excel (XLSX)](/sdocs/template-architecture/document-formats/xlsx-format) for spreadsheet-first output.

### What you can do with document formats

* Generate dynamic PDFs from Salesforce data.
* Fill fixed PDF forms with exact field placement.
* Deliver editable Word, PowerPoint, and Excel files.
* Send HTML email content with merged record values.
* Choose format-specific guidance for syntax, layout, and troubleshooting.

### Browse by format

* [PDF Templates](/sdocs/template-architecture/document-formats/pdf-templates)
* [Upload Existing PDFs](/sdocs/template-architecture/document-formats/pdf-upload-format)
* [HTML Email Templates](/sdocs/template-architecture/document-formats/html-email-format)
* [Microsoft Word (DOCX)](/sdocs/template-architecture/document-formats/docx-s-docs)
* [PowerPoint (PPTX)](/sdocs/template-architecture/document-formats/pptx-format)
* [Excel (XLSX)](/sdocs/template-architecture/document-formats/xlsx-format)
* [Additional Formats](/sdocs/template-architecture/document-formats/other-formats)

### Related note

Microsoft templates use bracket-based S-Docs syntax inside Office files.

If you need that syntax pattern, start with [Merge Fields With Microsoft Templates (DOCX, PPTX, XLSX)](/sdocs/template-architecture/inserting-merge-fields/merge-fields-with-microsoft-templates-docx-pptx-xlsx).


# PDF Templates

Choose the right PDF format, see example outputs, copy a starter template, and learn the main PDF rules.

Use this page when you need a PDF and want to choose the right format fast.

A standard **PDF Template** is the most flexible PDF format in S-Docs.

Use it when you want to build the document layout in the template itself and generate a dynamic PDF from Salesforce data.

If you already have a finished PDF form, use [Upload Existing PDFs](/sdocs/template-architecture/document-formats/pdf-upload-format) instead.

{% hint style="info" %}
Pick **PDF Templates** when dynamic layout matters most.

Pick **Upload Existing PDFs** when exact field placement on a fixed form matters most.
{% endhint %}

### Tell me which one to pick

| Pick this format         | Use it when you need                     | Best for                                                                             | Not ideal when                                                              |
| ------------------------ | ---------------------------------------- | ------------------------------------------------------------------------------------ | --------------------------------------------------------------------------- |
| **PDF Templates**        | Full layout control in the template body | Quotes, invoices, contracts, reports, multi-page packets                             | You already have a final PDF that only needs overlay fields                 |
| **Upload Existing PDFs** | Exact placement on top of a fixed PDF    | Government forms, pre-approved legal forms, static brochures, drag-and-drop overlays | You need related lists, flexible tables, headers, footers, or page settings |

#### Use PDF Templates if you need

* related lists and data tables
* conditional logic
* components
* headers and footers
* page settings and margin control
* multi-page output with reusable layout

#### Use Upload Existing PDFs if you need

* a fixed background document
* drag-and-drop field placement
* simple overlays on an existing PDF
* quick setup for non-technical builders

Keep in mind:

* Upload Existing PDFs are portrait-only.
* Related lists are not supported there.
* Traditional headers, footers, and page settings are not available there.

### Show me what it looks like

These examples show the same idea in three views:

* raw Salesforce data
* template structure
* generated PDF result

{% tabs %}
{% tab title="Quote / invoice" %}
**Best fit:** customer-facing quotes, invoices, and order summaries

**Raw data**

```
Quote.Name: ACME Renewal
Quote.Account.Name: Acme Corp
Quote.Owner.CompanyName: S-Docs, Inc.
Quote.TotalPrice: 25000

QuoteLineItems:
- Premier Support | Qty 2 | Unit 12500 | Total 25000
```

**Generated PDF**

```
PROJECT: ACME Renewal
CLIENT: Acme Corp
DATE: March 24, 2026

SERVICE            QTY    PRICE      TOTAL
Premier Support      2    $12,500    $25,000

GRAND TOTAL                        $25,000
```

**Template snippet**

{% code title="quote-template.html" %}

```html
<table border="0" cellpadding="2" cellspacing="0" style="width:100%;">
  <tr>
    <td>PROJECT: {{!Quote.Name}}</td>
    <td style="text-align:right">{{!Quote.Owner.CompanyName}}</td>
  </tr>
  <tr>
    <td>CLIENT: {{!Quote.Account.Name}}</td>
    <td style="text-align:right">DATE: {{!DocumentDateTime MMMMM d, yyyy}}</td>
  </tr>
</table>

<!--{{!
<lineitemsSOQL>
  <listname>quotelineitem</listname>
  <column>description</column>
  <column format-number="#,###">quantity</column>
  <column prefix="$" format-number="#,###.##">listprice</column>
  <column prefix="$" format-number="#,###.##">totalprice</column>
</lineitemsSOQL>
}}-->
```

{% endcode %}

For a fuller real example, see [Quote Template on the Quote Object](broken://spaces/WKNnJmhJBQwhdk5WBFsi/pages/2056868cec5aee11ab9a7d9590e6418e3733f21d).
{% endtab %}

{% tab title="Multi-page report" %}
**Best fit:** work orders, summaries, audit reports, and packet-style output

**Raw data**

```
Opportunity.Name: Q2 Expansion
Opportunity.Account.Name: Northern Trail
Opportunity.Amount: 4222300.8
Opportunity.CloseDate: 2026-03-24

OpportunityLineItems:
- Consulting
- Implementation
- Training
```

**Generated PDF**

```
Q2 Expansion Summary

Account: Northern Trail
Close Date: March 24, 2026
Amount: $4,222,300.80

Section 1: Executive summary
Section 2: Line items table
Section 3: Terms and conditions
```

**Template snippet**

{% code title="report-template.html" %}

```html
<h1>{{!Opportunity.Name}} Summary</h1>
<p>Account: {{!Opportunity.Account.Name}}</p>
<p>Close Date: {{!Opportunity.CloseDate format-date="MMMM dd, yyyy"}}</p>
<p>Amount: ${{!Opportunity.Amount format-number="#,###.##"}}</p>

<h2>Line Items</h2>
<!--{{!
<lineitemsSOQL>
  <listname>opportunitylineitems</listname>
  <column>PricebookEntry.Product2.Name</column>
  <column format-number="#,###">Quantity</column>
  <column prefix="$" format-number="#,###.##">UnitPrice</column>
  <column prefix="$" format-number="#,###.##">TotalPrice</column>
</lineitemsSOQL>
}}-->
```

{% endcode %}

This is the common pattern for document-style PDFs that need dynamic sections and tables.
{% endtab %}

{% tab title="Fixed form" %}
**Best fit:** exact overlays on an existing form

If your goal is:

* keep a pre-approved PDF exactly as designed
* drag fields onto a fixed background
* avoid rebuilding the layout in markup

then use [Upload Existing PDFs](/sdocs/template-architecture/document-formats/pdf-upload-format), not a standard PDF Template.

That format supports drag-and-drop fields on top of an uploaded PDF background.
{% endtab %}
{% endtabs %}

### Give me the raw materials

Use this starter when you want a clean PDF template with:

* a title block
* key record fields
* a line item table
* number and date formatting

{% code title="pdf-template-starter.html" %}

```html
<style type="text/css">
  body {
    font-family: Arial, sans-serif;
    font-size: 10pt;
    color: #222;
  }

  h1, h2 {
    margin-bottom: 8px;
  }

  table.layout {
    width: 100%;
    border-collapse: collapse;
    margin-bottom: 14px;
  }

  table.layout td,
  table.layout th {
    padding: 6px;
    border-bottom: 1px solid #d9d9d9;
    text-align: left;
  }

  .label {
    width: 28%;
    font-weight: bold;
  }
</style>

<h1>Document Title</h1>

<table class="layout">
  <tr>
    <td class="label">Record</td>
    <td>{{!Opportunity.Name}}</td>
  </tr>
  <tr>
    <td class="label">Account</td>
    <td>{{!Opportunity.Account.Name}}</td>
  </tr>
  <tr>
    <td class="label">Close Date</td>
    <td>{{!Opportunity.CloseDate format-date="MMMM dd, yyyy"}}</td>
  </tr>
  <tr>
    <td class="label">Amount</td>
    <td>${{!Opportunity.Amount format-number="#,###.##"}}</td>
  </tr>
</table>

<h2>Line Items</h2>

<table class="layout">
  <thead>
    <tr>
      <th>Product</th>
      <th>Qty</th>
      <th>Unit Price</th>
      <th>Total</th>
    </tr>
  </thead>
  <tbody>
<!--{{!
<lineitemsSOQL>
  <class>none</class>
  <listname>opportunitylineitems</listname>
  <column>PricebookEntry.Product2.Name</column>
  <column format-number="#,###">Quantity</column>
  <column prefix="$" format-number="#,###.##">UnitPrice</column>
  <column prefix="$" format-number="#,###.##">TotalPrice</column>
</lineitemsSOQL>
}}-->
  </tbody>
</table>
```

{% endcode %}

If you need an easier drag-and-drop starting point, use [Upload Existing PDFs](/sdocs/template-architecture/document-formats/pdf-upload-format).

### What are the rules?

#### Anatomy of a standard PDF Template

**Required to create the template record**

* template name
* `Related To Type`
* template format set to `PDF`

**Required for useful output**

* document body content

Without body content, the generated PDF will be blank.

**Common optional parts**

* merge fields
* related lists with `lineitems` or `lineitemsSOQL`
* conditional logic
* components
* headers and footers
* page settings
* CSS styling

#### Common data types

* **Text**: names, addresses, IDs, freeform content
* **Number and currency**: totals, quantities, prices, percentages
* **Date and datetime**: close dates, invoice dates, timestamps
* **Boolean**: checkbox-style output
* **Related data**: child records shown as tables or repeated sections

Use template attributes when values need display formatting.

For broader formatting help, see [Format Data with Template Attributes](/sdocs/advanced-template-logic/template-attributes).

#### Constraints and rendering rules

* PDF output uses Salesforce PDF rendering.
* JavaScript-rendered content is not supported.
* Modern web layouts are less reliable than table-based layout.
* Basic HTML and CSS patterns are safest for print-style output.
* Unicode and international text need extra testing.
* `Arial Unicode MS` is the documented multibyte font for extended character sets.

{% hint style="warning" %}
Rich text fields can introduce extra paragraph tags, font fallback, and formatting differences.

If your output depends on rich text, test with real sample data early.
{% endhint %}

#### Quick decision checklist

Choose **PDF Templates** when you answer **yes** to one or more of these:

* Do I need related lists or dynamic tables?
* Do I need headers, footers, or page settings?
* Do I need conditional sections or reusable components?
* Am I building a document, not filling a fixed form?

Choose [Upload Existing PDFs](/sdocs/template-architecture/document-formats/pdf-upload-format) when you answer **yes** to this:

* Do I already have the final PDF and only need to place data on top of it?

### Next reads by goal

* Need exact overlay placement on a finished PDF? Start with [Upload Existing PDFs](/sdocs/template-architecture/document-formats/pdf-upload-format).
* Need styling guidance? Read [Style Templates](/sdocs/template-architecture/template-authoring).
* Need table and child-record data? Read [Insert Data Tables](/sdocs/advanced-template-logic/related-lists).
* Need PDF-specific limitations? Read [PDF Render Limitations](broken://spaces/WKNnJmhJBQwhdk5WBFsi/pages/3ccb810031f9ead1d614975ed1c05651aa01130d).
* Need font guidance for multilingual output? Read [Supported Fonts in PDF Format](/sdocs/template-architecture/document-formats/pdf-templates/supported-fonts-in-pdf-format).


# PDF Rendering Considerations

Understand the main Salesforce PDF rendering considerations before you build or troubleshoot PDF templates.

S-Docs PDF templates use Salesforce PDF rendering.

That engine works well for print-style documents. It also has a few important considerations to plan around.

### Key Considerations

* Some HTML and CSS rules render differently than they do in a browser.
* PDF output relies on Salesforce's rendering engine.
* The PDF rendering service outputs PDF version `1.4` and supports CSS up to version `2.1`.
* JavaScript-rendered content is not supported.
* Interactive form elements may not behave as expected in PDF output.
* Modern web layout patterns are often less reliable than simple print markup.
* Multilingual characters need extra testing.
* Font support is more limited than in a browser.
* Large pages, large PDFs, and heavy image usage can approach Salesforce rendering limits.

### Not currently available

These PDF capabilities are not currently available:

* fillable PDFs
* password-protected PDFs

### What To Avoid

Avoid these patterns in PDF templates when possible:

* buttons, inputs, and browser-driven form behavior
* JavaScript-dependent content
* complex responsive layouts
* advanced CSS that depends on modern browser support

Table-based layouts and simple CSS are usually the safest choice.

### Font and language considerations

PDF rendering has stricter font support than normal browser output.

Salesforce documents four core PDF font families, plus `Arial Unicode MS` for multibyte characters, in its [supported fonts reference](https://developer.salesforce.com/docs/atlas.en-us.pages.meta/pages/pages_output_pdf_supported_fonts.htm).

Use it when your document includes non-Latin characters or multilingual content. Even then, test with real data before rollout.

{% hint style="warning" %}
If your template includes international characters, do not assume browser output and PDF output will match.
{% endhint %}

Some standard Visualforce components also have font-related limits in PDF output.

For example, components such as `apex:pageBlock` and `apex:sectionHeader` are not the best choice for double-byte font rendering.

### Salesforce rendering thresholds

Salesforce also applies hard limits during PDF generation:

* The page response before PDF rendering cannot exceed `15 MB`.
* The generated PDF file cannot exceed `60 MB`.
* Total image data included in the PDF cannot exceed `30 MB`.

These limits matter most for:

* image-heavy documents
* long reports
* packet-style PDFs with many related list rows

### Inline CSS requirements

Inline CSS works only under specific conditions.

If you rely on inline styles in a Visualforce PDF page, use:

* API version `28.0` or later
* `applyBodyTag="false"` on `apex:page`
* explicit, valid `html`, `head`, and `body` tags

Without that structure, inline styling may not render as expected.

### Best practice

Build PDFs like printable documents, not web pages.

Use:

* simple HTML structure
* table-based alignment when layout must stay fixed
* basic CSS
* supported fonts

Test early if your template includes:

* multiple languages
* special characters
* rich text fields
* complex spacing or page layout

### Troubleshooting tip

If you are unsure whether an issue comes from the PDF engine, test the same pattern in a simple Visualforce PDF page.

That helps confirm whether the behavior is a Salesforce rendering limit or a template issue.

When a PDF fails or renders inconsistently, check these first:

* unsupported JavaScript or dynamic browser behavior
* unsupported fonts or multilingual characters
* oversized images or overall output size
* CSS that depends on browser features instead of print-safe markup

### Related resources

* Review [PDF Templates](/sdocs/template-architecture/document-formats/pdf-templates) for format guidance and build patterns.
* Review [Supported Fonts in PDF Format](/sdocs/template-architecture/document-formats/pdf-templates/supported-fonts-in-pdf-format) for font-specific details.
* Review [PDF Render Limitations](broken://spaces/WKNnJmhJBQwhdk5WBFsi/pages/3ccb810031f9ead1d614975ed1c05651aa01130d) for additional background and a Visualforce test example.
* Review Salesforce's [PDF rendering considerations](https://developer.salesforce.com/docs/atlas.en-us.pages.meta/pages/pages_output_pdf_considerations.htm).
* Review Salesforce's [supported PDF fonts](https://developer.salesforce.com/docs/atlas.en-us.pages.meta/pages/pages_output_pdf_supported_fonts.htm).


# Supported Fonts in PDF Format

Salesforce PDF rendering supports a limited set of `font-family` values.

These rules apply to server-side PDF rendering. Browser output can differ.

### Supported `font-family` values

| Typeface         | Supported `font-family` values                      |
| ---------------- | --------------------------------------------------- |
| Arial Unicode MS | `Arial Unicode MS`                                  |
| Helvetica family | `sans-serif`, `SansSerif`, `Dialog`                 |
| Times family     | `serif`, `Times`                                    |
| Courier family   | `monospace`, `Courier`, `Monospaced`, `DialogInput` |

### Fallback behavior

If you use a value that is not listed here, PDF output falls back to `Times`.

For example, `Helvetica` is not a supported `font-family` value in Salesforce PDF rendering.

Use `sans-serif` instead.

{% hint style="warning" %}
If PDF output does not use the font you expect, check the exact `font-family` value first.
{% endhint %}

### Multibyte character support

`Arial Unicode MS` is the only multibyte font available in Salesforce PDF rendering.

Use it when your document includes characters from languages that do not use the Latin character set.

`Arial Unicode MS` does not support bold or italic styling in this PDF rendering context.

For guidance on that limitation, read [Bold and Italics with Unicode Fonts In PDF](/sdocs/template-architecture/document-formats/pdf-templates/bold-and-italics-with-unicode-fonts-in-pdf).

### Web font support

Web fonts are not supported when a page is rendered as a PDF file.

### Related resources

* Review [PDF Rendering Considerations](/sdocs/template-architecture/document-formats/pdf-templates/pdf-rendering-considerations) for broader PDF rendering limits.
* Review [How to Handle International Characters](/sdocs/template-architecture/template-settings/document-options-tab/how-to-handle-international-characters) for Unicode setup guidance.
* Review Salesforce's [supported PDF fonts reference](https://developer.salesforce.com/docs/atlas.en-us.pages.meta/pages/pages_output_pdf_supported_fonts.htm).
* Review Salesforce's [PDF rendering considerations](https://developer.salesforce.com/docs/atlas.en-us.pages.meta/pages/pages_output_pdf_considerations.htm).


# Bold and Italics with Unicode Fonts In PDF

Troubleshoot PDF templates where bold or italic text stops working after Unicode fonts are enabled.

Bold and italic text can stop rendering in PDF templates when Unicode fonts are enabled.

This usually happens when the template uses `Arial Unicode MS` for multibyte character support.

### Why it happens

When **Template contains international characters (Unicode fonts)** is enabled in template settings, the full document body uses `Arial Unicode MS`.

That font supports multibyte characters in Salesforce PDF output.

It does not reliably support bold or italic styling in that same output.

### Recommended workaround

Disable **Template contains international characters (Unicode fonts)** at the template level.

Then apply the multibyte font only to the content that needs it, such as:

* specific paragraphs
* individual merge fields
* short multilingual sections

This keeps the rest of the PDF on a standard supported font, where bold and italic styling can still render normally.

### Examples

Apply the font only where multibyte characters appear.

#### Apply the font to one merge field

Wrap the merge field in a `span` tag:

```html
<span style="font-family: 'Arial Unicode MS';">{{!Contact.MailingStreet}}</span>
```

Use this pattern when only one field needs multibyte character support.

#### Apply the font to part of a sentence

Wrap only the multilingual section:

```html
Customer name: <span style="font-family: 'Arial Unicode MS';">{{!Contact.Name}}</span>
```

This keeps the label text on the document's standard font.

#### Apply the font to a full paragraph

Wrap the full paragraph in a `span` tag:

```html
<span style="font-family: 'Arial Unicode MS';">
    {{!Account.Description}}
</span>
```

If you need block-level spacing, use a paragraph tag instead:

```html
<p style="font-family: 'Arial Unicode MS';">
    {{!Account.Description}}
</p>
```

Use the paragraph approach when the full line or block needs the Unicode font.

### Important limitation

If text must use a multibyte font and also appear bold, PDF output cannot support both requirements together in this scenario.

Use one of these approaches:

* prioritize multilingual character support
* keep bold or italics only on text that does not require the multibyte font
* limit `Arial Unicode MS` to the smallest possible section

{% hint style="warning" %}
If a field or paragraph requires `Arial Unicode MS`, do not expect bold or italic formatting to render in the generated PDF.
{% endhint %}

### Best practice

Use Unicode support only when the full document needs it.

If only part of the document contains multibyte characters, apply the Unicode-capable font only to that content.

Test with real sample data before rollout, especially when the template mixes English text with multilingual fields.

### Related resources

* Review [How to Handle International Characters](/sdocs/template-architecture/template-settings/document-options-tab/how-to-handle-international-characters) for Unicode setup guidance.
* Review [Supported Fonts in PDF Format](/sdocs/template-architecture/document-formats/pdf-templates/supported-fonts-in-pdf-format) for Salesforce PDF font limits.
* Review [PDF Rendering Considerations](/sdocs/template-architecture/document-formats/pdf-templates/pdf-rendering-considerations) for broader PDF rendering behavior.


# Upload Existing PDFs

Upload a finished PDF and place Salesforce data on top of it with drag-and-drop fields.

Use this format when you already have a finished PDF form.

Upload Existing PDFs let you place Salesforce data on top of a fixed PDF background.

If you need flexible layout, related lists, or page settings, use [PDF Templates](/sdocs/template-architecture/document-formats/pdf-templates) instead.

{% hint style="info" %}
Pick **Upload Existing PDFs** when exact field placement matters most.

Pick **PDF Templates** when dynamic layout matters most.
{% endhint %}

### Use this format when

* You already have the final PDF design.
* You need drag-and-drop field placement.
* You want to fill a fixed form with Salesforce data.

### Keep these limits in mind

* Portrait only
* No related lists
* No standard headers, footers, or page settings

### Start with the guide that fits your task

<table data-card-size="large" data-column-title-hidden data-view="cards"><thead><tr><th>Title</th><th>Description</th><th data-card-target data-type="content-ref">Target</th></tr></thead><tbody><tr><td><strong>How To: Upload PDF To S-Docs</strong></td><td>Set up a PDF-Upload template and understand how the format works.</td><td><a href="/sdocs/template-architecture/document-formats/pdf-upload-format/pdf-upload-format-how-to-guide">How To: Upload PDF To S-Docs (Classic Editor)</a></td></tr><tr><td><strong>How to: Center Text With PDF-Upload Merge Fields</strong></td><td>Center overlay text by updating the field style settings.</td><td><a href="/sdocs/template-architecture/document-formats/pdf-upload-format/centering-text-in-pdf-upload-merge-fields">How to: Center Text With PDF-Upload Merge Fields</a></td></tr><tr><td><strong>Quick Reference: Named Queries for PDF Upload Templates</strong></td><td>Use named queries when you need dynamic values beyond simple field overlays.</td><td><a href="/sdocs/template-architecture/document-formats/pdf-upload-format/named-queries-for-pdf-upload-templates-reference">Quick Reference: Named Queries for PDF Upload Templates</a></td></tr></tbody></table>


# How To: Upload PDF To S-Docs (Classic Editor)

> *PDF-Upload is a template format where users can take an existing PDF Document (S-Docs generated or not) and upload it through the template editor to generate future S-Docs.*

## How does PDF-Upload Work?

S-Docs captures a static background image of the uploaded PDF Document which is then used when the file is generated. This means that the PDF Document cannot be changed or scaled. Data cannot be integrated into the original PDF, as it is a background image, instead we utilize merge fields that drag and drop with overlaying text.

{% hint style="info" %}
Considerations:

* Once a template exists as a different file format, it cannot be changed to PDF-Upload Format Likewise, PDF-Upload templates cannot be changed to a different file format
* Only Portrait Orientation is supported
* Component Templates cannot be brought into a PDF-Upload Template to populate with data
* Related Lists are not supported, only Named Queries
* Conditional Logic must be manually implemented, there is no supported WYSIWYG capability
* Traditional Page Header, Footer, and Page Settings are not available
  {% endhint %}

## PDF-Upload and the Template Editor

In the template editor the user is prompted immediately with 2 options: Upload PDF and PDF File Quality. Once the upload is successful, the user can navigate through standard tabs such as Document Options, Email Settings, Runtime Prompts, and Advanced Options.

The PDF-Upload unique options within the template editor are separated into two sections, **PDF-Upload Fields**, where you will be able to customize the drag-and-drop merge fields, and **PDF-Upload Settings**, where you can add any standardizations for your merge fields along with named queries.

PDF-Upload Fields

* Merge Field: Where to Select Merge Field to be layered onto Static Image. S-Sign Field compatible
* Additional Style: Overridable CSS Styling Area, only supports up to CSS 2.1
* Render If: Conditional Render Area to show merge fields if a specified condition is met

PDF-Upload Settings

* Default Merge Field Style: Default CSS Styling for all merge fields, supports up to CSS 2.1
* Named Queries: Allows Named Queries (LineItemsSOQL queries that utilize tags) to be used

## Conditional Logic in PDF - Upload

As earlier stated, PDF-Upload Fields can be rendered onto a PDF-Upload Document if specific criteria are met. Instead of adding a render block, you simply need to specify the relationship to be evaluated.

**Examples:**

```
{{!Opportunity.StageName}} == 'Closed'
```

```
{{!Contact.Phone}} == 'NULL'
```

```
{{!Opportunity.Id}} == 006Da00000NOcmwIAD
```

## Using PDF-Upload Templates as Components for PDF Templates

PDF-Upload Templates can not utilize components when trying to generate a S-Doc. It is possible to use PDF-Upload Templates as the component for your standard PDF Template.

To use a PDF-Upload Template as a component:

{% stepper %}
{% step %}

### Add componentType attribute

Add componentType="pdf-upload" must be added to the component syntax.
{% endstep %}

{% step %}

### Close HTML tags before the component

HTML tags cannot open before the component merge field and close after it; you must close all tags before the PDF-Upload component is inserted. Upon document generation, the content before the component, the component itself, and the content after the component are wrapped in separate tags.
{% endstep %}

{% step %}

### Match orientation and dimensions

The PDF Template and PDF-Upload Template must have the same orientation and dimensions.
{% endstep %}
{% endstepper %}

**Example:**

Name of the PDF-Upload Template being “PDF Upload Component”

```
{{{{!PDF Upload Component componentType="pdf-upload"}}}}
```

```
<template componentType="pdf-upload">PDF Upload Component</template>
```


# How to: Upload a PDF as a Template

PDF-Upload is a template format where users can take an existing PDF Document (S-Docs generated or not) and upload it through the template editor to generate future S-Docs.

{% hint style="info" %}
Please assign the **S-Docs PDF Upload Editor** permission set or contact your Salesforce administrator.
{% endhint %}

## How does PDF-Upload Work?

S-Docs captures a static background image of the uploaded PDF Document which is then used when the file is generated. This means that the PDF Document cannot be changed or scaled. Data cannot be integrated into the original PDF, as it is a background image, instead we utilize merge fields that drag and drop with overlaying text.

### Create a New PDF-Upload Template Record

In the S-Docs app:

Click on the **S-Docs Templates** menu item to navigate to the templates page.

Click on **New.**

In the template record page, enter template details and **select PDF-Upload** as the template format.

Once the template record is created, click the **Template Editor** button to access the editing workflow.

{% hint style="info" %}
**Considerations:**

* All new PDF-Upload templates will automatically launch the new PDF-Upload template editing interface; existing PDF-Upload templates will continue to utilize the classic editor.
* Once a template exists as a different file format, it cannot be changed to PDF-Upload Format Likewise, PDF-Upload templates cannot be changed to a different file format
* Component Templates cannot be brought into a PDF-Upload Template to populate with data
* Related Lists are not supported
* Conditional Logic is not a supported WYSIWYG capability
* Traditional Page Header, Footer, and Page Settings are not available
  {% endhint %}

### **Upload a PDF Document**

Upload a PDF stored on a local drive by clicking the **Upload Files** button or by dragging and dropping it into the upload area.

<figure><img src="https://1548664070-files.gitbook.io/~/files/v0/b/gitbook-x-prod.appspot.com/o/spaces%2FWKNnJmhJBQwhdk5WBFsi%2Fuploads%2FFzZfhsIpch65YrtQGsNK%2FScreenshot%202026-05-21%20at%201.18.24%E2%80%AFPM.png?alt=media&amp;token=fc5de339-e713-4d92-8610-bb0d188331b0" alt=""><figcaption></figcaption></figure>

Once the file is uploaded, it will automatically launch the template editor.

<figure><img src="https://1548664070-files.gitbook.io/~/files/v0/b/gitbook-x-prod.appspot.com/o/spaces%2FWKNnJmhJBQwhdk5WBFsi%2Fuploads%2FPUyimHhkyIES9V0BdfRB%2FScreenshot%202026-05-21%20at%201.20.53%E2%80%AFPM.png?alt=media&amp;token=d0c0ddd4-1cb2-415d-ad81-230b05906b5e" alt=""><figcaption></figcaption></figure>

### Preparing Templates for Generation

#### Editing Template Names

Click on the pencil icon next to or the **Template Title** field and change the document name.

<figure><img src="https://1548664070-files.gitbook.io/~/files/v0/b/gitbook-x-prod.appspot.com/o/spaces%2FWKNnJmhJBQwhdk5WBFsi%2Fuploads%2FewAA6mnZtDLZvvKAqkDu%2FScreenshot%202026-05-21%20at%201.27.32%E2%80%AFPM.png?alt=media&amp;token=6f2b1396-6fd9-4132-b59f-5e28e1dd9427" alt=""><figcaption></figcaption></figure>

#### Add Merge Field Variables

Expand the variables list and simply drag and drop the fields into your template.

{% hint style="info" %}
The template editor automatically loads the runtime variables and fields for the object that the template is created for - in this case Opportunity fields are already preloaded in the editor experience. Fields pull data directly from Salesforce and merges it into your generated document.
{% endhint %}

<figure><img src="https://1548664070-files.gitbook.io/~/files/v0/b/gitbook-x-prod.appspot.com/o/spaces%2FWKNnJmhJBQwhdk5WBFsi%2Fuploads%2FE8xeohkg53mBUDsS0Twk%2FScreenshot%202026-05-21%20at%201.23.57%E2%80%AFPM.png?alt=media&amp;token=d18a0830-5413-4678-b90c-a293d1429851" alt=""><figcaption></figcaption></figure>

### Signature Input Fields

If the template is being created for use in a signature request, PDF-Upload templates offer a selection of signature input fields that activate for the signer profile(s) they are assigned to.

#### Add signer profiles

Each signer requires a corresponding Signature Profile before adding fields.

**Click Select an option.**

![](https://www.sdocs.com/hs-fs/hubfs/knowledge-base-s-docs/2/2-11.png?width=1026\&height=492\&name=2-11.png)

Click **Manage Profiles,** then **+Add New Profile.**

![](https://www.sdocs.com/hs-fs/hubfs/knowledge-base-s-docs/2/2-112.png?width=1024\&height=664\&name=2-112.png)

**Give the profile a name.**

Click **Save**

If the template includes multiple signers, simply click +**Add new profile** and repeat the process.

{% hint style="info" %}
Control the signing order by toggling the **Is Sequential** option. For scenarios that require sequential signing orders, enable this option and simply click and drag each profile to set the order using the **vertical dots grip icon** to the left of the name field. If this is toggled off, signees will not need to sign in a specific order.
{% endhint %}

![](https://www.sdocs.com/hs-fs/hubfs/knowledge-base-s-docs/2/2-113.png?width=1274\&height=792\&name=2-113.png)

{% hint style="info" %}
By default, a **Require PIN** is toggled on for an additional layer of security. You can toggle this off; however, it’s best practice to keep it on.
{% endhint %}

#### Add Signature Input Fields

To use signature input fields, add a signer profile and simply drag and drop the desired fields to the template body.

**Field size.** To adjust each field’s size, click on the field and drag the corners to resize or type the width and height in the properties in the Variable Properties menu in the right sidebar that activates when clicking on a field.

**Variable names.** To make a more intuitive experience for users and help cue them on what information will appear where, change a fields variable name.

In the right sidebar, type the text to appear in a field under the *Variable name* field. For instance, rename Company.Company\_Name to ***Company Name*** to help it appear simpler and more clear to a user.

#### Add Signature Input Fields

<img src="https://www.sdocs.com/hs-fs/hubfs/knowledge-base-s-docs/2/2-11-2.png?width=768&#x26;height=738&#x26;name=2-11-2.png" alt="2-11-2" height="738" width="768">

{% hint style="info" %}
The variable source field is not editable. This is because it is designed to inform template authors where the data is coming from in the Salesforce record.
{% endhint %}

#### Add Signature Input Fields

If the template is being created for use in a signature request, PDF-Upload templates offer a selection of signature input fields that activate for the signer profile(s) they are assigned to.

To use signature input fields, add a signer profile and simply drag and drop the desired fields to the template body.

<figure><img src="https://1548664070-files.gitbook.io/~/files/v0/b/gitbook-x-prod.appspot.com/o/spaces%2FWKNnJmhJBQwhdk5WBFsi%2Fuploads%2FN3WiOPtrCM4BfzMzOi51%2FScreenshot%202026-05-21%20at%201.58.02%E2%80%AFPM.png?alt=media&amp;token=c6a5a39a-792b-49d5-8dd6-85e827e5b2a1" alt=""><figcaption></figcaption></figure>

#### Configure Signer Profiles

Signer profiles can be renamed and configured to require a one-time password (PIN) to access the signature request.

<figure><img src="https://1548664070-files.gitbook.io/~/files/v0/b/gitbook-x-prod.appspot.com/o/spaces%2FWKNnJmhJBQwhdk5WBFsi%2Fuploads%2F17A8XVj6G1ZVcE9Gp8rf%2FScreenshot%202026-05-21%20at%202.16.21%E2%80%AFPM.png?alt=media&amp;token=abf4ddcb-a0a0-4f64-b52e-5809fe16c309" alt=""><figcaption></figcaption></figure>

{% hint style="info" %}
Signature input fields are color-coded according to the signee profile so tempalte authors can easily control layouts and quickly identify the fields each signer is responsible for executing.
{% endhint %}

#### Configure Signature Input Fields

Drag and drop the signature, text, and dates fields into your template.

#### Adjust Field Settings and Formatting

By default date, text, and signature fields are toggled to be required. You can toggle all of these fields off except for the signature fields — signature fields will always require a response.

{% hint style="info" %}
Change settings to automatically fill in the *Date* field with the signature date to avoid possible user error from manual inputs.
{% endhint %}

<img src="https://www.sdocs.com/hs-fs/hubfs/knowledge-base-s-docs/2/2-12.png?width=1922&#x26;height=1164&#x26;name=2-12.png" alt="2-12" height="1164" width="1922">

Similar to the *output fields* above, you have the same formatting controls. Edit the *input fields* text formatting, field sizes, and field labels. Changing the field label name for specific fields can help clarify what information signers should put into certain fields.

All signature input fields have a variation of the same three configuration categories:

**Properties:** General data population and naming information; controls for what the signer will see.

<figure><img src="https://1548664070-files.gitbook.io/~/files/v0/b/gitbook-x-prod.appspot.com/o/spaces%2FWKNnJmhJBQwhdk5WBFsi%2Fuploads%2F46O3iE1jzYXTrVB1vJB7%2FScreenshot%202026-05-21%20at%202.26.10%E2%80%AFPM.png?alt=media&amp;token=35b04cdf-2ebf-4c7a-bdaa-50d9744598a0" alt=""><figcaption></figcaption></figure>

**Assignment:** Signer profile association, requirements, and data write-backs.

<figure><img src="https://1548664070-files.gitbook.io/~/files/v0/b/gitbook-x-prod.appspot.com/o/spaces%2FWKNnJmhJBQwhdk5WBFsi%2Fuploads%2FWwlyfDMuIGUQYMUKSXTq%2FScreenshot%202026-05-21%20at%202.26.24%E2%80%AFPM.png?alt=media&amp;token=c6fe431b-4bb7-42a6-a02f-fbb92b337c1f" alt=""><figcaption></figcaption></figure>

**Dimensions:** Sizing and placement control of signature inputs

<figure><img src="https://1548664070-files.gitbook.io/~/files/v0/b/gitbook-x-prod.appspot.com/o/spaces%2FWKNnJmhJBQwhdk5WBFsi%2Fuploads%2FPFZfyYQFvIjb2LHRKTcc%2FScreenshot%202026-05-21%20at%202.26.34%E2%80%AFPM.png?alt=media&amp;token=b1085e7d-00d0-4fd0-b1a7-954836993422" alt=""><figcaption></figcaption></figure>

### Publish Template

To activate the PDF-Upload template, click the **Publish Template** button at the top-right corner of the template editor. The template will now be active for the use in the records of the base object it was designed for.


# How to: Center Text With PDF-Upload Merge Fields

Center text in a PDF-upload merge field by updating the Additional Style value.

By default, PDF-upload merge fields align text to the left.

This matters when you need text to sit in the middle of a form field, not the left side.

Use **Additional Style** to control alignment for a PDF-upload merge field.

To center text, set both a `width` and `text-align:center`.

{% hint style="info" %}
`text-align:center` alone usually does not work.

Add a `width` so S-Docs knows the area to center within.
{% endhint %}

### Common examples

#### Center across the page

Use this for text that should center across a standard letter-width area:

```
width:8in;text-align:center;
```

#### Center inside a smaller area

Use this when the field sits inside a smaller box or section:

```
width:100px;text-align:center;
```

Replace `100px` with the width of your target area.


# Quick Reference: Named Queries for PDF Upload Templates

## Named Queries

Use named queries in PDF Upload templates when you need to place dynamic values on top of a static uploaded PDF.

Standard related lists and DirectSOQL related lists do not work in PDF Upload templates because the uploaded background itself does not merge data.

### Solution 1: Return one field from one record

Use this pattern when you need a single value from the returned record.

#### Named query

{% code title="solution-1-named-query.xml" %}

```xml
<!--{{!<LineItemsSOQL>
<queryname>myQuery1</queryname>
<soql>SELECT Name, Id FROM Opportunity WHERE opportunity.id='006Da00000NOcmwIAD' LIMIT 1</soql>
</LineItemsSOQL>}}-->
```

{% endcode %}

#### Merge field

{% code title="solution-1-merge-field.txt" %}

```
{{!myQuery1.Id}}
```

{% endcode %}

#### Result

{% code title="solution-1-result.txt" %}

```
006Da00000NOcmwIAD
```

{% endcode %}

### Solution 2: Return multiple fields from the same query

Use this pattern when one named query returns several values you want to place in different PDF Upload fields.

#### Named query

{% code title="solution-2-named-query.xml" %}

```xml
<!--{{!<LineItemsSOQL>
<queryname>myQuery2</queryname>
<soql>SELECT quantity, listprice, totalprice, productcode FROM opportunitylineitem WHERE opportunity.id= '006Da00000NOcmwIAD'</soql>
</LineItemsSOQL>}}-->
```

{% endcode %}

#### Merge fields

{% code title="solution-2-merge-fields.txt" %}

```
{{!myQuery2.quantity}}
{{!myQuery2.listprice}}
{{!myQuery2.totalprice}}
```

{% endcode %}

#### Result

{% code title="solution-2-result.txt" %}

```
1.00
2.00
2.00
```

{% endcode %}

### Solution 3: Use a filter and offset to target a later row

Use this pattern when your named query returns several rows and you need a specific row from a filtered result set.

#### Named query

{% code title="solution-3-named-query.xml" %}

```xml
<!--{{!<LineItemsSOQL>
<queryname>myQuery2</queryname>
<filter id="1">TotalPrice != 0</filter>
<soql>SELECT quantity, listprice, totalprice, productcode FROM opportunitylineitem WHERE opportunity.id= '006Da00000NOcmwIAD'</soql>
</LineItemsSOQL>}}-->
```

{% endcode %}

#### Merge fields

{% code title="solution-3-merge-fields.txt" %}

```
{{!myQuery2.quantity}}
{{!myQuery2.listprice}}
{{!myQuery2.totalPrice id="1" offset = "3"}}
```

{% endcode %}

#### Result

{% code title="solution-3-result.txt" %}

```
1.00
2.00
150.00
```

{% endcode %}

#### Special considerations

First define a filter for the records you want.

Then assign that filter an ID.

Finally, use `offset` to select which row from that filtered list to return.

### Solution 4: Return an aggregate value

Use this pattern when you need a total, count, or other aggregate result from SOQL.

#### Named query

{% code title="solution-4-named-query.xml" %}

```xml
<!--{{!<LineItemsSOQL>
<queryname>myQuery3</queryname>
<soql>SELECT SUM(TotalPrice) asum FROM OpportunityLineItem WHERE opportunity.id= '006Da00000NOcmwIAD'</soql>
</LineItemsSOQL>}}-->
```

{% endcode %}

#### Merge field

{% code title="solution-4-merge-field.txt" %}

```
{{!myQuery3.asum}}
```

{% endcode %}

#### Result

{% code title="solution-4-result.txt" %}

```
430.0
```

{% endcode %}

#### Special considerations

Aggregate functions work in named queries.

Assign the aggregate result to an alias, then reference that alias in the merge field.


# HTML Email Templates

Build merged email content in S-Docs when the output should be sent as email, not generated as a file.

Use this format when the final output should be an email body.

HTML Email Templates let you merge Salesforce data into subject lines, recipients, and message content.

If you need a generated file instead, start with [PDF Templates](/sdocs/template-architecture/document-formats/pdf-templates) or another document format in [Document Formats](/sdocs/template-architecture/document-formats).

{% hint style="info" %}
Pick **HTML Email Templates** when the output should be sent as email.

Pick a document format when the output should be downloaded, attached, or stored as a file.
{% endhint %}

### Use this format when

* You want a reusable email body with merge fields.
* You need default subject and recipient values.
* You want users to send generated documents with a predefined email message.

### Keep these limits in mind

* This format builds email content, not document files.
* Email sending behavior depends on your email settings.
* Sender, recipient, and domain rules are controlled outside the body content.

### Start with the guide that fits your task

<table data-card-size="large" data-column-title-hidden data-view="cards"><thead><tr><th>Title</th><th>Description</th><th data-card-target data-type="content-ref">Target</th></tr></thead><tbody><tr><td><strong>Email Settings Tab</strong></td><td>Control default subjects, recipients, sender options, and outbound email restrictions.</td><td><a href="/sdocs/template-architecture/template-settings/email-settings-tab">Email Settings Tab</a></td></tr><tr><td><strong>Email Settings Quick Reference</strong></td><td>Scan each email setting fast in table format.</td><td><a href="/sdocs/template-architecture/template-settings/email-settings-tab/email-settings-quick-reference-tables">Email Settings Quick Reference</a></td></tr><tr><td><strong>Email Delivery and Security</strong></td><td>Set sender behavior, locked fields, and approved recipient domains.</td><td><a href="/sdocs/template-architecture/template-settings/email-settings-tab/email-delivery-and-security">Email Delivery and Security</a></td></tr><tr><td><strong>How To: Sending Generated Documents via Email</strong></td><td>Use an HTML Email Template when sending documents from the Documents component.</td><td><a href="/sdocs/automation-and-document-lifecycle/workflows/sending-generated-documents-via-email-s-docs-lwc">How To: Sending Generated Documents via Email</a></td></tr><tr><td><strong>How To: Email Editor In Flow</strong></td><td>Use email templates and prefilled email values in Salesforce Flow.</td><td><a href="broken://spaces/WKNnJmhJBQwhdk5WBFsi/pages/qXbzsyU8aK2CyCfvT0M6">Broken link</a></td></tr></tbody></table>


# Microsoft Word (DOCX)

Use this page when you want to design the document in Microsoft Word and generate a true `.docx` output from Salesforce data.

A DOCX template is built in Word, then uploaded to S-Docs for generation.

Use it when Word layout tools matter more than HTML or CSS control.

{% hint style="info" %}
Pick **DOCX** when you want Word-native formatting, editable Word output, and bracket-based S-Docs syntax.

Pick [PDF Templates](/sdocs/template-architecture/document-formats/pdf-templates) when you want the layout built directly in the template body.
{% endhint %}

### When DOCX is the right fit

Use DOCX templates when you need:

* Microsoft Word layout and styling tools
* a generated `.docx` file
* merge fields inside a Word document
* conditional sections in Word
* related list tables inside Word tables
* named queries in Microsoft template syntax
* reusable DOCX components

DOCX is a strong fit for contracts, letters, forms, packets, and customer documents that users may keep editing in Word after generation.

### How DOCX templates work

The document design lives in Word.

The dynamic data comes from S-Docs syntax placed inside the Word file.

DOCX templates use bracketed syntax around S-Docs blocks and merge fields.

{% code title="docx-basic-syntax.txt" %}

```plaintext
[{{!Account.Name}}]

[<!--RENDER='{{!Opportunity.StageName}}' == 'Closed Won' -->]
  Approved amount: [{{!Opportunity.Amount #,###.00}}]
[<!--ENDRENDER-->]
```

{% endcode %}

### Build and upload a DOCX template

{% stepper %}
{% step %}

### Create the template record

Create a new S-Docs template.

Set the format to **DOCX**.
{% endstep %}

{% step %}

### Build the document in Microsoft Word

Create the layout in Word just as you want it to appear.

Use normal Word tools for fonts, spacing, tables, headers, and page layout.
{% endstep %}

{% step %}

### Add S-Docs fields and logic

Insert merge fields with DOCX syntax.

Use square brackets around fields, query blocks, and render blocks.
{% endstep %}

{% step %}

### Upload the `.docx` file

Open the template in **Template Editor**.

Upload the Word file so S-Docs can use it for generation.
{% endstep %}

{% step %}

### Generate and test

Test with real record data.

Verify merge fields, table output, images, and conditional sections before rollout.
{% endstep %}
{% endstepper %}

### Core DOCX patterns

#### Merge fields

Wrap merge fields in square brackets.

{% code title="docx-merge-field.txt" %}

```plaintext
[{{!Opportunity.Name}}]
[{{!Contact.Email}}]
```

{% endcode %}

#### Conditional logic

Use bracketed `RENDER` tags.

{% code title="docx-render-block.txt" %}

```plaintext
[<!--RENDER='{{!Opportunity.Amount}}' > '10000' -->]
  Executive approval required.
[<!--ENDRENDER-->]
```

{% endcode %}

#### Component templates

Use a DOCX Component template type here.

{% code title="docx-component.txt" %}

```plaintext
[{{{{!Component Template Name}}}}]
```

{% endcode %}

#### Named queries

Wrap both the query block and the output fields in square brackets.

{% code title="docx-named-query.txt" %}

```plaintext
[{{!<lineitemsSOQL>
  <class>none</class>
  <queryname>TopItem</queryname>
  <soql>
    SELECT Name, TotalPrice
    FROM OpportunityLineItem
    WHERE OpportunityId = '{{!Opportunity.Id}}'
    ORDER BY TotalPrice DESC
    LIMIT 1
  </soql>
</lineitemsSOQL>}}]

[{{!TopItem.Name}}]
[{{!TopItem.TotalPrice #,###.##}}]
```

{% endcode %}

#### Related list tables

DOCX related lists render inside Word tables.

Use a table with:

1. a header row
2. an odd row
3. an even row

Then wrap the table with DOCX table tags.

{% code title="docx-related-list-table.txt" %}

```plaintext
[{{!<lineitemsSOQL>
<tableformat>]

| Product | Quantity | Total |
| sample  | sample   | sample |
| sample  | sample   | sample |

[</tableformat>
<soql>
  SELECT Product2.Name, Quantity, TotalPrice
  FROM OpportunityLineItem
  WHERE OpportunityId = '{{!Opportunity.Id}}'
</soql>
<column>Product2.Name</column>
<column>Quantity</column>
<column format-number="#,###.##" prefix="$">TotalPrice</column>
</lineitemsSOQL>}}]
```

{% endcode %}

### Supported features

DOCX templates support these common S-Docs capabilities:

* merge fields
* conditional logic
* named queries
* related list tables
* component templates
* embedded images
* Word-native formatting and layout

### Important constraints

Keep these DOCX rules in mind:

* Use square brackets around DOCX merge fields and markup blocks.
* Use Word tables for repeating table output.
* Re-upload the file after updating it in Word.
* Live Edit is not supported.

{% hint style="warning" %}
Word spelling and grammar suggestions can break DOCX generation.

Before upload, use the Word Editor to clear all active proofreading marks from the file.
{% endhint %}

### Next reads by goal

* Need merge field syntax? Read [Merge Fields With Microsoft Templates](/sdocs/template-architecture/inserting-merge-fields/merge-fields-with-microsoft-templates-docx-pptx-xlsx).
* Need DOCX table setup? Read [How to: Create a Table In Microsoft Templates](/sdocs/advanced-template-logic/related-lists/how-to-create-a-table-in-microsoft-templates-docx-pptx).
* Need DOCX conditional syntax? Read [Quick Setup: Conditional Logic With Microsoft Templates](/sdocs/advanced-template-logic/conditional-logic/quick-setup-conditional-logic-with-microsoft-templates-docx-pptx-xlsx).
* Need named query patterns? Read [How To: Advanced Data Retrieval with Named Queries](/sdocs/advanced-template-logic/named-query/how-to-advanced-data-retrieval-with-named-queries).
* Need DOCX components? Read [Component (DOCX)](/sdocs/advanced-template-logic/build-reusable-templates/component-template-how-to-article/component-docx).
* Need to fix Word paste styling? Read [Copy from Word: WindowText](broken://spaces/WKNnJmhJBQwhdk5WBFsi/pages/0fbbe8a2be555b1e892a399258485c46d95f454b).
* Need to fix proofreading markup errors? Read [DOCX Generation Failure: SpellStart](/sdocs/template-architecture/document-formats/docx-s-docs/additional-resources/docx-generation-failure-spellstart).
* Need checkbox output in DOCX? Read [checkboxes with docx](/sdocs/template-architecture/document-formats/docx-s-docs/additional-resources/checkboxes-with-docx).
* Need embedded image troubleshooting? Read [Generating DOCX DOC DOC New Documents with Embedded Images](broken://spaces/WKNnJmhJBQwhdk5WBFsi/pages/7688f493f94359a710ed38a8b84f36d57be00360).


# Build and Upload a DOCX Template

Design the document in Microsoft Word, add bracketed S-Docs syntax, upload the .docx file, and generate editable Word output from Salesforce data.

Use this page when you want Word-native design in Microsoft Word and a generated `.docx` output from Salesforce data.

A DOCX template is built in Word, then uploaded to S-Docs for generation.

Use DOCX when Word editing matters more than HTML layout or slide design.

{% hint style="info" %}
Pick **DOCX** when you need editable Word output, Word design tools, and bracket-based S-Docs syntax.

Pick [PowerPoint (PPTX)](/sdocs/template-architecture/document-formats/pptx-format) when you need slide-based output.
{% endhint %}

### Before you start

Make sure you have:

* a new S-Docs template with format set to **DOCX**
* the correct **Related To Type** for your base record
* a `.docx` file you can edit in Microsoft Word
* permission to upload the latest Word file into **Template Editor**

{% hint style="warning" %}
DOCX templates use the uploaded Word file.

If you change the file in Word, re-upload it before testing again.
{% endhint %}

### Build and upload a DOCX template

{% stepper %}
{% step %}

### Create the template record

Create a new S-Docs template.

Set **Template Format** to `DOCX`.
{% endstep %}

{% step %}

### Build the document in Microsoft Word

Create the document layout in Word exactly as you want it to appear.

Use normal Word tools for fonts, spacing, tables, headers, images, and page layout.
{% endstep %}

{% step %}

### Add S-Docs merge syntax

Insert merge fields, render blocks, and query output using bracketed Microsoft template syntax.

{% code title="docx-basic-syntax.txt" %}

```plaintext
[{{!Opportunity.Name}}]

[<!--RENDER='{{!Opportunity.StageName}}' == 'Closed Won' -->]
  Approved amount: [{{!Opportunity.Amount #,###.##}}]
[<!--ENDRENDER-->]
```

{% endcode %}
{% endstep %}

{% step %}

### Add table-based repeating data when needed

If you need a related list, build it inside a Word table.

Your Word table needs:

1. a header row
2. an odd row with placeholder text
3. an even row with placeholder text

Use the Microsoft template table wrapper around that table.
{% endstep %}

{% step %}

### Upload the `.docx` file

Open the template in **Template Editor**.

Upload the Word file so S-Docs can use it for generation.
{% endstep %}

{% step %}

### Generate and test with real data

Test the template with real Salesforce records.

Verify merge fields, table output, images, conditional sections, and page layout before rollout.
{% endstep %}
{% endstepper %}

### Core DOCX syntax patterns

#### Merge fields

Wrap merge fields in square brackets.

{% code title="docx-merge-fields.txt" %}

```plaintext
[{{!Account.Name}}]
[{{!Opportunity.Amount #,###.##}}]
```

{% endcode %}

Use this same pattern for relationship fields too.

{% code title="docx-merge-field-paths.txt" %}

```plaintext
[{{!Opportunity.Name}}]
[{{!Opportunity.Account.Name}}]
[{{!Contact.Email}}]
```

{% endcode %}

#### Conditional logic

Wrap both `RENDER` tags in square brackets.

{% code title="docx-render-block.txt" %}

```plaintext
[<!--RENDER='{{!Contact.Phone}}' != 'NULL' -->]
  Phone: [{{!Contact.Phone}}]
[<!--ENDRENDER-->]
```

{% endcode %}

Keep merge fields inside rendered content in square brackets too.

Use the same operators you use in standard conditional logic.

{% code title="docx-render-operators.txt" %}

```plaintext
[<!--RENDER=( ('{{!Account.BillingState}}' == 'CA' || '{{!Account.BillingState}}' == 'NV')
             && '{{!Account.Active_Contract__c}}' == 'True' ) -->]
  Regional account with active contract
[<!--ENDRENDER-->]
```

{% endcode %}

Nested render blocks work too.

{% code title="docx-render-nested.txt" %}

```plaintext
[<!--RENDER='{{!Opportunity.StageName}}' == 'Closed Won' -->]
  Congratulations on your purchase.
  [<!--RENDER1='{{!Opportunity.Install_Date__c}}' != 'NULL' -->]
    Installation is scheduled for [{{!Opportunity.Install_Date__c}}].
  [<!--ENDRENDER1-->]
[<!--ENDRENDER-->]
```

{% endcode %}

#### Named queries

Wrap both the query block and output fields in square brackets.

{% code title="docx-named-query.txt" %}

```plaintext
[{{!<lineitemsSOQL>
  <queryname>TopItem</queryname>
  <soql>
    SELECT Name, TotalPrice
    FROM OpportunityLineItem
    WHERE OpportunityId = '{{!Opportunity.Id}}'
    ORDER BY TotalPrice DESC
    LIMIT 1
  </soql>
</lineitemsSOQL>}}]

[{{!TopItem.Name}}]
[{{!TopItem.TotalPrice #,###.##}}]
```

{% endcode %}

If you need a filtered or offset result, keep the same square-bracket wrapping.

{% code title="docx-named-query-filter-offset.txt" %}

```plaintext
[{{!<lineitemsSOQL>
  <queryname>FilteredItems</queryname>
  <soql>
    SELECT Name, TotalPrice
    FROM OpportunityLineItem
    WHERE OpportunityId = '{{!Opportunity.Id}}'
    ORDER BY TotalPrice DESC
  </soql>
  <filter id="1">TotalPrice >= 1000</filter>
</lineitemsSOQL>}}]

[{{!FilteredItems.Name filter="1" offset="1"}}]
[{{!FilteredItems.TotalPrice filter="1" offset="1" #,###.##}}]
```

{% endcode %}

#### Related list tables

DOCX related lists render inside Word tables.

Use the same table wrapper pattern used in Microsoft templates.

{% code title="docx-related-list-table.txt" %}

```plaintext
[{{!<lineitemsSOQL>
<tableformat>]

| Product | Quantity | Total |
| sample  | sample   | sample |
| sample  | sample   | sample |

[</tableformat>
<soql>
  SELECT Product2.Name, Quantity, TotalPrice
  FROM OpportunityLineItem
  WHERE OpportunityId = '{{!Opportunity.Id}}'
  ORDER BY SortOrder
</soql>
<column>Product2.Name</column>
<column>Quantity</column>
<column format-number="#,###.##" prefix="$">TotalPrice</column>
</lineitemsSOQL>}}]
```

{% endcode %}

Use this structure exactly:

1. Put the opening block before the Word table.
2. Keep the table inside the `tableformat` wrapper.
3. Put the query and `<column>` tags after the table.
4. (For `<soql>` tables) Make sure each `<column>` matches a field returned in `SELECT`.

#### Component templates

DOCX supports DOCX component templates.

Wrap the component reference in square brackets too.

{% code title="docx-component.txt" %}

```plaintext
[{{{{!Component Template Name}}}}]
```

{% endcode %}

{% hint style="info" %}
For DOCX syntax, five rules matter most:

* merge fields use square brackets
* named query output fields use square brackets
* `RENDER` blocks use square brackets
* merge fields inside rendered content also use square brackets
* component references use square brackets
  {% endhint %}

### Common syntax mistakes

* **Field prints as text:** add square brackets around the merge field
* **Conditional block does not run:** wrap both opening and closing `RENDER` tags in square brackets
* **Named query returns nothing:** confirm the output field is wrapped in square brackets and included in `SELECT`
* **Related list table breaks:** confirm the Word table has a header row, an odd row, and an even row
* **DOCX generation fails:** clear Word spelling and grammar markup, then re-upload the file

### What DOCX supports

DOCX templates support these common S-Docs capabilities:

* merge fields
* conditional logic
* named queries
* related list tables
* component templates
* images and Word-native formatting

### Important DOCX considerations

Keep these DOCX-specific rules in mind:

* Live Edit is not supported.
* DOCX formatting comes from Word, not CSS-driven page markup.
* Related list tables must be built as Word tables.
* You must re-upload the file after each Word change.
* Word proofing markup can break generation.

{% hint style="warning" %}
If DOCX generation fails with `spellStart`, `gramStart`, or `gramEnd`, clear all red and blue proofing marks in Word and upload the cleaned file again.
{% endhint %}

### Next reads by goal

* Need a DOCX overview? Read [Microsoft Word (DOCX)](/sdocs/template-architecture/document-formats/docx-s-docs).
* Need DOCX setup considerations? Read [DOCX Rendering Considerations](/sdocs/template-architecture/document-formats/docx-s-docs/docx-rendering-considerations).
* Need merge field syntax? Read [Merge Fields With Microsoft Templates (DOCX, PPTX, XLSX)](/sdocs/template-architecture/inserting-merge-fields/merge-fields-with-microsoft-templates-docx-pptx-xlsx).
* Need table setup examples? Read [How to: Create a Table In Microsoft Templates (DOCX, PPTX)](/sdocs/advanced-template-logic/related-lists/how-to-create-a-table-in-microsoft-templates-docx-pptx).
* Need conditional syntax? Read [Quick Setup: Conditional Logic With Microsoft Templates (DOCX, PPTX, XLSX)](/sdocs/advanced-template-logic/conditional-logic/quick-setup-conditional-logic-with-microsoft-templates-docx-pptx-xlsx).
* Need DOCX components? Read [Component (DOCX)](/sdocs/advanced-template-logic/build-reusable-templates/component-template-how-to-article/component-docx).
* Need to fix proofreading markup errors? Read [DOCX Generation Failure: SpellStart, GramStart, or GramEnd](/sdocs/template-architecture/document-formats/docx-s-docs/additional-resources/docx-generation-failure-spellstart).
* Need attached total rows? Read [How to Add a Subtotal Row to a DOCX Table](/sdocs/template-architecture/document-formats/docx-s-docs/additional-resources/add-a-subtotal-line-to-the-end-of-a-table-in-docx).


# DOCX Rendering Considerations

Understand the main DOCX rendering considerations before you build or troubleshoot Word-based templates.

S-Docs DOCX templates use Microsoft Word files as the document layout source.

That approach gives you Word-native formatting and editable output.

It also has a few important considerations to plan around.

### Key considerations

* DOCX layout and styling come from the uploaded Word file.
* Dynamic content only renders where valid S-Docs DOCX syntax is inserted.
* DOCX merge fields, logic blocks, and query blocks must use square brackets.
* Repeating tables must be built as Word tables.
* Changes made in Word do not apply until you re-upload the file.
* Word proofing markup can break generation.
* Some PDF-specific behaviors do not apply to DOCX output.
* Live Edit is not supported for DOCX documents.
* Test tables, images, and conditional sections with real data before rollout.

### Not currently available

These DOCX capabilities are not currently available:

* Live Edit for generated DOCX documents

### What to avoid

Avoid these patterns in DOCX templates when possible:

* fields or tags missing square brackets
* PDF-only attributes or expectations in a DOCX template
* repeating content outside a proper Word table structure
* editing a Word file locally without re-uploading it
* leaving spelling or grammar markup in the uploaded file

Simple Word-native layout is usually the safest choice.

### Word and template structure

DOCX templates are built in Microsoft Word, not in the template body.

S-Docs merges data into the uploaded `.docx` file at generation time.

That means document structure, spacing, headers, and page layout should be controlled in Word.

S-Docs logic still works in DOCX.

The wrapper changes.

Use square brackets around visible merge fields and DOCX markup blocks.

{% hint style="warning" %}
If a DOCX field or logic block prints as plain text, check the square brackets first.
{% endhint %}

### Table and repeating content considerations

DOCX related lists render inside Word tables.

Use a table with:

* a header row
* an odd row
* an even row

S-Docs uses the odd and even rows as the repeating pattern.

If the table structure is incomplete, the output can repeat incorrectly or fail to render as expected.

Subtotal or total rows also need DOCX-specific table handling when they must stay attached to the main table.

### Word editing considerations

Word can save extra XML markup that S-Docs cannot process during DOCX generation.

The most common example is spelling or grammar proofing markup.

This can surface as [errors such as](/sdocs/template-architecture/document-formats/docx-s-docs/additional-resources/docx-generation-failure-spellstart) `spellStart`, `gramStart`, or `gramEnd`.

{% hint style="warning" %}
Before upload, clear all red and blue proofing marks in Word.
{% endhint %}

DOCX templates also require a fresh upload after every file change.

Saving the file in Word alone does not update the template stored in S-Docs.

### Feature differences from PDF templates

DOCX output is not the same as PDF output.

Use DOCX when you want Word-native editing and formatting.

Do not expect PDF-specific behaviors to carry over.

For example:

* PDF checkbox image attributes do not apply in DOCX
* DOCX uses Word tables instead of HTML table layout
* DOCX formatting comes from Word, not CSS-driven page markup

If you need checkbox-style output in DOCX, use Unicode checkbox characters instead of PDF checkbox attributes.

### Best practice

Build DOCX templates like Word documents first.

Then layer S-Docs syntax into that structure.

Use:

* Word-native layout and formatting
* bracketed DOCX merge syntax
* Word tables for repeating rows
* real-data testing before release

Test early if your template includes:

* related list tables
* conditional sections
* embedded images
* checkbox-style output
* multilingual content

### Troubleshooting tip

When a DOCX file fails or renders incorrectly, check these first:

* missing square brackets around DOCX syntax
* Word proofing markup left in the file
* repeating content placed outside the required Word table structure
* PDF-only attributes used in a DOCX template
* a newer local file that was never re-uploaded

If the issue is isolated to one section, test that pattern in a smaller DOCX file first.

That helps confirm whether the problem is in the syntax, the Word structure, or the uploaded file state.

### Related resources

* Review [Microsoft Word (DOCX)](/sdocs/template-architecture/document-formats/docx-s-docs) for format guidance and build patterns.
* Review [Merge Fields With Microsoft Templates (DOCX, PPTX, XLSX)](/sdocs/template-architecture/inserting-merge-fields/merge-fields-with-microsoft-templates-docx-pptx-xlsx) for DOCX merge syntax.
* Review [How to: Create a Table In Microsoft Templates (DOCX, PPTX)](/sdocs/advanced-template-logic/related-lists/how-to-create-a-table-in-microsoft-templates-docx-pptx) for DOCX table setup.
* Review [Quick Setup: Conditional Logic With Microsoft Templates (DOCX, PPTX, XLSX)](/sdocs/advanced-template-logic/conditional-logic/quick-setup-conditional-logic-with-microsoft-templates-docx-pptx-xlsx) for bracketed `RENDER` syntax.
* Review [DOCX Generation Failure: SpellStart, GramStart, or GramEnd](/sdocs/template-architecture/document-formats/docx-s-docs/additional-resources/docx-generation-failure-spellstart) for proofing markup fixes.
* Review [Use Checkbox Symbols in DOCX Templates](/sdocs/template-architecture/document-formats/docx-s-docs/additional-resources/checkboxes-with-docx) for checkbox-style output.
* Review [How to Add a Subtotal Row to a DOCX Table](/sdocs/template-architecture/document-formats/docx-s-docs/additional-resources/add-a-subtotal-line-to-the-end-of-a-table-in-docx) for attached total rows.


# Additional Resources


# DOCX Generation Failure: SpellStart, GramStart, or GramEnd

Fix DOCX generation failures caused by Microsoft Word spelling and grammar markup inside the uploaded template.

This error usually means Microsoft Word saved proofing markup inside the `.docx` file.

S-Docs cannot process Word spelling and grammar markers during DOCX generation.

### Common error messages

You may see one of these errors:

* `Failed to parse XML due to: could not determine namespace bound to attribute prefix w`
* `spellStart`
* `gramStart`
* `gramEnd`

These errors point to the same root cause.

Word added spelling or grammar suggestion markup to the template file.

### Why this happens

When Word flags text with red or blue underlines, it can store extra XML tags in the file.

That markup can include proofing attributes such as `w:spellStart`, `w:gramStart`, or `w:gramEnd`.

If those tags remain in the uploaded template, DOCX generation can fail.

### Fix the DOCX template

{% stepper %}
{% step %}

### Open the template record

Go to the S-Docs template that is failing.
{% endstep %}

{% step %}

### Download the latest uploaded DOCX

Open **Template Editor**.

Select **Download most recently uploaded DOCX**.
{% endstep %}

{% step %}

### Open the file in Microsoft Word

Use Word to review the document for spelling and grammar markup.
{% endstep %}

{% step %}

### Clear all proofing suggestions

Remove or resolve every spelling and grammar suggestion in the file.

Make sure all red and blue underlines are gone.

{% hint style="warning" %}
Some proofing marks disappear, then new ones appear. Keep reviewing until all suggestions are cleared.
{% endhint %}
{% endstep %}

{% step %}

### Save the cleaned DOCX file

Save the file after all proofing markup is removed.
{% endstep %}

{% step %}

### Re-upload the DOCX file

Return to the template.

Use **Choose File** to upload the cleaned version.
{% endstep %}

{% step %}

### Generate the document again

Test the template with a real record.

If the proofing markup was the issue, generation should now succeed.
{% endstep %}
{% endstepper %}

### Quick check

Before you re-upload, confirm:

* no red spelling underlines remain
* no blue grammar underlines remain
* the saved file is still a `.docx`

### Related articles

* [Microsoft Word (DOCX)](/sdocs/template-architecture/document-formats/docx-s-docs)
* [Merge Fields With Microsoft Templates (DOCX, PPTX, XLSX)](/sdocs/template-architecture/inserting-merge-fields/merge-fields-with-microsoft-templates-docx-pptx-xlsx)


# Use Checkbox Symbols in DOCX Templates

Replace boolean values with Unicode checkbox characters when you need checkbox-style output in a DOCX template.

DOCX templates do not support the PDF checkbox image behavior.

If you use PDF checkbox attributes in DOCX, the output will not render as expected.

Use Unicode checkbox characters instead.

### Use Unicode characters for checked and unchecked values

Replace `true` and `false` with these characters:

* checked: `☑`
* unchecked: `☐`

This works because DOCX outputs text, not PDF checkbox images.

### Merge field example

Use `replaceAll` inside the DOCX merge field.

```plaintext
[{{!OBJECT.Checkbox_Field__c replaceAll="true, ☑,false, ☐"}}]
```

### Related list example

Use `replaceAll` on the related list column.

```plaintext
<column replaceAll="true, ☑,false, ☐">Checkbox_Field__c</column>
```

### Notes

* This approach is for DOCX templates.
* PDF checkbox attributes still apply to PDF templates only.
* The exact appearance depends on the font used in Word.

{% hint style="info" %}
If the checkbox symbols do not display well, switch the Word font to one that supports Unicode checkbox characters clearly.
{% endhint %}

### Related articles

* [Microsoft Word (DOCX)](/sdocs/template-architecture/document-formats/docx-s-docs)
* [How to Show Checkboxes on Forms](/sdocs/advanced-template-logic/template-attributes/template-attributes-how-to-guides/how-to-show-checkboxes-on-forms)


# How to Add a Subtotal Row to a DOCX Table

Keep subtotal and total rows attached to a DOCX table so they render as one complete table.

Use `tableend` when you want a subtotal or total to stay attached to a DOCX table.

This pattern helps grouped table content render as one complete table.

It also avoids the extra line break that can appear between separate Word tables.

### When to use this

Use this pattern when:

* a DOCX related list ends with a subtotal row
* a final total should appear as part of the same table
* grouped rows should read as one continuous table

### Basic pattern

Place a closing `tableend` block after the main DOCX table.

Insert the subtotal or total table inside that block.

<pre class="language-plaintext" data-title="docx-tableend-pattern.txt"><code class="lang-plaintext"><strong>[&#x3C;tableend>]
</strong>INSERT TABLE HERE
[&#x3C;/tableend>]
</code></pre>

`INSERT TABLE HERE` should be a Word table.

Match its column widths and formatting to the main table.

### How it works

1. Build your main DOCX table with the normal table syntax.
2. Add the `tableend` wrapper after that table.
3. Insert a one-row table for the subtotal or total.
4. Add your label and merge field values in that row.

### Example use case

Use this when a product table needs a final summary row like `Subtotal` or `Grand Total`.

The summary row stays visually connected to the rows above it.

#### Example:

```
[{{!<lineitemsSOQL>
<tableformat>]

| Product  | Quantity | SubTotal |
| apples   | 4        | $4       |
| oranges  | 6        | $12      |

[</tableformat>
<soql>
  SELECT Product2.Name, Quantity, TotalPrice
  FROM OpportunityLineItem
  WHERE OpportunityId = '{{!Opportunity.Id}}'
  ORDER BY SortOrder
</soql>
<column>Product2.Name</column>
<column>Quantity</column>
<column format-number="#,###.##" prefix="$">TotalPrice</column>
</lineitemsSOQL>}}]
[<tableend>]
|          |          |    Total |
|          |          |    $16   |
[</tableend>]
```

### Tips

* Keep the subtotal table structure aligned with the main table.
* Use the same borders and cell padding for a seamless result.
* Test in Word after upload to confirm the rows appear as one table block.

### Related articles

* [Microsoft Word (DOCX)](/sdocs/template-architecture/document-formats/docx-s-docs)
* [How to: Create a Table In Microsoft Templates (DOCX, PPTX)](/sdocs/advanced-template-logic/related-lists/how-to-create-a-table-in-microsoft-templates-docx-pptx)


# PowerPoint (PPTX)

Use this page when you want to design slides in Microsoft PowerPoint and generate a true `.pptx` presentation from Salesforce data.

A PPTX template is built in PowerPoint, then uploaded to S-Docs for generation.

Use it when slide design matters more than HTML layout or Word editing.

{% hint style="info" %}
Pick **PPTX** when you need presentation-style output, PowerPoint design tools, and bracket-based S-Docs syntax.
{% endhint %}

### When PPTX is the right fit

Use PPTX templates when you need:

* Microsoft PowerPoint slide design tools
* a generated `.pptx` file
* merge fields inside a presentation
* conditional sections in slides
* related list tables in PowerPoint tables
* named queries in Microsoft template syntax
* generation through **S-Docs LWCs** or the **SDK** with the newer upload flow

PPTX is a strong fit for sales decks, customer presentations, proposals, summaries, and slide-based exports.

### How PPTX templates work

The slide design lives in PowerPoint.

The dynamic data comes from S-Docs syntax placed inside the `.pptx` file.

PPTX templates use bracketed Microsoft template syntax around S-Docs blocks and merge fields.

{% code title="pptx-basic-syntax.txt" %}

```plaintext
[{{!Account.Name}}]

[<!--RENDER='{{!Opportunity.StageName}}' == 'Closed Won' -->]
  Closed-won summary
[<!--ENDRENDER-->]
```

{% endcode %}

### Quick visual examples

<figure><img src="https://1548664070-files.gitbook.io/~/files/v0/b/gitbook-x-prod.appspot.com/o/spaces%2FWKNnJmhJBQwhdk5WBFsi%2Fuploads%2FUSoTbDXI4ydnn65c5sGV%2Fimage.png?alt=media&amp;token=20591e94-6175-4ded-bf30-6dc6a7a891ba" alt="PPTX merge field wrapped in square brackets" width="375"><figcaption><p>Wrap PPTX merge fields in square brackets.</p></figcaption></figure>

<figure><img src="https://1548664070-files.gitbook.io/~/files/v0/b/gitbook-x-prod.appspot.com/o/spaces%2FWKNnJmhJBQwhdk5WBFsi%2Fuploads%2FSX6u3bewrte2tT0gPxST%2Fimage.png?alt=media&amp;token=dcaa79c5-e724-4972-b09b-f98c1263fdbc" alt="PPTX named query output fields wrapped in square brackets"><figcaption><p>For Named Queries, wrap named query output fields in square brackets too.</p></figcaption></figure>

<figure><img src="https://1548664070-files.gitbook.io/~/files/v0/b/gitbook-x-prod.appspot.com/o/spaces%2FWKNnJmhJBQwhdk5WBFsi%2Fuploads%2Ft7IDr6ZAmyg11o6wvOtf%2Fimage.png?alt=media&amp;token=fb3d0e91-e876-4bb9-b44f-c6758b6c2287" alt="PowerPoint table with header row odd row and even row"><figcaption><p>Build PowerPoint tables with a header row, an odd row, and an even row.</p></figcaption></figure>

### Conditional logic

Use conditional logic when slide content should appear only for certain records.

PPTX conditional logic uses the same `RENDER` model as other Microsoft templates.

Wrap both the opening and closing tags in square brackets.

{% code title="pptx-render-block.txt" %}

```plaintext
[<!--RENDER='{{!Contact.Phone}}' != 'NULL' -->]
  Phone: [{{!Contact.Phone}}]
[<!--ENDRENDER-->]
```

{% endcode %}

Keep merge fields inside rendered content in square brackets too.

Use the same operators you use in standard S-Docs conditional logic.

{% code title="pptx-render-operators.txt" %}

```plaintext
[<!--RENDER=( ('{{!Account.BillingState}}' == 'CA' || '{{!Account.BillingState}}' == 'NV')
             && '{{!Account.Active_Contract__c}}' == 'True' ) -->]
  Regional account with active contract
[<!--ENDRENDER-->]
```

{% endcode %}

Nested render blocks work too.

{% code title="pptx-render-nested.txt" %}

```plaintext
[<!--RENDER='{{!Opportunity.StageName}}' == 'Closed Won' -->]
  Congratulations on your purchase.
  [<!--RENDER1='{{!Opportunity.Install_Date__c}}' != 'NULL' -->]
    Installation is scheduled for [{{!Opportunity.Install_Date__c}}].
  [<!--ENDRENDER1-->]
[<!--ENDRENDER-->]
```

{% endcode %}

Common fixes:

* If the block prints as text, add square brackets around both `RENDER` tags.
* If a field inside the block stays blank, wrap that merge field in square brackets too.
* If the condition never matches, verify the field path and comparison value.

{% hint style="info" %}
Starting with S-Docs Summer '25 (`v10.0`), PPTX generation uses Salesforce Compression functionality.

This improves consistency, file handling, and performance for the newer Microsoft template upload flow.
{% endhint %}

### Supported features

PPTX templates support these common S-Docs capabilities:

* merge fields
* conditional logic
* named queries
* related list tables
* images and slide-native PowerPoint formatting

### Important constraints

Keep these PPTX rules in mind:

* Live Edit is not supported.
* Template headers and footers are not supported.
* Component templates are not supported.
* S-Sign is not supported.
* Related list tables cannot span multiple pages or slides.
* Templates uploaded through the legacy Template Editor have an approximate limit of **10 slides**.

### Next reads by goal

* Need the build steps? Read [Build and Upload a PPTX Template](/sdocs/template-architecture/document-formats/pptx-format/build-and-upload-a-pptx-template).
* Need troubleshooting? Read [Troubleshoot PPTX Generation](broken://spaces/WKNnJmhJBQwhdk5WBFsi/pages/oHOjBkHQcTceCbxsE9iL).
* Need table wrapper syntax? Read [Related List Structure In Microsoft Templates (DOCX, PPTX, XLSX)](broken://spaces/WKNnJmhJBQwhdk5WBFsi/pages/47d7aeb4bb2b144961088cfdf431dc82e5549990).
* Need table setup examples? Read [How to: Create a Table In Microsoft Templates (DOCX, PPTX, XLSX)](/sdocs/advanced-template-logic/related-lists/how-to-create-a-table-in-microsoft-templates-docx-pptx).
* Need conditional syntax? Read [Conditional Logic In Microsoft Templates (DOCX, PPTX, XLSX)](broken://spaces/WKNnJmhJBQwhdk5WBFsi/pages/Tm6hjFlwwkYPXtXjpGbi).
* Need named query syntax? Read [Named Queries In Microsoft Templates (DOCX, PPTX, XLSX)](broken://spaces/WKNnJmhJBQwhdk5WBFsi/pages/aqrFMMmbfsrmI8OD34jb).


# PPTX Rendering Considerations

Understand the main PPTX rendering considerations before you build or troubleshoot PowerPoint-based templates.

S-Docs PPTX templates use Microsoft PowerPoint files as the slide layout source.

That approach gives you slide-native formatting and generated `.pptx` output.

It also has a few important considerations to plan around.

### Key considerations

* PPTX layout and styling come from the uploaded PowerPoint file.
* Dynamic content only renders where valid S-Docs Microsoft template syntax is inserted.
* PPTX merge fields, logic blocks, and query blocks must use square brackets.
* Repeating tables must be built as PowerPoint tables.
* The upload path and generation path must match.
* Changes made in PowerPoint do not apply until you re-upload the file.
* Related list tables cannot span multiple slides.
* Some template features are not available in PPTX output.
* Test slide overflow, images, and table output with real data before rollout.

### Not currently available

These PPTX capabilities are not currently available:

* Live Edit for generated PPTX documents
* template headers and footers
* component templates
* S-Sign

### What to avoid

Avoid these patterns in PPTX templates when possible:

* fields or tags missing square brackets
* mismatched upload and generation methods
* repeating content outside a proper PowerPoint table structure
* copying complex tables from external files without rebuilding them
* packing too much dynamic content into one slide
* editing a PowerPoint file locally without re-uploading it

Simple slide-native layout is usually the safest choice.

### PowerPoint and template structure

PPTX templates are built in Microsoft PowerPoint, not in the template body.

S-Docs merges data into the uploaded `.pptx` file at generation time.

That means slide structure, spacing, text boxes, images, and table layout should be controlled in PowerPoint.

S-Docs logic still works in PPTX.

The wrapper changes.

Use square brackets around visible merge fields and Microsoft template markup blocks.

{% hint style="warning" %}
If a PPTX field or logic block prints as plain text, check the square brackets first.
{% endhint %}

### Upload mode and generation path

PPTX behavior changes based on your S-Docs version and whether **Enable New Microsoft Template Upload** is checked.

If **Enable New Microsoft Template Upload** is checked:

* this applies to Summer 2025 (`v10.0`) and later
* the template is uploaded through the newer Microsoft template upload flow
* the template can be generated through **S-Docs LWCs** or the **SDK**
* the template is not compatible with the legacy custom S-Docs button

If **Enable New Microsoft Template Upload** is not checked:

* this applies to older templates and legacy upload flow templates
* the template is uploaded through **Template Editor**
* the template can be generated through the legacy custom S-Docs button
* the template is not compatible with **LWCs** or the **SDK**

Starting in Summer 2025 (`v10.0`), the newer PPTX flow uses Salesforce Compression functionality.

That improves consistency, file handling, and performance in the newer upload flow.

{% hint style="warning" %}
If the upload method and generation method do not match, the PPTX template may appear valid but still fail to generate where you expect.
{% endhint %}

### Table and repeating content considerations

PPTX related lists render inside PowerPoint tables.

Use a table with:

* a header row
* an odd row
* an even row

S-Docs uses the odd and even rows as the repeating pattern.

If the table structure is incomplete, the output can repeat incorrectly or fail to render as expected.

PPTX related list tables also cannot continue onto another slide.

If one table can outgrow a slide, use `LIMIT` and `OFFSET` to split the data across slides or reduce the row count.

If a related list only populates the first cell, check these first:

* rebuild the PowerPoint table from scratch
* simplify table styling, especially border styling
* move the table to a simpler slide with fewer dynamic elements

### Feature differences from DOCX and PDF templates

PPTX output is not the same as DOCX or PDF output.

Use PPTX when you want presentation-style slides and PowerPoint-native design tools.

Do not expect document-style features to carry over.

For example:

* PPTX does not support template headers and footers
* PPTX does not support component templates
* PPTX uses PowerPoint tables instead of HTML or Word table layout
* PPTX formatting comes from PowerPoint, not CSS-driven page markup

### Best practice

Build PPTX templates like presentation slides first.

Then layer S-Docs syntax into that structure.

Use:

* PowerPoint-native layout and formatting
* bracketed PPTX merge syntax
* simple PowerPoint tables for repeating rows
* real-data testing before release

Test early if your template includes:

* related list tables
* conditional sections
* embedded images
* dense text that can overflow a slide
* long lists that may exceed one slide

### Troubleshooting tip

When a PPTX file fails or renders incorrectly, check these first:

* missing square brackets around PPTX syntax
* unsupported features such as components or Live Edit
* upload mode and generation path mismatch
* repeating content placed outside the required PowerPoint table structure
* slide content that exceeds table or slide limits
* a newer local file that was never re-uploaded

If a table behaves unpredictably, test the same pattern in a smaller deck first.

That helps confirm whether the issue is in the syntax, the PowerPoint structure, or the upload path.

### Related resources

* Review [PowerPoint (PPTX)](/sdocs/template-architecture/document-formats/pptx-format) for format guidance and build patterns.
* Review [Build and Upload a PPTX Template](/sdocs/template-architecture/document-formats/pptx-format/build-and-upload-a-pptx-template) for syntax, upload flow, and examples.
* Review [Troubleshoot PPTX Generation](broken://spaces/WKNnJmhJBQwhdk5WBFsi/pages/oHOjBkHQcTceCbxsE9iL) for setup checks and failure patterns.
* Review [Merge Fields With Microsoft Templates (DOCX, PPTX, XLSX)](/sdocs/template-architecture/inserting-merge-fields/merge-fields-with-microsoft-templates-docx-pptx-xlsx) for bracketed Microsoft template syntax.
* Review [How to: Create a Table In Microsoft Templates (DOCX, PPTX)](/sdocs/advanced-template-logic/related-lists/how-to-create-a-table-in-microsoft-templates-docx-pptx) for table wrapper setup.
* Review [S-Docs Limitations](https://kb.sdocs.com/knowledge-base/sdocs/understanding-template-formats/s-docs-limitations/) for broader product limits.
* Review [PPTX Templates](https://kb.sdocs.com/knowledge-base/sdocs/understanding-template-formats/pptx-templates/) for additional PPTX background.


# Build and Upload a PPTX Template

Design slides in Microsoft PowerPoint, add bracketed S-Docs syntax, upload the .pptx file, and generate dynamic presentations from Salesforce data.

Use this page when you want slide-native design in Microsoft PowerPoint and a generated `.pptx` output from Salesforce data.

A PPTX template is built in PowerPoint, then uploaded to S-Docs for generation.

Use PPTX when slide design matters more than HTML layout or Word editing.

{% hint style="info" %}
Pick **PPTX** when you need presentation-style output, PowerPoint design tools, and bracket-based S-Docs syntax.

Pick [Microsoft Word (DOCX)](/sdocs/template-architecture/document-formats/docx-s-docs) when users need to keep editing the final document in Word.
{% endhint %}

### Before you start

Make sure you have:

* a new S-Docs template with format set to **PPTX**
* the correct **Related To Type** for your base record
* a `.pptx` file you can edit in Microsoft PowerPoint
* the right upload path for your S-Docs version

PPTX upload behavior depends on whether **Enable New Microsoft Template Upload** is checked.

* **Checked** — use the newer Microsoft template upload flow. This applies to Summer 2025 (`v10.0`) and later. These templates generate through **S-Docs LWCs** or the **SDK**.
* **Not checked** — use the legacy upload flow in **Template Editor**. These templates generate through the legacy custom S-Docs button.

{% hint style="warning" %}
The upload path and generation path must match.

A valid PPTX file can still fail if it was uploaded in one mode and generated in the other.
{% endhint %}

### Build and upload a PPTX template

{% stepper %}
{% step %}

### Create the template record

Create a new S-Docs template.

Set **Template Format** to `PPTX`.
{% endstep %}

{% step %}

### Build the slide deck in Microsoft PowerPoint

Create the slide layout in PowerPoint exactly as you want it to appear.

Use normal PowerPoint tools for text, shapes, images, alignment, and tables.
{% endstep %}

{% step %}

### Add S-Docs merge syntax

Insert merge fields, render blocks, and query output using bracketed Microsoft template syntax.

{% code title="pptx-basic-syntax.txt" %}

```plaintext
[{{!Opportunity.Name}}]

[<!--RENDER='{{!Opportunity.StageName}}' == 'Closed Won' -->]
  Closed-won summary slide content
[<!--ENDRENDER-->]
```

{% endcode %}

<figure><img src="https://1548664070-files.gitbook.io/~/files/v0/b/gitbook-x-prod.appspot.com/o/spaces%2FWKNnJmhJBQwhdk5WBFsi%2Fuploads%2FUSoTbDXI4ydnn65c5sGV%2Fimage.png?alt=media&amp;token=20591e94-6175-4ded-bf30-6dc6a7a891ba" alt="PPTX merge field wrapped in square brackets" width="375"><figcaption><p>Wrap PPTX merge fields in square brackets.</p></figcaption></figure>
{% endstep %}

{% step %}

### Add table-based repeating data when needed

If you need a related list, build it inside a PowerPoint table.

Your PowerPoint table needs:

1. a header row
2. an odd row with placeholder text
3. an even row with placeholder text

Use the Microsoft template wrapper around that table.
{% endstep %}

{% step %}

### Upload the `.pptx` file

If **Enable New Microsoft Template Upload** is checked, upload the file through the newer Microsoft template upload flow.

If it is not checked, upload the file in **Template Editor**.
{% endstep %}

{% step %}

### Generate and test with real data

Test the template with real Salesforce records.

Verify merge fields, slide overflow, images, related list output, and conditional sections before rollout.
{% endstep %}
{% endstepper %}

### Core PPTX syntax patterns

#### Merge fields

Wrap merge fields in square brackets.

{% code title="pptx-merge-fields.txt" %}

```plaintext
[{{!Account.Name}}]
[{{!Opportunity.Amount #,###.##}}]
```

{% endcode %}

Use this same pattern for standard field paths too.

{% code title="pptx-merge-field-paths.txt" %}

```plaintext
[{{!Opportunity.Name}}]
[{{!Opportunity.Account.Name}}]
[{{!Contact.Email}}]
```

{% endcode %}

#### Conditional logic

Wrap both `RENDER` tags in square brackets.

{% code title="pptx-render-block.txt" %}

```plaintext
[<!--RENDER='{{!Contact.Phone}}' != 'NULL' -->]
  Phone: [{{!Contact.Phone}}]
[<!--ENDRENDER-->]
```

{% endcode %}

Keep merge fields inside rendered content in square brackets too.

Use the same operators you use in standard conditional logic.

{% code title="pptx-render-operators.txt" %}

```plaintext
[<!--RENDER=( ('{{!Account.BillingState}}' == 'CA' || '{{!Account.BillingState}}' == 'NV')
             && '{{!Account.Active_Contract__c}}' == 'True' ) -->]
  Regional account with active contract
[<!--ENDRENDER-->]
```

{% endcode %}

Nested render blocks work too.

{% code title="pptx-render-nested.txt" %}

```plaintext
[<!--RENDER='{{!Opportunity.StageName}}' == 'Closed Won' -->]
  Congratulations on your purchase.
  [<!--RENDER1='{{!Opportunity.Install_Date__c}}' != 'NULL' -->]
    Installation is scheduled for [{{!Opportunity.Install_Date__c}}].
  [<!--ENDRENDER1-->]
[<!--ENDRENDER-->]
```

{% endcode %}

#### Named queries

Wrap both the query block and output fields in square brackets.

{% code title="pptx-named-query.txt" %}

```plaintext
[{{!<lineitemsSOQL>
  <queryname>TopItem</queryname>
  <soql>
    SELECT Name, TotalPrice
    FROM OpportunityLineItem
    WHERE OpportunityId = '{{!Opportunity.Id}}'
    ORDER BY TotalPrice DESC
    LIMIT 1
  </soql>
</lineitemsSOQL>}}]

[{{!TopItem.Name}}]
[{{!TopItem.TotalPrice #,###.##}}]
```

{% endcode %}

<figure><img src="https://1548664070-files.gitbook.io/~/files/v0/b/gitbook-x-prod.appspot.com/o/spaces%2FWKNnJmhJBQwhdk5WBFsi%2Fuploads%2FSX6u3bewrte2tT0gPxST%2Fimage.png?alt=media&amp;token=dcaa79c5-e724-4972-b09b-f98c1263fdbc" alt="PPTX named query output fields wrapped in square brackets"><figcaption><p>Wrap named query output fields in square brackets too.</p></figcaption></figure>

If you need a filtered or offset result, keep the same square-bracket wrapping.

{% code title="pptx-named-query-filter-offset.txt" %}

```plaintext
[{{!<lineitemsSOQL>
  <queryname>FilteredItems</queryname>
  <soql>
    SELECT Name, TotalPrice
    FROM OpportunityLineItem
    WHERE OpportunityId = '{{!Opportunity.Id}}'
    ORDER BY TotalPrice DESC
  </soql>
  <filter id="1">TotalPrice >= 1000</filter>
</lineitemsSOQL>}}]

[{{!FilteredItems.Name filter="1" offset="1"}}]
[{{!FilteredItems.TotalPrice filter="1" offset="1" #,###.##}}]
```

{% endcode %}

#### Related list tables

PPTX related lists render inside PowerPoint tables. Because the related list syntax is integrated within the styling table, no `<class>` or `<tableformat>` tags are needed.

<figure><img src="https://1548664070-files.gitbook.io/~/files/v0/b/gitbook-x-prod.appspot.com/o/spaces%2FWKNnJmhJBQwhdk5WBFsi%2Fuploads%2Ft7IDr6ZAmyg11o6wvOtf%2Fimage.png?alt=media&amp;token=fb3d0e91-e876-4bb9-b44f-c6758b6c2287" alt="PowerPoint table with header, odd row, and even row"><figcaption><p>Build the PowerPoint table with a header row, an odd row, and an even row.</p></figcaption></figure>

{% code title="pptx-related-list-table.txt" %}

```plaintext
[{{!<lineitemsSOQL>
<soql>
  SELECT Product2.Name, Quantity, TotalPrice
  FROM OpportunityLineItem
  WHERE OpportunityId = '{{!Opportunity.Id}}'
  ORDER BY SortOrder
</soql>
<column>Product2.Name</column>
<column>Quantity</column>
<column format-number="#,###.##" prefix="$">TotalPrice</column>
</lineitemsSOQL>}}]
```

{% endcode %}

Simple steps:

1. Insert your styling table: header line, 2 rows, and as many columns as you need.
2. Add the whole related list code block inside the table.
3. (For `<soql>` tables) Make sure each `<column>` matches a field returned in `SELECT`.

{% hint style="info" %}
For PPTX syntax, four rules matter most:

* merge fields use square brackets
* named query output fields use square brackets
* `RENDER` blocks use square brackets
* merge fields inside rendered content also use square brackets
  {% endhint %}

### Common syntax mistakes

* **Field prints as text:** add square brackets around the merge field
* **Conditional block does not run:** wrap both opening and closing `RENDER` tags in square brackets
* **Named query returns nothing:** confirm the output field is wrapped in square brackets and included in `SELECT`
* **Related list table breaks:** confirm the table has a header row, an odd row, and an even row
* **Only the first table cell populates:** recreate the PowerPoint table and simplify table styling

### What PPTX supports

PPTX templates support these common S-Docs capabilities:

* merge fields
* conditional logic
* named queries
* related list tables
* images and slide-native PowerPoint formatting
* generation through **S-Docs LWCs** and the **SDK** when uploaded through the newer Microsoft template upload flow

### Important PPTX limitations

Keep these PPTX-specific rules in mind:

* Live Edit is not supported.
* Template headers and footers are not supported.
* Component templates are not supported.
* S-Sign is not supported.
* Related list tables cannot span multiple pages or slides.
* You may need `LIMIT` and `OFFSET` to control table size.
* Templates uploaded through the legacy Template Editor have an approximate limit of **10 slides**.

{% hint style="warning" %}
If a related list only fills the first cell or behaves unpredictably, rebuild the PowerPoint table from scratch and simplify table styling first.
{% endhint %}

### Next reads by goal

* Need a PPTX overview? Read [PowerPoint (PPTX)](/sdocs/template-architecture/document-formats/pptx-format).
* Need PPTX troubleshooting? Read [Troubleshoot PPTX Generation](broken://spaces/WKNnJmhJBQwhdk5WBFsi/pages/oHOjBkHQcTceCbxsE9iL).
* Need table wrapper syntax? Read [Related List Structure In Microsoft Templates (DOCX, PPTX, XLSX)](broken://spaces/WKNnJmhJBQwhdk5WBFsi/pages/47d7aeb4bb2b144961088cfdf431dc82e5549990).
* Need table setup examples? Read [How to: Create a Table In Microsoft Templates (DOCX, PPTX, XLSX)](/sdocs/advanced-template-logic/related-lists/how-to-create-a-table-in-microsoft-templates-docx-pptx).
* Need conditional syntax? Read [Conditional Logic In Microsoft Templates (DOCX, PPTX, XLSX)](broken://spaces/WKNnJmhJBQwhdk5WBFsi/pages/Tm6hjFlwwkYPXtXjpGbi).
* Need named query syntax? Read [Named Queries In Microsoft Templates (DOCX, PPTX, XLSX)](broken://spaces/WKNnJmhJBQwhdk5WBFsi/pages/aqrFMMmbfsrmI8OD34jb).


# Excel (XLSX)

Choose XLSX when you need spreadsheet-first output, Excel-native formatting, and bracket-based Microsoft template syntax.

Use this page when you want to design a workbook in Microsoft Excel and generate a true `.xlsx` file from Salesforce data.

An XLSX template is built in Excel, then uploaded to S-Docs for generation.

Use it when spreadsheet structure matters more than HTML layout, Word editing, or slide design.

{% hint style="info" %}
Pick **XLSX** when you need spreadsheet-first output, Excel design tools, and bracket-based S-Docs syntax.
{% endhint %}

### When XLSX is the right fit

Use XLSX templates when you need:

* Microsoft Excel workbook design tools
* a generated `.xlsx` file
* merge fields inside a workbook
* conditional sections in worksheet content
* named queries in Microsoft template syntax
* generation through **S-Docs LWCs** or the **SDK** with the newer upload flow

XLSX is a strong fit for data exports, pricing workbooks, operational reports, and spreadsheet-first deliverables.

### How XLSX templates work

The workbook design lives in Excel.

The dynamic data comes from S-Docs syntax placed inside the `.xlsx` file.

XLSX templates use bracketed Microsoft template syntax around S-Docs blocks and merge fields.

{% code title="xlsx-basic-syntax.txt" %}

```plaintext
[{{!Account.Name}}]

[<!--RENDER='{{!Opportunity.StageName}}' == 'Closed Won' -->]
  Closed-won summary
[<!--ENDRENDER-->]
```

{% endcode %}

### Conditional logic

Use conditional logic when worksheet content should appear only for certain records.

XLSX conditional logic uses the same `RENDER` model as other Microsoft templates.

Wrap both the opening and closing tags in square brackets.

{% code title="xlsx-render-block.txt" %}

```plaintext
[<!--RENDER='{{!Contact.Phone}}' != 'NULL' -->]
  Phone: [{{!Contact.Phone}}]
[<!--ENDRENDER-->]
```

{% endcode %}

Keep merge fields inside rendered content in square brackets too.

Use the same operators you use in standard S-Docs conditional logic.

{% code title="xlsx-render-operators.txt" %}

```plaintext
[<!--RENDER=( ('{{!Account.BillingState}}' == 'CA' || '{{!Account.BillingState}}' == 'NV')
             && '{{!Account.Active_Contract__c}}' == 'True' ) -->]
  Regional account with active contract
[<!--ENDRENDER-->]
```

{% endcode %}

Nested render blocks work too.

{% code title="xlsx-render-nested.txt" %}

```plaintext
[<!--RENDER='{{!Opportunity.StageName}}' == 'Closed Won' -->]
  Congratulations on your purchase.
  [<!--RENDER1='{{!Opportunity.Install_Date__c}}' != 'NULL' -->]
    Installation is scheduled for [{{!Opportunity.Install_Date__c}}].
  [<!--ENDRENDER1-->]
[<!--ENDRENDER-->]
```

{% endcode %}

Common fixes:

* If the block prints as text, add square brackets around both `RENDER` tags.
* If a field inside the block stays blank, wrap that merge field in square brackets too.
* If the condition never matches, verify the field path and comparison value.

{% hint style="info" %}
Starting with S-Docs Summer '25 (`v10.0`), XLSX generation uses the newer Microsoft template upload flow when enabled.

That improves consistency, file handling, and performance for supported generation paths.
{% endhint %}

### Supported features

XLSX templates support these common S-Docs capabilities:

* merge fields
* conditional logic
* named queries
* Excel-native formatting and formulas

### Important constraints

Keep these XLSX rules in mind:

* Live Edit is not supported.
* Template headers and footers are not supported.
* Component templates are not supported.
* S-Sign is not supported.
* Related lists are not supported.
* Leading zeros and strict number formats may need explicit Excel formatting.

### Next reads by goal

* Need the build steps? Read [Build and Upload an XLSX Template](/sdocs/template-architecture/document-formats/xlsx-format/build-and-upload-an-xlsx-template).
* Need setup details? Read [XLSX Rendering Considerations](/sdocs/template-architecture/document-formats/xlsx-format/xlsx-rendering-considerations).
* Need merge field syntax? Read [Merge Fields With Microsoft Templates (DOCX, PPTX, XLSX)](/sdocs/template-architecture/inserting-merge-fields/merge-fields-with-microsoft-templates-docx-pptx-xlsx).
* Need conditional syntax? Read [Quick Setup: Conditional Logic With Microsoft Templates (DOCX, PPTX, XLSX)](/sdocs/advanced-template-logic/conditional-logic/quick-setup-conditional-logic-with-microsoft-templates-docx-pptx-xlsx).
* Need named query patterns? Read [How To: Advanced Data Retrieval with Named Queries](/sdocs/advanced-template-logic/named-query/how-to-advanced-data-retrieval-with-named-queries).
* Need formatting help for leading zeros? Read [Preserve leading zeros in Excel output](/sdocs/template-architecture/document-formats/other-formats/leading-zeroes-for-xls-templates).


# XLSX Rendering Considerations

Understand the main XLSX rendering considerations before you build or troubleshoot Excel-based templates.

S-Docs XLSX templates use Microsoft Excel files as the workbook layout source.

That approach gives you spreadsheet-native formatting and generated `.xlsx` output.

It also has a few important considerations to plan around.

### Key considerations

* XLSX layout and styling come from the uploaded Excel file.
* Dynamic content only renders where valid S-Docs Microsoft template syntax is inserted.
* XLSX merge fields, logic blocks, and query blocks must use square brackets.
* The upload path and generation path must match.
* Changes made in Excel do not apply until you re-upload the file.
* Some template features are not available in XLSX output.
* Related lists are not available in XLSX output.
* Test formulas and formatting with real data before rollout.

### Not currently available

These XLSX capabilities are not currently available:

* Live Edit for generated XLSX documents
* template headers and footers
* component templates
* S-Sign
* Related Lists

### What to avoid

Avoid these patterns in XLSX templates when possible:

* fields or tags missing square brackets
* mismatched upload and generation methods
* planning around related list output in XLSX
* editing an Excel file locally without re-uploading it
* rolling out formulas or totals without testing real data

Simple workbook-native layout is usually the safest choice.

### Excel and template structure

XLSX templates are built in Microsoft Excel, not in the template body.

S-Docs merges data into the uploaded `.xlsx` file at generation time.

That means worksheet structure, formulas, cell formatting, and table layout should be controlled in Excel.

S-Docs logic still works in XLSX.

The wrapper changes.

Use square brackets around visible merge fields and Microsoft template markup blocks.

{% hint style="warning" %}
If an XLSX field or logic block prints as plain text, check the square brackets first.
{% endhint %}

### Upload mode and generation path

XLSX behavior changes based on your S-Docs version and whether **Enable New Microsoft Template Upload** is checked.

If **Enable New Microsoft Template Upload** is checked:

* this applies to Summer 2025 (`v10.0`) and later
* the template is uploaded through the newer Microsoft template upload flow
* the template can be generated through **S-Docs LWCs** or the **SDK**
* the template is not compatible with the legacy custom S-Docs button

If **Enable New Microsoft Template Upload** is not checked:

* this applies to older templates and legacy upload flow templates
* the template is uploaded through **Template Editor**
* the template can be generated through the legacy custom S-Docs button
* the template is not compatible with **LWCs** or the **SDK**

Starting in Summer 2025 (`v10.0`), the newer XLSX flow uses Salesforce Compression functionality.

That improves consistency, file handling, and performance in the newer upload flow.

{% hint style="warning" %}
If the upload method and generation method do not match, the XLSX template may appear valid but still fail to generate where you expect.
{% endhint %}

### Related list considerations

XLSX templates do not support related lists.

Use XLSX for single-value output, workbook formatting, and spreadsheet-native calculations.

If you need repeating row output from Salesforce data, use a format that supports related lists instead.

### Feature differences from DOCX, PPTX, and PDF templates

XLSX output is not the same as DOCX, PPTX, or PDF output.

Use XLSX when you want spreadsheet-style output and Excel-native design tools.

Do not expect document-style or slide-style features to carry over.

For example:

* XLSX does not support template headers and footers
* XLSX does not support component templates
* XLSX uses Excel table structures instead of HTML or Word table layout
* XLSX formatting comes from Excel, not CSS-driven page markup

### Best practice

Build XLSX templates like Excel workbooks first.

Then layer S-Docs syntax into that structure.

Use:

* Excel-native layout and formatting
* bracketed XLSX merge syntax
* real-data testing before release

Test early if your template includes:

* formulas or totals that depend on row counts
* conditional sections
* strict number formatting or leading zeros
* large data sets

### Troubleshooting tip

When an XLSX file fails or renders incorrectly, check these first:

* missing square brackets around XLSX syntax
* unsupported features such as components or Live Edit
* upload mode and generation path mismatch
* workbook logic that assumes related list output is available
* formulas or formatting that assume fixed output shape
* a newer local file that was never re-uploaded

If one section behaves unpredictably, test the same pattern in a smaller workbook first.

That helps confirm whether the issue is in the syntax, the Excel structure, or the upload path.

### Related resources

* Review [Excel (XLSX)](/sdocs/template-architecture/document-formats/xlsx-format) for format guidance and build patterns.
* Review [Build and Upload an XLSX Template](/sdocs/template-architecture/document-formats/xlsx-format/build-and-upload-an-xlsx-template) for syntax, upload flow, and examples.
* Review [Merge Fields With Microsoft Templates (DOCX, PPTX, XLSX)](/sdocs/template-architecture/inserting-merge-fields/merge-fields-with-microsoft-templates-docx-pptx-xlsx) for bracketed Microsoft template syntax.
* Review [Quick Setup: Conditional Logic With Microsoft Templates (DOCX, PPTX, XLSX)](/sdocs/advanced-template-logic/conditional-logic/quick-setup-conditional-logic-with-microsoft-templates-docx-pptx-xlsx) for bracketed `RENDER` syntax.
* Review [Preserve leading zeros in Excel output](/sdocs/template-architecture/document-formats/other-formats/leading-zeroes-for-xls-templates) for formatting edge cases.
* Review [S-Docs Limitations](https://kb.sdocs.com/knowledge-base/sdocs/understanding-template-formats/s-docs-limitations/) for broader product limits.
* Review [XLSX Templates](https://kb.sdocs.com/knowledge-base/sdocs/understanding-template-formats/xlsx-templates/) for additional XLSX background.


# Build and Upload an XLSX Template

Design the workbook in Microsoft Excel, add bracketed S-Docs syntax, upload the .xlsx file, and generate dynamic spreadsheet output from Salesforce data.

Use this page when you want workbook-native design in Microsoft Excel and a generated `.xlsx` output from Salesforce data.

An XLSX template is built in Excel, then uploaded to S-Docs for generation.

Use XLSX when spreadsheet structure matters more than HTML layout, Word editing, or slide design.

{% hint style="info" %}
Pick **XLSX** when you need spreadsheet-first output, Excel design tools, and bracket-based S-Docs syntax.

Pick [Microsoft Word (DOCX)](/sdocs/template-architecture/document-formats/docx-s-docs) when users need document-style output in Word.
{% endhint %}

### Before you start

Make sure you have:

* a new S-Docs template with format set to **XLSX**
* the correct **Related To Type** for your base record
* an `.xlsx` file you can edit in Microsoft Excel
* the right upload path for your S-Docs version

XLSX templates do not support related lists.

If you need repeating row output, use a format that supports related lists instead.

XLSX upload behavior depends on whether **Enable New Microsoft Template Upload** is checked.

* **Checked** — use the newer Microsoft template upload flow. This applies to Summer 2025 (`v10.0`) and later. These templates generate through **S-Docs LWCs** or the **SDK**.
* **Not checked** — use the legacy upload flow in **Template Editor**. These templates generate through the legacy custom S-Docs button.

{% hint style="warning" %}
The upload path and generation path must match.

A valid XLSX file can still fail if it was uploaded in one mode and generated in the other.
{% endhint %}

### Build and upload an XLSX template

{% stepper %}
{% step %}

### Create the template record

Create a new S-Docs template.

Set **Template Format** to `XLSX`.
{% endstep %}

{% step %}

### Build the workbook in Microsoft Excel

Create the workbook layout in Excel exactly as you want it to appear.

Use normal Excel tools for worksheets, tables, formulas, number formats, and cell styling.
{% endstep %}

{% step %}

### Add S-Docs merge syntax

Insert merge fields, render blocks, and query output using bracketed Microsoft template syntax.

{% code title="xlsx-basic-syntax.txt" %}

```plaintext
[{{!Opportunity.Name}}]

[<!--RENDER='{{!Opportunity.StageName}}' == 'Closed Won' -->]
  Closed-won summary
[<!--ENDRENDER-->]
```

{% endcode %}
{% endstep %}

{% step %}

### Add merge fields, logic, and formulas

Place merge fields where single values should appear.

Add conditional logic where worksheet content should show only for certain records.

Keep workbook formulas and formatting in Excel.
{% endstep %}

{% step %}

### Upload the `.xlsx` file

If **Enable New Microsoft Template Upload** is checked, upload the file through the newer Microsoft template upload flow.

If it is not checked, upload the file in **Template Editor**.
{% endstep %}

{% step %}

### Generate and test with real data

Test the template with real Salesforce records.

Verify merge fields, formulas, row growth, number formatting, and conditional sections before rollout.
{% endstep %}
{% endstepper %}

### Core XLSX syntax patterns

#### Merge fields

Wrap merge fields in square brackets.

{% code title="xlsx-merge-fields.txt" %}

```plaintext
[{{!Account.Name}}]
[{{!Opportunity.Amount #,###.##}}]
```

{% endcode %}

Use this same pattern for standard field paths too.

{% code title="xlsx-merge-field-paths.txt" %}

```plaintext
[{{!Opportunity.Name}}]
[{{!Opportunity.Account.Name}}]
[{{!Contact.Email}}]
```

{% endcode %}

#### Conditional logic

Wrap both `RENDER` tags in square brackets.

{% code title="xlsx-render-block.txt" %}

```plaintext
[<!--RENDER='{{!Contact.Phone}}' != 'NULL' -->]
  Phone: [{{!Contact.Phone}}]
[<!--ENDRENDER-->]
```

{% endcode %}

Keep merge fields inside rendered content in square brackets too.

Use the same operators you use in standard conditional logic.

{% code title="xlsx-render-operators.txt" %}

```plaintext
[<!--RENDER=( ('{{!Account.BillingState}}' == 'CA' || '{{!Account.BillingState}}' == 'NV')
             && '{{!Account.Active_Contract__c}}' == 'True' ) -->]
  Regional account with active contract
[<!--ENDRENDER-->]
```

{% endcode %}

Nested render blocks work too.

{% code title="xlsx-render-nested.txt" %}

```plaintext
[<!--RENDER='{{!Opportunity.StageName}}' == 'Closed Won' -->]
  Congratulations on your purchase.
  [<!--RENDER1='{{!Opportunity.Install_Date__c}}' != 'NULL' -->]
    Installation is scheduled for [{{!Opportunity.Install_Date__c}}].
  [<!--ENDRENDER1-->]
[<!--ENDRENDER-->]
```

{% endcode %}

#### Named queries

Wrap both the query block and output fields in square brackets.

{% code title="xlsx-named-query.txt" %}

```plaintext
[{{!<lineitemsSOQL>
  <queryname>TopItem</queryname>
  <soql>
    SELECT Name, TotalPrice
    FROM OpportunityLineItem
    WHERE OpportunityId = '{{!Opportunity.Id}}'
    ORDER BY TotalPrice DESC
    LIMIT 1
  </soql>
</lineitemsSOQL>}}]

[{{!TopItem.Name}}]
[{{!TopItem.TotalPrice #,###.##}}]
```

{% endcode %}

If you need a filtered or offset result, keep the same square-bracket wrapping.

{% code title="xlsx-named-query-filter-offset.txt" %}

```plaintext
[{{!<lineitemsSOQL>
  <queryname>FilteredItems</queryname>
  <soql>
    SELECT Name, TotalPrice
    FROM OpportunityLineItem
    WHERE OpportunityId = '{{!Opportunity.Id}}'
    ORDER BY TotalPrice DESC
  </soql>
  <filter id="1">TotalPrice >= 1000</filter>
</lineitemsSOQL>}}]

[{{!FilteredItems.Name filter="1" offset="1"}}]
[{{!FilteredItems.TotalPrice filter="1" offset="1" #,###.##}}]
```

{% endcode %}

{% hint style="info" %}
For XLSX syntax, three rules matter most:

* merge fields use square brackets
* named query output fields use square brackets
* `RENDER` blocks use square brackets
  {% endhint %}

### Common syntax mistakes

* **Field prints as text:** add square brackets around the merge field
* **Conditional block does not run:** wrap both opening and closing `RENDER` tags in square brackets
* **Named query returns nothing:** confirm the output field is wrapped in square brackets and included in `SELECT`
* **Related list output is expected:** XLSX does not support related lists
* **Formatting shifts after edits:** re-upload the workbook and retest with real data

### What XLSX supports

XLSX templates support these common S-Docs capabilities:

* merge fields
* conditional logic
* named queries
* Excel-native formatting and formulas
* generation through **S-Docs LWCs** and the **SDK** when uploaded through the newer Microsoft template upload flow

### Important XLSX limitations

Keep these XLSX-specific rules in mind:

* Live Edit is not supported.
* Template headers and footers are not supported.
* Component templates are not supported.
* S-Sign is not supported.
* Related lists are not supported.
* Leading zeros and strict number formats may need explicit Excel formatting.

{% hint style="warning" %}
If you need repeating row output, choose a format that supports related lists instead of XLSX.
{% endhint %}

### Next reads by goal

* Need an XLSX overview? Read [Excel (XLSX)](/sdocs/template-architecture/document-formats/xlsx-format).
* Need XLSX setup considerations? Read [XLSX Rendering Considerations](/sdocs/template-architecture/document-formats/xlsx-format/xlsx-rendering-considerations).
* Need merge field syntax? Read [Merge Fields With Microsoft Templates (DOCX, PPTX, XLSX)](/sdocs/template-architecture/inserting-merge-fields/merge-fields-with-microsoft-templates-docx-pptx-xlsx).
* Need conditional syntax? Read [Quick Setup: Conditional Logic With Microsoft Templates (DOCX, PPTX, XLSX)](/sdocs/advanced-template-logic/conditional-logic/quick-setup-conditional-logic-with-microsoft-templates-docx-pptx-xlsx).
* Need named query patterns? Read [How To: Advanced Data Retrieval with Named Queries](/sdocs/advanced-template-logic/named-query/how-to-advanced-data-retrieval-with-named-queries).
* Need formatting help for leading zeros? Read [Preserve leading zeros in Excel output](/sdocs/template-architecture/document-formats/other-formats/leading-zeroes-for-xls-templates).


---

[Next Page](https://help.sdocs.com/llms-full.txt/1)

