> For the complete documentation index, see [llms.txt](https://help.sdocs.com/llms.txt). Markdown versions of documentation pages are available by appending `.md` to page URLs; this page is available as [Markdown](https://help.sdocs.com/sdocs/template-architecture/document-formats/pdf-upload-format/how-to-upload-a-pdf-as-a-template-draft.md).
# How to: Upload a PDF as a Template
{% hint style="info" %}
Please assign the **S-Docs PDF Upload Editor** permission set or contact your Salesforce administrator.
{% endhint %}
## How does PDF-Upload Work?
S-Docs captures a static background image of the uploaded PDF Document which is then used when the file is generated. This means that the PDF Document cannot be changed or scaled. Data cannot be integrated into the original PDF, as it is a background image, instead we utilize merge fields that drag and drop with overlaying text.
### Create a New PDF-Upload Template Record
In the S-Docs app:
Click on the **S-Docs Templates** menu item to navigate to the templates page.
Click on **New.**
In the template record page, enter template details and **select PDF-Upload** as the template format.
Once the template record is created, click the **Template Editor** button to access the editing workflow.
{% hint style="info" %}
**Considerations:**
* All new PDF-Upload templates will automatically launch the new PDF-Upload template editing interface; existing PDF-Upload templates will continue to utilize the classic editor.
* Once a template exists as a different file format, it cannot be changed to PDF-Upload Format Likewise, PDF-Upload templates cannot be changed to a different file format
* Component Templates cannot be brought into a PDF-Upload Template to populate with data
* Related Lists are not supported
* Conditional Logic is not a supported WYSIWYG capability
* Traditional Page Header, Footer, and Page Settings are not available
{% endhint %}
### **Upload a PDF Document**
Upload a PDF stored on a local drive by clicking the **Upload Files** button or by dragging and dropping it into the upload area.
Once the file is uploaded, it will automatically launch the template editor.
### Preparing Templates for Generation
#### Editing Template Names
Click on the pencil icon next to or the **Template Title** field and change the document name.
#### Add Merge Field Variables
Expand the variables list and simply drag and drop the fields into your template.
{% hint style="info" %}
The template editor automatically loads the runtime variables and fields for the object that the template is created for - in this case Opportunity fields are already preloaded in the editor experience. Fields pull data directly from Salesforce and merges it into your generated document.
{% endhint %}
### Signature Input Fields
If the template is being created for use in a signature request, PDF-Upload templates offer a selection of signature input fields that activate for the signer profile(s) they are assigned to.
#### Add signer profiles
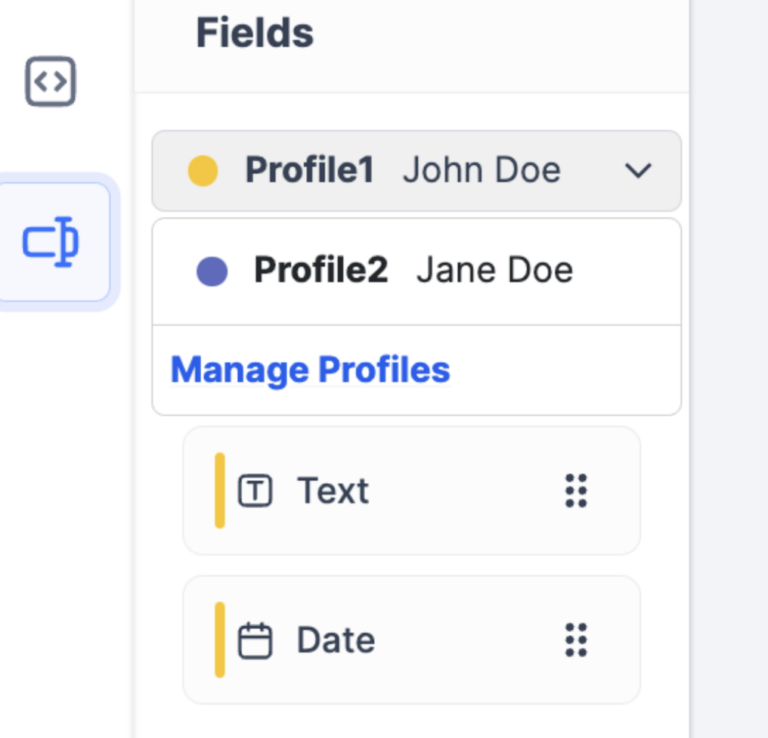
Each signer requires a corresponding Signature Profile before adding fields.
**Click Select an option.**

Click **Manage Profiles,** then **+Add New Profile.**

**Give the profile a name.**
Click **Save**
If the template includes multiple signers, simply click +**Add new profile** and repeat the process.
{% hint style="info" %}
Control the signing order by toggling the **Is Sequential** option. For scenarios that require sequential signing orders, enable this option and simply click and drag each profile to set the order using the **vertical dots grip icon** to the left of the name field. If this is toggled off, signees will not need to sign in a specific order.
{% endhint %}

{% hint style="info" %}
By default, a **Require PIN** is toggled on for an additional layer of security. You can toggle this off; however, it’s best practice to keep it on.
{% endhint %}
#### Add Signature Input Fields
To use signature input fields, add a signer profile and simply drag and drop the desired fields to the template body.
**Field size.** To adjust each field’s size, click on the field and drag the corners to resize or type the width and height in the properties in the Variable Properties menu in the right sidebar that activates when clicking on a field.
**Variable names.** To make a more intuitive experience for users and help cue them on what information will appear where, change a fields variable name.
In the right sidebar, type the text to appear in a field under the *Variable name* field. For instance, rename Company.Company\_Name to ***Company Name*** to help it appear simpler and more clear to a user.
#### Add Signature Input Fields
{% hint style="info" %}
The variable source field is not editable. This is because it is designed to inform template authors where the data is coming from in the Salesforce record.
{% endhint %}
#### Add Signature Input Fields
If the template is being created for use in a signature request, PDF-Upload templates offer a selection of signature input fields that activate for the signer profile(s) they are assigned to.
To use signature input fields, add a signer profile and simply drag and drop the desired fields to the template body.
#### Configure Signer Profiles
Signer profiles can be renamed and configured to require a one-time password (PIN) to access the signature request.
{% hint style="info" %}
Signature input fields are color-coded according to the signee profile so tempalte authors can easily control layouts and quickly identify the fields each signer is responsible for executing.
{% endhint %}
#### Configure Signature Input Fields
Drag and drop the signature, text, and dates fields into your template.
#### Adjust Field Settings and Formatting
By default date, text, and signature fields are toggled to be required. You can toggle all of these fields off except for the signature fields — signature fields will always require a response.
{% hint style="info" %}
Change settings to automatically fill in the *Date* field with the signature date to avoid possible user error from manual inputs.
{% endhint %}
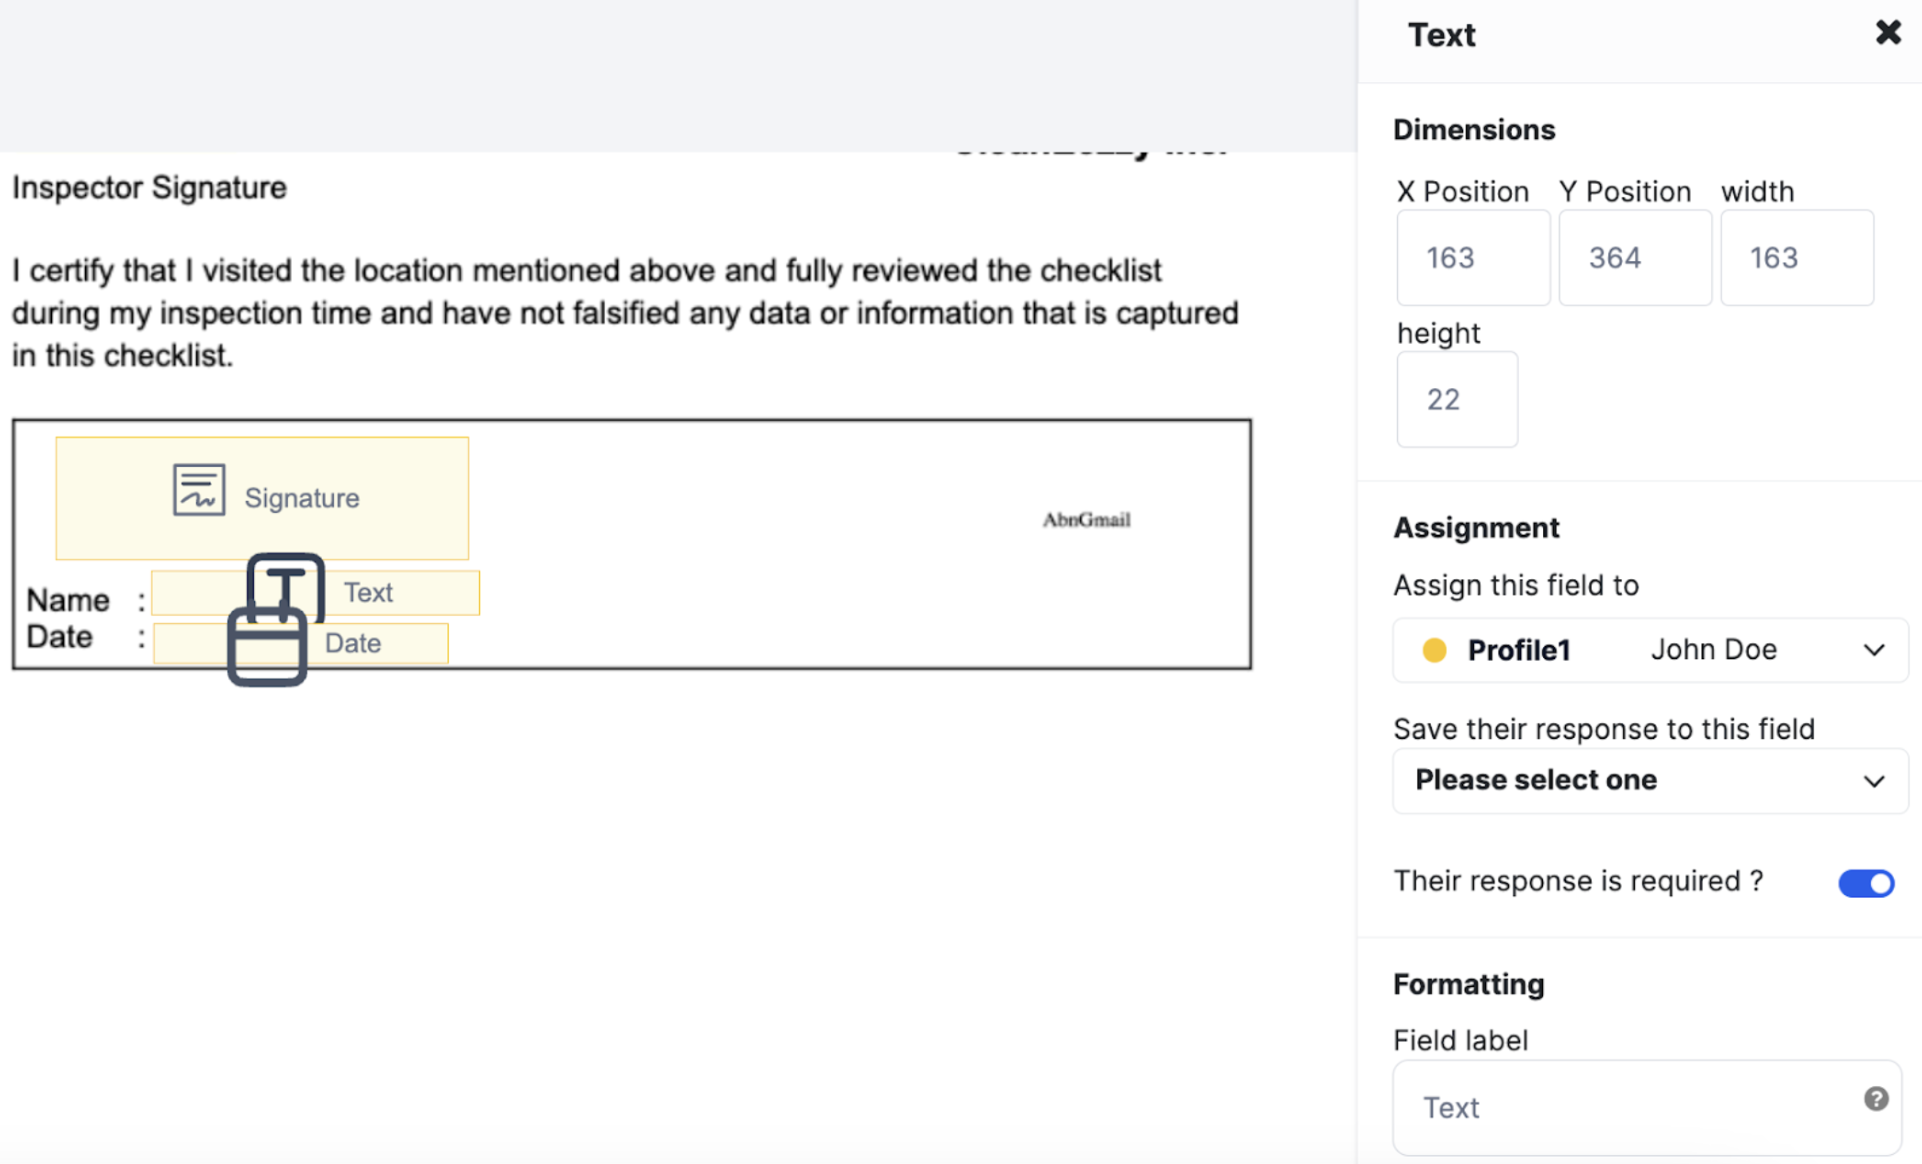
Similar to the *output fields* above, you have the same formatting controls. Edit the *input fields* text formatting, field sizes, and field labels. Changing the field label name for specific fields can help clarify what information signers should put into certain fields.
All signature input fields have a variation of the same three configuration categories:
**Properties:** General data population and naming information; controls for what the signer will see.
**Assignment:** Signer profile association, requirements, and data write-backs.
**Dimensions:** Sizing and placement control of signature inputs
### Publish Template
To activate the PDF-Upload template, click the **Publish Template** button at the top-right corner of the template editor. The template will now be active for the use in the records of the base object it was designed for.
---
# Agent Instructions
This documentation is published with GitBook. GitBook is the documentation platform designed so that both humans and AI agents can read, navigate, and reason over technical content effectively. Learn more at gitbook.com.
## Querying This Documentation
If you need additional information that is not directly available in this page, you can query the documentation dynamically by asking a question.
Perform an HTTP GET request on the current page URL with the `ask` query parameter, and the optional `goal` query parameter:
```
GET https://help.sdocs.com/sdocs/template-architecture/document-formats/pdf-upload-format/how-to-upload-a-pdf-as-a-template-draft.md?ask=&goal=
```
`ask` is the immediate question: it should be specific, self-contained, and written in natural language.
`goal` is optional and describes the broader end goal you are ultimately trying to accomplish on behalf of the user. GitBook uses it to tailor the answer towards what is most useful for that goal.
The response will contain a direct answer to the question and relevant excerpts and sources from the documentation.
Use this mechanism when the answer is not explicitly present in the current page, you need clarification or additional context, or you want to retrieve related documentation sections.
 {% hint style="info" %}
The variable source field is not editable. This is because it is designed to inform template authors where the data is coming from in the Salesforce record.
{% endhint %}
#### Add Signature Input Fields
If the template is being created for use in a signature request, PDF-Upload templates offer a selection of signature input fields that activate for the signer profile(s) they are assigned to.
To use signature input fields, add a signer profile and simply drag and drop the desired fields to the template body.
{% hint style="info" %}
The variable source field is not editable. This is because it is designed to inform template authors where the data is coming from in the Salesforce record.
{% endhint %}
#### Add Signature Input Fields
If the template is being created for use in a signature request, PDF-Upload templates offer a selection of signature input fields that activate for the signer profile(s) they are assigned to.
To use signature input fields, add a signer profile and simply drag and drop the desired fields to the template body.
 Similar to the *output fields* above, you have the same formatting controls. Edit the *input fields* text formatting, field sizes, and field labels. Changing the field label name for specific fields can help clarify what information signers should put into certain fields.
All signature input fields have a variation of the same three configuration categories:
**Properties:** General data population and naming information; controls for what the signer will see.
Similar to the *output fields* above, you have the same formatting controls. Edit the *input fields* text formatting, field sizes, and field labels. Changing the field label name for specific fields can help clarify what information signers should put into certain fields.
All signature input fields have a variation of the same three configuration categories:
**Properties:** General data population and naming information; controls for what the signer will see.